Post category: Garden design
Without some expertise, high walls of concrete blocks or bricks pose a difficult task to build, and badly built walls are always an eyesore! However, low walls are well within the ability of most people. A low wall, 30 to 60 centimetres high is a useful divider of space in a garden, and plants look well, set against the level uniformity of the wall.
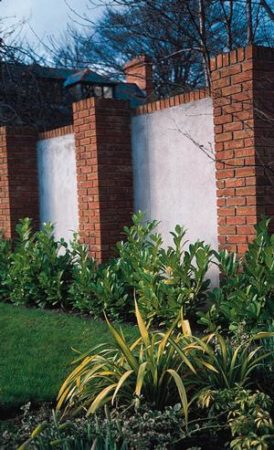
Piers And Walls
Click here to view bigger sized image
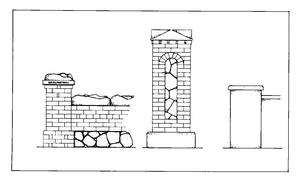
Walls are prone to damage in a number of ways. If the foundation is inadequate, they break their ‘back’ and sag in the middle. They are very easily knocked over, even by wind, unless supported by piers, and if there are no gaps left for expansion and contraction, they can crack and become unstable.
Foundations
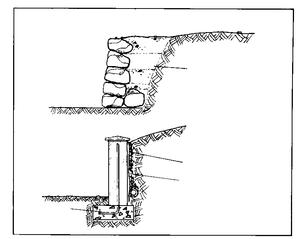
Every garden wall must have proper foundations. These need only be 5 to 10 cm thick for walls up to thirty centimetres high, but generally they will need to be at least fifteen centimetres thick and about three times as wide as the wall. Foundations should be laid on firm subsoil, thirty centimetres or so below the soil surface.
Lay the foundation by digging out the soil to a depth of 15 centimetres – enough to support a couple of courses of blocks, deeper if the wall is to be higher. Fill the trench with concrete made of 4 parts gravel, 1 part sand and 1 part cement.
Building a wall
Give the foundation a few days to set, then make up mortar, 3 parts clean builders’ sand and one part cement. Lay the first block at one end, on a 1 centimetre bed of mortar, and level it, using a spirit level. Lay a second block at the other end, stretch builder’s string between the two, to give a straight line, and then lay the rest, making each one level.
The second course goes on top, in the same way, but ‘staggered’ to give strength. Block walls will need capping and the simplest way is to buy capping, and lay it on top. ‘Screen’, or open, blocks are made to a variety of patterns, and they make very attractive boundaries without the ‘closed-in’ feeling of a solid wall.
Piers
Walls built of 10cm thick blocks are not safe over 3 courses without piers. The maximum safe height recommended for 22.5cm blocks is 1.8 metres with piers at least every 3 metres. For safety, walls over 1.8 metres high must be designed and built by a professional.
Low walls supported by piers at their ends will usually be secure if they are not longer than about ten metres. Longer walls, and walls higher than one metre, must have piers every three metres , and at their ends, to prevent them keeling over.
Piers And Walls
Click here to view bigger sized image
Every six metres, walls need movement joints to prevent cracking. These can be provided at a pier by tying the wall to the pier with galvanised strips inset to the mortar joints and greased at the pier end to allow them to move more subsequently. Piers carrying heavy, or wide, gates will need to be reinforced with steel.
Damp-proof course
A damp-proof course may be built into the base of a garden wall to prevent rising moisture causing white efflorescence from the concrete and spalling of the concrete. But a damp-proof course can make a wall unstable and advice should be taken about the design of the wall and its piers.
A damp-proof tanking course of heavy polythene can be put behind retaining walls to protect them from dampness seeping through from behind. However, this effect might be sought after and low retaining walls without much weight behind them will not be affected by water, once seepholes are provided at ground level every two metres. Professional advice should be sought for walls retaining high banks because these will need steel reinforcement to make them safe.
Retaining walls
A retaining wall with an earthen bank behind has to carry a very heavy loading. Simple walls of blocks are not able to withstand the pressure and may collapse, or be overturned. The design of these walls involves calculations of the amount and type of steel reinforcements.
Piers And Walls
Click here to view bigger sized image
These walls may need to be built of poured concrete. These operations are beyond the competence of lay people. Considerations of the safety of retaining walls are most important when these walls are accessible to the public.
Dry stone wall
A dry stone wall can be used as a low retaining wall, where a sloping piece of ground is terraced into two pieces of level ground, for instance, or as a free-standing wall. It is an attractive ornamental feature in itself.
First set about moving soil to change the levels. If the slope is steep, several terraces will be needed. Having no mortar, a dry stone wall is not stable at a height greater than 90 centimetres. Move soil down the slope to fill the lower level. When this is done, a face, or bank, of soil is left half way up the slope.
Begin building the wall about 30 centimetres from the front of this bank. Use the bigger stones at this stage, as they are easier to manœuvre on the ground. Fill in behind the first course of stones with soil and pack it tight. Then lay another course of stones, with more soil and firming.
When the height of the bank is reached, soil can be brought down the slope to fill in, raising the wall until the upper area is levelled. Place the stones with the broad end out and the pointed end into the soil, and put a slight backwards tilt on the wall to give it stability.
Plants can be put in the gaps between the stones. This type of wall is a lot of work, but worth the effort – a garden on a number of levels is always more interesting. A free-standing wall is built in the same way but with two sides and some mortar used in the middle to strengthen it.
Laying tarmac and concrete accurately is skilled work, best left to a professional. But gravel and paving slabs are relatively easy to lay. For a path, choose the obvious route through the garden. If there is no obvious route, create one by using obstacles or barriers.
Paths and Paving
Click here to view bigger sized image
Put a paved area in a position of full sun, as far as possible. The area will be used more often and stay cleaner. A paved area must be situated so that it is private, or can be made private by screening. Otherwise, there will always be a feeling of discomfort.
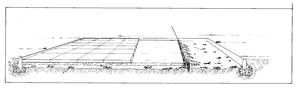
There are three ways to lay paying – sand bed, dry sand-and-cement bed, or sand and cement mortar. Laying paving on a sand bed is the easiest and most commonly used method. To lay gravel paths or paving, start by removing the top 10 to 15 centimetres of soil, or more if the ground is soft. As the site for paving must not be soft, drainage might be necessary first.
Pack the remaining soil well. Lay 5 centimetres of hardcore for gravel; 5 centimetres of sand on top of 10 cm of hardcore for paving slabs. Gravel laid on hardcore lasts longer than if laid on soil as it tends to sink into the soil. Firm the foundation well.
It is essential to get an accurate level for paying slabs, especially for areas wider than a couple of metres. To achieve this, a ‘screed’ should be set up. First, drive in short pegs to set the level of the foundation.
Allowing for the thickness of the slab to come on top, use a long, straight piece of timber with a spirit level, to get the tops of the pegs to the correct height. A slight slope, to throw off water, should be built in at this stage – 1 centimetre in 1 metre is enough.
Lay two straight pieces of 5 x 5 cm timber beside the pegs and level with their tops. Fill in the sand accurately and firm it well, levelling all the time with a third ‘straight edge’ laid across the two pieces of timber.
Paths and Paving
Click here to view bigger sized image
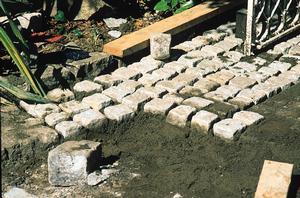
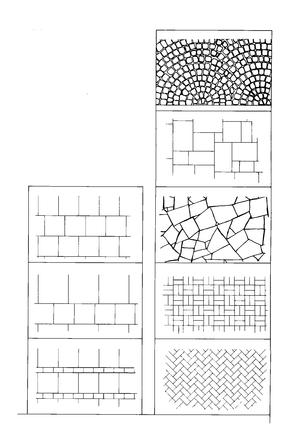
When the sand is level and evenly firm, lay the slabs in position, leaving a very small gap to allow for manœuvre. Level and lay the slabs by degrees. Some cement – 1 part dry cement to 8 parts sand – can be used to give a firmer base. The cement sets in time.
If a kerb is to be used to retain the sides of paved or gravel areas, especially paths, it should be put in place before laying foundations. Stand the kerbing on a bed of sand and cement (3:1) and allow it to set. It must laid level, or evenly sloping. Rough kerbing can be put in place without fixing in concrete.
A useful kind of informal kerb is a mowing strip of bricks laid level with the soil of the lawn. It reduces the amount of lawn edge cutting and can be continued around the lawn edge – not just at pathways. The mowing strip need not be set in concrete.
Paths and Paving
Click here to view bigger sized image
Slabs can also be laid on a bed of wet sand and cement mortar (5:1) laid under each slab. The amount used should be enough to allow the slabs to be lightly tapped to their correct level. The level of the foundation needs to be accurately alid out with pegs beforehand and these pegs constantly checked off as slabs are laid. This is the best way to lay natural stone paving, which is often of varying thickness and very difficult to lay on a level sand bed.
Measure the area to be paved and work out how many slabs will be needed. One square metre will take 6.25 (40cm x 40cm) slabs, 4.2 (60cm x 40cm) slabs or 2.8 (60cm x 60cm) slabs. One tonne of sand covers about ten square metres to a depth of five centimetres. Measure the layout of slabs carefully to reduce the number of slabs that must be cut.
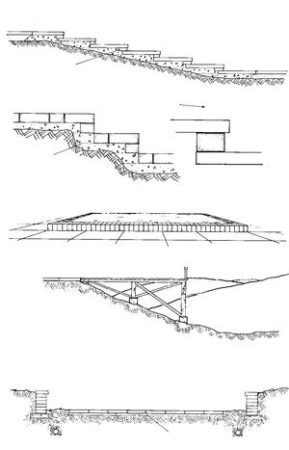
Garden steps should be low and wide in the tread. Start by measuring the fall of the bank with a spirit level and length of timber. Divide the ‘drop’ into a whole number of steps. For example, a fall of fifty centimetres will make five 10 centimetre steps, or four 12.5 centimetre steps.
Remember to allow for mortar between courses of bricks or paving in the ‘risers’. The same thickness of mortar should be used in each joint, otherwise the steps will be of slightly different heights and the flight of steps will look uneven. A very slight ‘fall’ forward on the step treads will throw off water.
Steps and Platforms
Click here to view bigger sized image
A grass, or gravel, platform can be made with a course of bricks or one 10 cm ‘step’ of paving slabs. Even one course of brick or paving will need a small foundation strip of about five centimetres deep. Otherwise, the line of brick will eventually sag and spoil the level of the platform.
A wooden platform or deck lasts better if it is set up on blocks of concrete formed in position using wooden shuttering, or built like a gate pier with concrete blocks. Small wooden decking platforms are within most people’s capabilities to build, but a large platform, or one raised higher than one metre, carries a lot of weight, may need steel supports, and should be designed by a specialist contractor or engineer.
A sunken garden needs retaining walls to hold back the soil and may need drainage pipes as well, especially if it is at the foot of a slope. It will need one or more flights of steps for access.
Wooden fences can be supported by wooden or concrete posts. Wooden posts should be heavy enough to support the weight of the fence and the pressure of the wind. They should be long enough to allow about one quarter of their length to go into the ground.
Fences
Click here to view bigger sized image
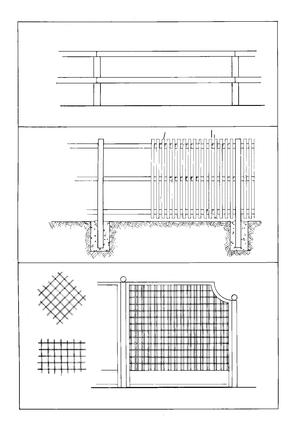
Concrete posts are much stronger and last longer. They suit wooden panel fencing but not other fence types, trellis for example. Wooden support posts are best made of hard wood such as oak, although these can be difficult to get, or pressure-treated softwood. Soft wood posts simply painted with wood preservative will last only two or three years.
Posts must be put in the ground firmly, to hold the wooden fencing panels. Measure out accurately where the posts should go, marking each spot with pegs. Dig holes about 30 centimetres square and 50 to 70 centimetres deep.
Some big stones can be used to part fill the hole and help to retain the posts in position. Next, three-quarters fill the holes with concrete made of 4 parts gravel, 1 part sand and 1 part cement. Using a concrete footing is the most secure way to set up a fence and it is easier than driving the stakes, which is difficult to do accurately.
The stakes are stood in the holes as described in a straight line and at the correct spacing and are made exactly upright with a spirit level, using three or four temporary props of light timber nailed lightly to hold the post in position. The hole is filled to the surface and gently rammed in position. Check the props to make sure the stake is straight.
Allow the post foundations to set for a day or two and then nail the wooden panels into position, with constant checking that they are straight and in line, or use metal clips.
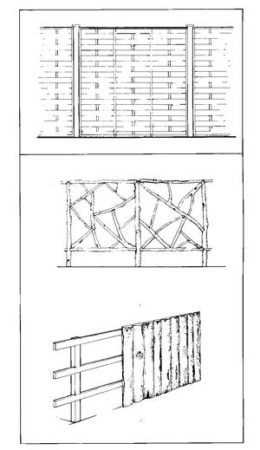
Fences
Click here to view bigger sized image
Rustic fencing can be tackled in the same way, except that forest poles are used instead of panels. The base of the poles in the ground should be treated, but the rest need not.
Specially made metal footings can be set into the concrete to get over the problem of wooden posts rotting just at ground level.
A wooden fence does not last as long as a wall but the useful life of a fence can be extended by painting it with wood preservative or paint. Supports for plants should be capable of being dismantled to allow painting. Most climbing plants are flexible enough to be leaned away from the fence during painting.
Rockery
Most rockery plants are sun-lovers – do not place a rockery in the shade of buildings or trees. A rock garden should resemble a natural rock outcrop and because rock normally outcrops from sloping ground, it helps greatly to have a rock garden built into a slope.
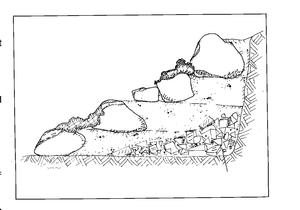
Rock Gardens
Click here to view bigger sized image
The rocks must not be simply dispersed over the area of the rockery but seem to actually come ‘out’ of the ground. They must be in the ground, not on top of it. Some of the rocks should be almost completely buried, as they would be in a natural outcrop, giving the impression of underlying rock.
Choose suitable stone and do not mix different types. Start by clearing the site of all existing vegetation, especially perennial weeds. On a flat site, build the rockery in stages – do not just heap up the soil and dot it with stones. Lay a tier of stones with the big ends outwards and a slight backward tilt to trap rainwater.
Fill in behind with soil and firm well. Mix some broken bricks, small stones or rubble into this fill-in material. Lay another tier of stones in the same way and fill in behind – repeating the procedure until all the rocks and soil are used up. Remember to hold onto some nice stone for the top of the rockery.
On a slope, dig out a low terrace, about 20to 30 cm deep and set the stone against the earth. Fill in behind and then move up to the next terrace. When placing rocks, try not to make the rock structure too regular. Group some stones together to give bulk and space them out a little in other places, as they would occur naturally.
Before planting, it is a good idea to make a special planting mixture for the top 10 centimetres, into which the plants will go. Even if some soil has to be moved to make room for this layer, it is worthwhile doing so. A mixture of 3 parts soil (2 parts, if the soil is heavy), 1 part coarse sand and 1 part peat is ideal. Use a 2.5 centimetre layer of shingle or stone chippings over the soil as a mulch to prevent weed germination.
Alpine bed
A raised alpine bed is an ideal way to grow alpine plants, giving the excellent drainage that they need. The bed is raised by at least 30 centimetres and looks best when the supporting sides are made of rock. A concrete block wall can be built first as support for the natural stone.
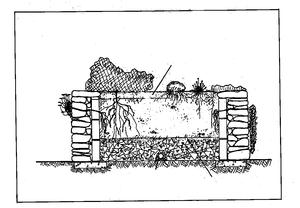
Rock Gardens
Click here to view bigger sized image
Stone walls can be built up without supporting blocks behind but they tend to ‘belly’ out and can even collapse in time, unless they are well built. But this irregularity can be part of their charm, and unsupported stone walls have the advantage that plants can be grown between the stones of the walls, rooting back into the soil behind.
If this attractive effect is required in an alpine bed with a concrete backing wall, some gaps will have to be left between the blocks during building. A drainage pipe should be laid beneath the bed to remove excess water, then a 10 cm layer of stone for drainage and finally the soil mixture when should be roughly 3 parts soil, one part shredded leaf mould or peat and one part coarse sand, grit or fine gravel. After planting, the surface can be dressed with 4-5 cm of grit.
Scree bed
A scree bed is built in the same way as a raised bed; it needs good drainage and it not simply a question of spreading gravel over the existing soil. A scree bed can be level with the existing soil or slightly raised above it to improve drainage. It can have a slight slope across it, but should meet the existing ground level and not have kerbs or raised sides.
Dig out the area to at least 30 cm and lay a base of rubble or coarse rock, use the soil for making the rockery soil mixture and use the surplus elsewhere in the garden. A layer of Plantex or similar material can be laid down to keep the rubble free of fine material. Then a layer of gravel about 5 cm deep is laid over and then the soil mixture of roughly 3 or 4 parts soil, one part shredded leaf mould or peat and one part coarse sand, grit or fine gravel.
A light coloured gravel, grit or coarse sand looks best in a scree bed in a layer of about 5 centimetres. One or two carefully placed large stones nicely set off the sand or gravel surface. They should be set well down into the surface layer.
When planting a scree bed, or indeed a rock garden or alpine bed, try to avoid planting too many plants. Alpine plants can grow quite large in a few years, spreading out by means of overground, or underground, stems. When the surface of a scree bed, rockery or alpine bed becomes cluttered with plants it loses much of its attractiveness.
It is the combination of plants, rock and sand or gravel, that is interesting. Plants are less likely to smother a rockery than a flat scree bed, but this problem should be guarded against by restricting the number of plants and their size.
Garden pools
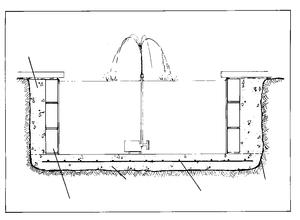
Water is restful and reinforces a garden’s air of calm and tranquillity. A pool of some sort can be chosen to suit most gardens. Concrete pools are difficult to build and often crack. Ready-formed fibreglass is quick and easy to install, but unless well disguised, it tends to look artificial.
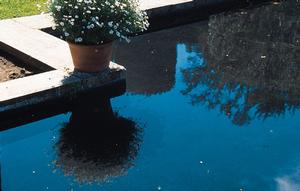
Water Features
Click here to view bigger sized image
Pool liners of polythene, PVC or butyl rubber are cheap, easy to put in, and can be made to any size or shape – except formal. Estimate the size of the liner as the maximum length plus twice the maximum depth and the maximum plus twice the maximum depth. Leave a little extra as a precaution.
Dig a hole to the size and shape required. The depth should be 45 centimetres for a small pool, 60–75 centimetres for a large one. A ‘shelf’ to one side, about 20 centimetres deep, is ideal for marginal water plants. The sheet to fit the hole should be the maximum length plus twice the maximum depth, and the maximum width plus twice the maximum depth. Line the hole with a layer of sand; spread the liner; weigh down the edges with bricks or stones, and fill the pool with water.
Around the edges of the pool, the polythene, or PVC, must be hidden from sunlight or it will break down and crack. Usually a pool is associated with a paved area and the paving could be laid to overhang the liner.
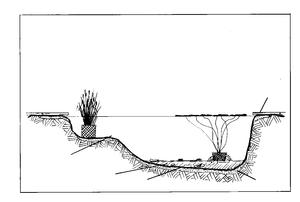
Cascades and streams
Cascades, waterfalls or artificial streams can be made with flexible pool liners that take the shape of the excavated soil when they are filled with water. A cascade of little ‘waterfalls’ can be made by having the water fall down a series of overlapping small pools. Unless there is a clean fall over the edge of a stone, water can be lost as it trickles down the face of the step between the small pools. Alternatively, the face of the cascade could be lined as well.
An ‘artificial’ stream can be made of a series of long narrow, shallow pools. In this case, and for cascades, it is essential to hide the liner with sand, gravel or stones. Any sight of the liner destroys the effect of these natural-looking garden features.
Formal pools
Formal pools are always of regular geometric shape, usually straight sided but sometimes circular, or semi-circular. A flexible liner cannot be maintained in a regular shape without rigid support. Concrete is used for formal pools but they are tricky to build without cracks.
The hole is dug out with straight sides and lined with heavy polythene. A solid slab of concrete, well tamped down and perhaps reinforced, is laid in the bottom. As it begins to set, the surface scum is brushed off the edges where the walls will be built. These must be built the following day and the floor kept damp in the meantime.
Water Features
Click here to view bigger sized image
The walls are built of dense blocks with joints of strong mortar and rendered with strong sand and cement plaster. Split blocks or bricks could also be used, without plaster rendering of course. Bonding adhesive can be mixed into the mortar and rendering to increase the bond and help to seal the walls.
Two days later the space between the walls and the polythene lining is filled with general purpose mix concrete, well compacted all round. The edges of the pool are finished with large paving slabs. The concrete surfaces of the pool can be sealed with special pond sealers, painted on.
Alternatively, the pool can be built as described but a flexible pond liner is placed under the pool base. The walls are then built on the base and the liner brought up behind the walls and filled behind before the edging slabs are put in place. The liner seals the pool and the concrete sides give the required formal shape.
Plants
Water lilies need deep water, and remember to get some oxygenating plants, such as Canadian pondweed or water milfoil. As these compete with algae for nutrients, they prevent it from clouding the water. Plenty of oxygenators are needed in a new pool.
Water Features
Click here to view bigger sized image
A cascade fed by a submerged circulating pump can be a great addition and is simple to install. Make a concrete course for it to flow down, or else use stones. Strips of pool liner could be used too, but they look a little obvious.
Size:
Large front gardens can be associated with small or large back gardens. Sometimes, they are large because of the unusual shape of a site, for example a corner site. Large front gardens are usually too big and the problem is to make the best use of them.
Problems
It is difficult to make use of large front gardens except to use them as ornamental gardens. They are unlikely to be used for some of the purposes to which a back garden might be put. For example, a fruit and vegetable area, greenhouse, compost area, paved sitting area, or children’s play area are not really suitable for front gardens!
Sometimes, the garden may be made suitable for these purposes by putting up a high wall or fence. This is not for long narrow front gardens, but division of the site might be an answer in this case.
Large front garden No. 1
A long narrow front garden might be divided as shown to provide a parking area at a distance from the house, thus giving the house the benefit of the ornamental end of the garden. The division might be simply created by borders that swing out in a curve into the central area, or more definitely by a fence or wall. The farthest part of the garden away from the house might be planted up with trees and shrubs and given an occasional tidy up.
Large front garden No. 2
A wide front garden or a corner site which is L-shaped can be made more use of then a long, narrow front garden. Simply by ‘taking in’ some of the front garden with high walls (minimum two metres), part of what was the front garden becomes a side garden. Any adequately enclosed front area can be used in all the ways that a back garden can. It will only lack a bit of privacy because of the proximity of the roadway.
Size:
Front gardens are usually much smaller than back gardens. Sometimes, they are just a strip of soil in front of the house. Very pretty little ornamental areas can be made of these.
Problem:
The main problem to deal with in a small front garden is usually the domination of a driveway, or footpath in the smallest gardens. These areas are mostly of mass concrete and not very appealing. They can be improved by being paved with slabs or paving bricks.
Small front garden No. 1
Small Front Gardens
Click here to view bigger sized drawing
A traditional front garden with lawn, one or two trees, shrubs and perennial flowers. The border of plants provides some privacy and a nice view from the house itself.
Small front garden No. 2
Small Front Gardens
Click here to view bigger sized drawing
A more radical treatment, the surface of gravel or coarse sand, a few rocks and about twenty plants. This is a scree garden with alpine plants that are easy to look after.
Small front garden No. 3
Small Front Gardens
Click here to view bigger sized drawing
A traditional style with one or two trees and grass or ground cover plants. This is an easy type of garden to look after if the right choice of specimen trees and shrubs is made.
Small front garden No. 4
Click here to view bigger sized drawing
Apart from a few small shrubs, the garden is planted with low-growing perennial flowers. These are spread over the ground surface which is deeply mulched with fairly coarse bark mulch.
Size:
Many flats and apartments have a balcony which can be used to grow plants. It is the smallest form of garden but very ornamental effects can be created in small spaces. Any plant can be grown in a pot and a surprising number of plants can be fitted on a balcony if the right ones are chosen.
Problems:
The three main problems associated with growing plants on balconies are exposure to wind, shading, and pots drying out. It is possible to solve the problem of plants in pots drying out by being more careful about watering, but the only way to solve the other two problems is to choose suitable plants.
Balconies above ground level suffer from wind damage; the higher up the balcony, the more exposure. Any balcony can have shaded conditions, but it is most usually a problem at ground level.
Balcony No. 1
This balcony garden is designed for a balcony exposed to a lot of wind
Click here to view bigger sized drawing
This balcony garden is designed for a balcony exposed to a lot of wind. There are no climbing plants because these cannot take wind damage. It is based mainly on alpine plants, many of which are very resistant; they have the additional attraction of being small and easy to accommodate.
The little hedge could be about sixty centimetres high, grown in a large window box. Any wind-resistant small shrubs would do. The hedge could be turned around occasionally to give the light to both sides.
Balcony No. 2
Balcony Gardens
Click here to view bigger sized drawing
This garden is suitable for a balcony that does not get too much wind. Liberal use is made of climbers, especially ivies, to decorate the walls – growing on trellis and hanging from brackets. They are also used to scramble around on the floor. The other plants could be shade-tolerant perennial flowers and annuals.
Assessment
High walls (1.8 m) and hedges, level ground, formal house faces west, not exposed.
Scanner Q76
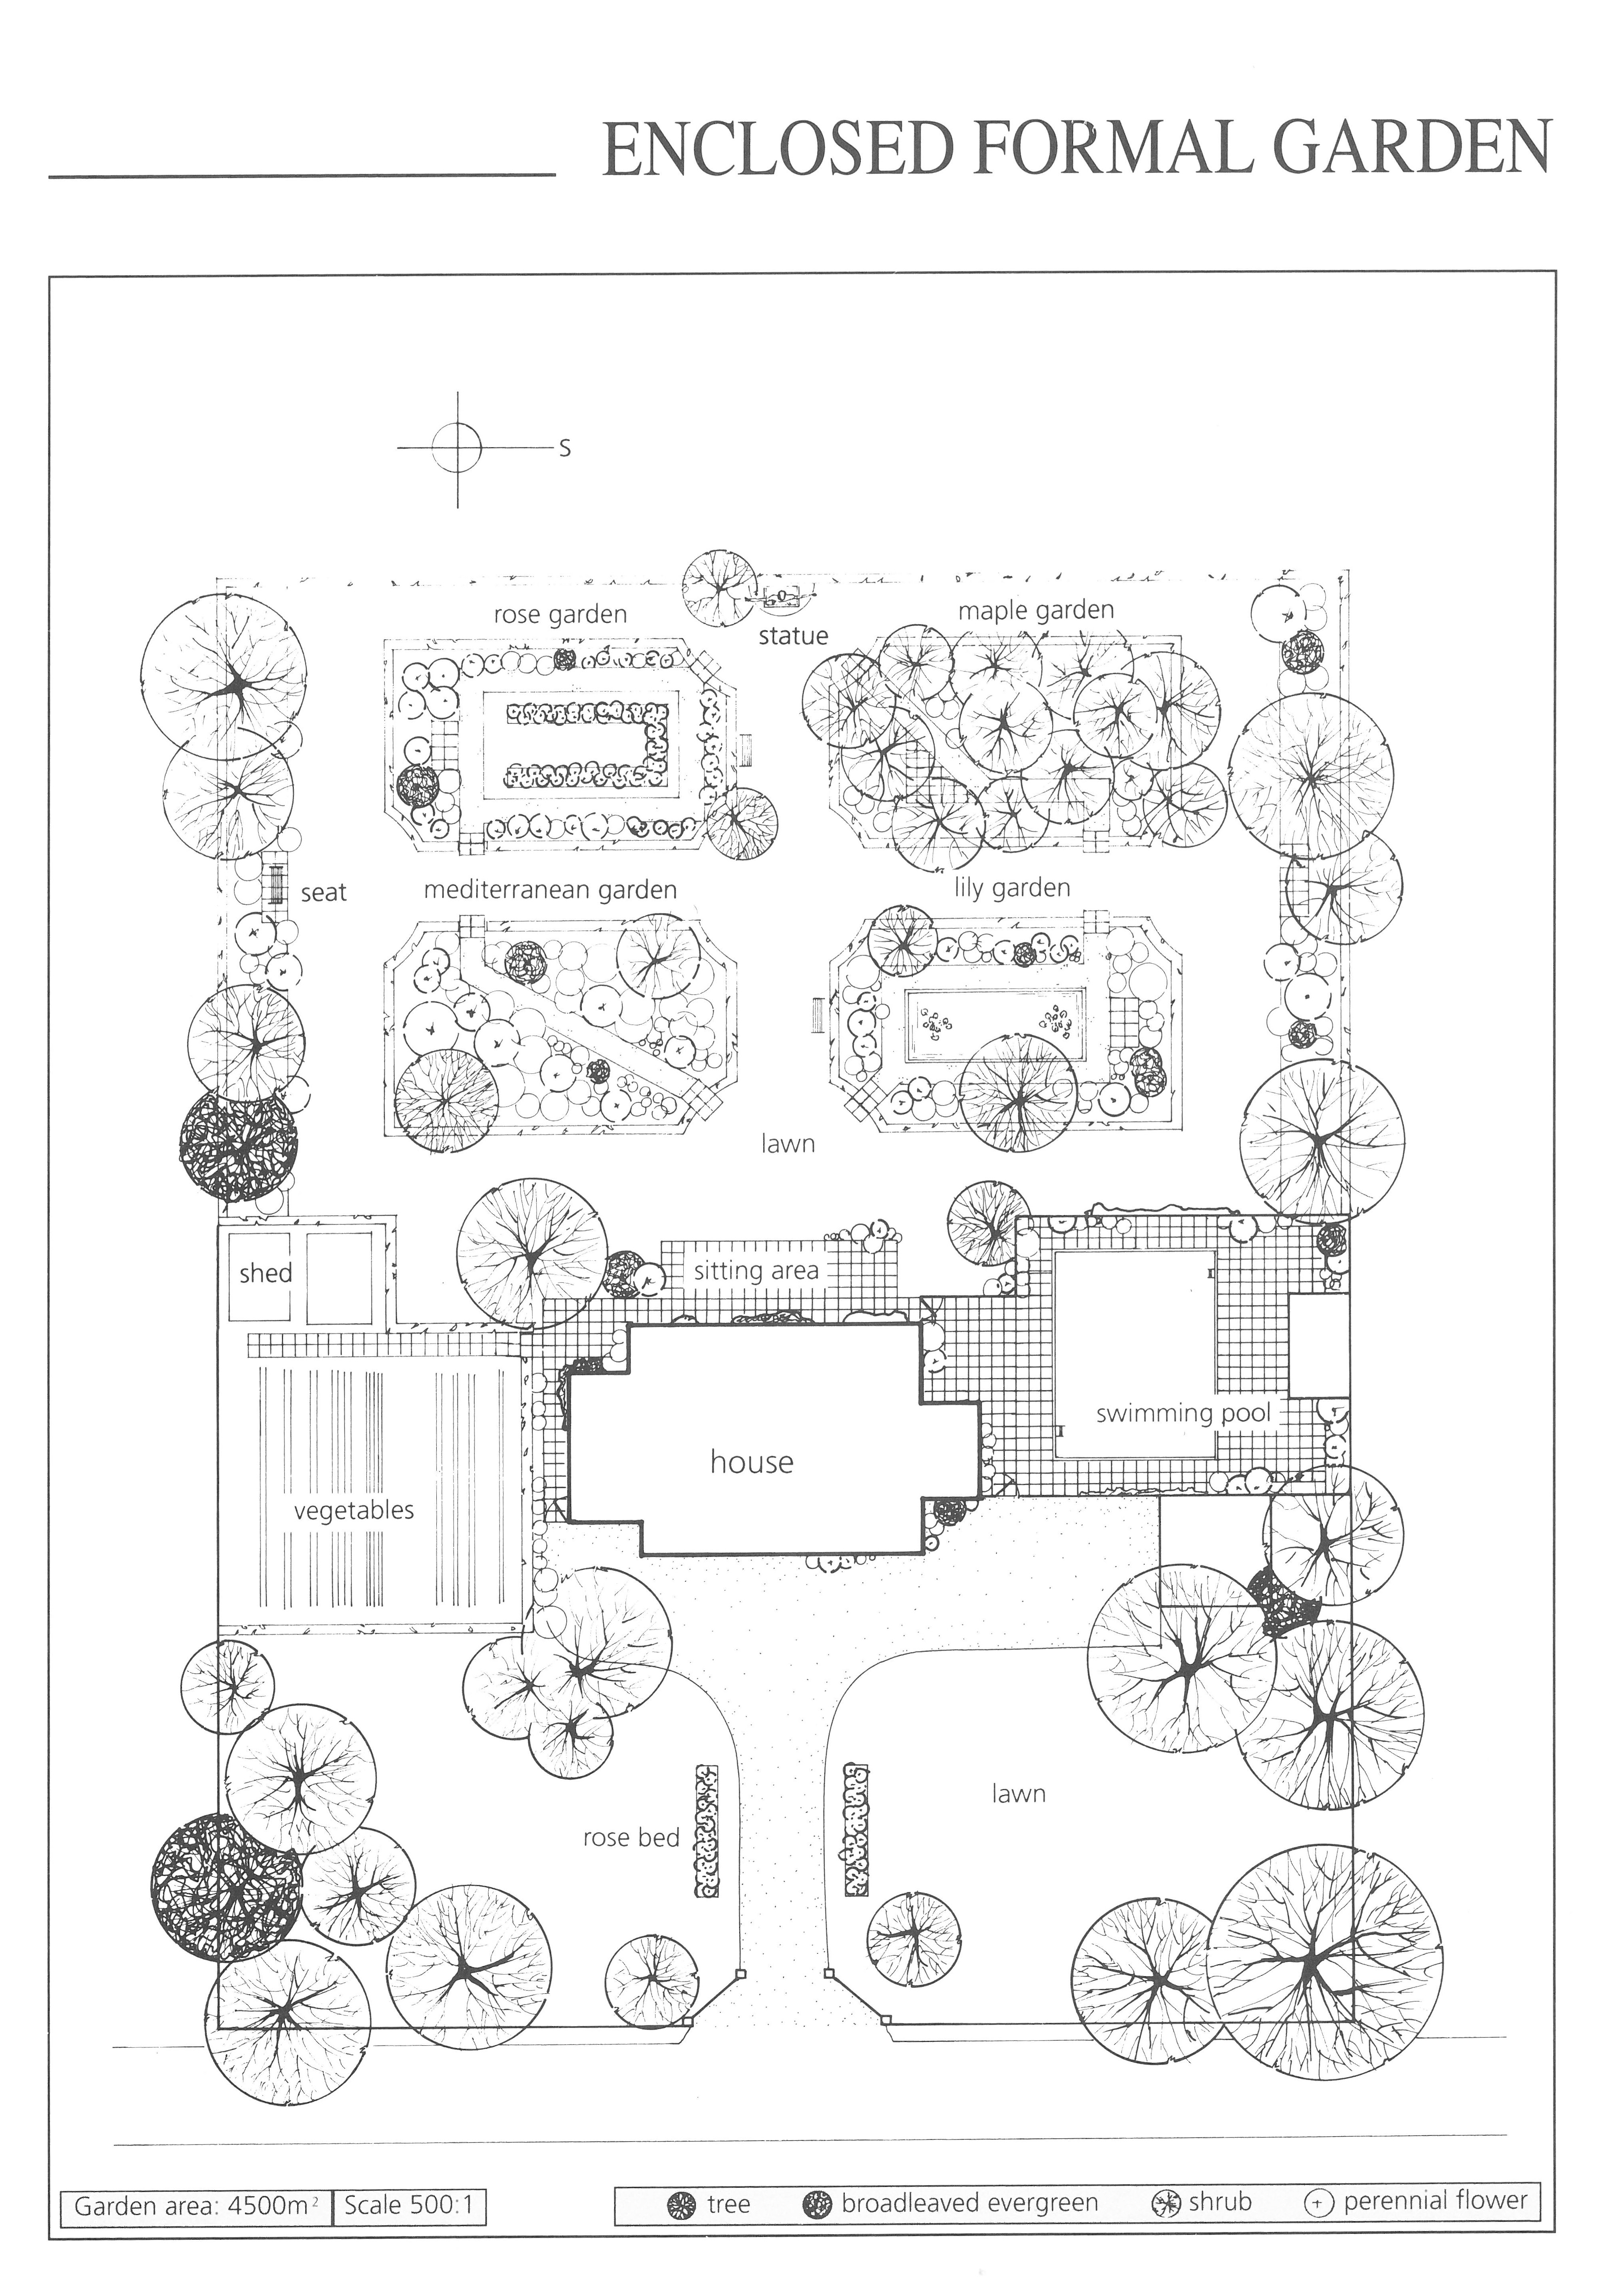
Case Study No. 7
Click here to view bigger sized drawing
Hard landscaping:
A driveway flanked by formal rosebeds divides the front garden evenly. High walls (2m) and hedges screen off the back garden from the front. A large walled, paved area of 60 cm square concrete slabs with a swimming pool adjoins the south side of the house. To the north of the house, there is a small kitchen garden. At the back of the house, a large paved terrace runs level with broad grass alleyways.
The main axis has a piece of sculpture at its end, the others have seats. The grass alleyways are framed by hedges (1.7 m high) that surround four enclosed gardens; Mediterranean garden, rose garden, maple and fern garden, and lily garden. Straight borders and hedges flank the sides of the back garden.
Planting:
A few large trees decorate the front lawn area. A mixture of small shrubs and perennial flowers spread onto the paving, and with the climbers on the walls, help to link the walled area and house to the garden. Trees, shrubs and some perennial flowers fill the straight borders. Each of the enclosed gardens features its theme plants and some complementary trees, shrubs and perennial flowers.
Garden style:
A very formal style with strong symmetry and great mystery. The enclosed gardens make separate pictures. The cross axis adds a feeling of space that counteracts the enclosure caused by the hedges.
Maintenance and cost:
Heavy maintenance; several gardens in one, mowing, hedges, edges. Expensive; paving, pools, walls, lots of plants.
Assessment:
Low wire fences, wall and hedges (1.8 m high), level ground, formal house faces north, not exposed.
Scanner Q76
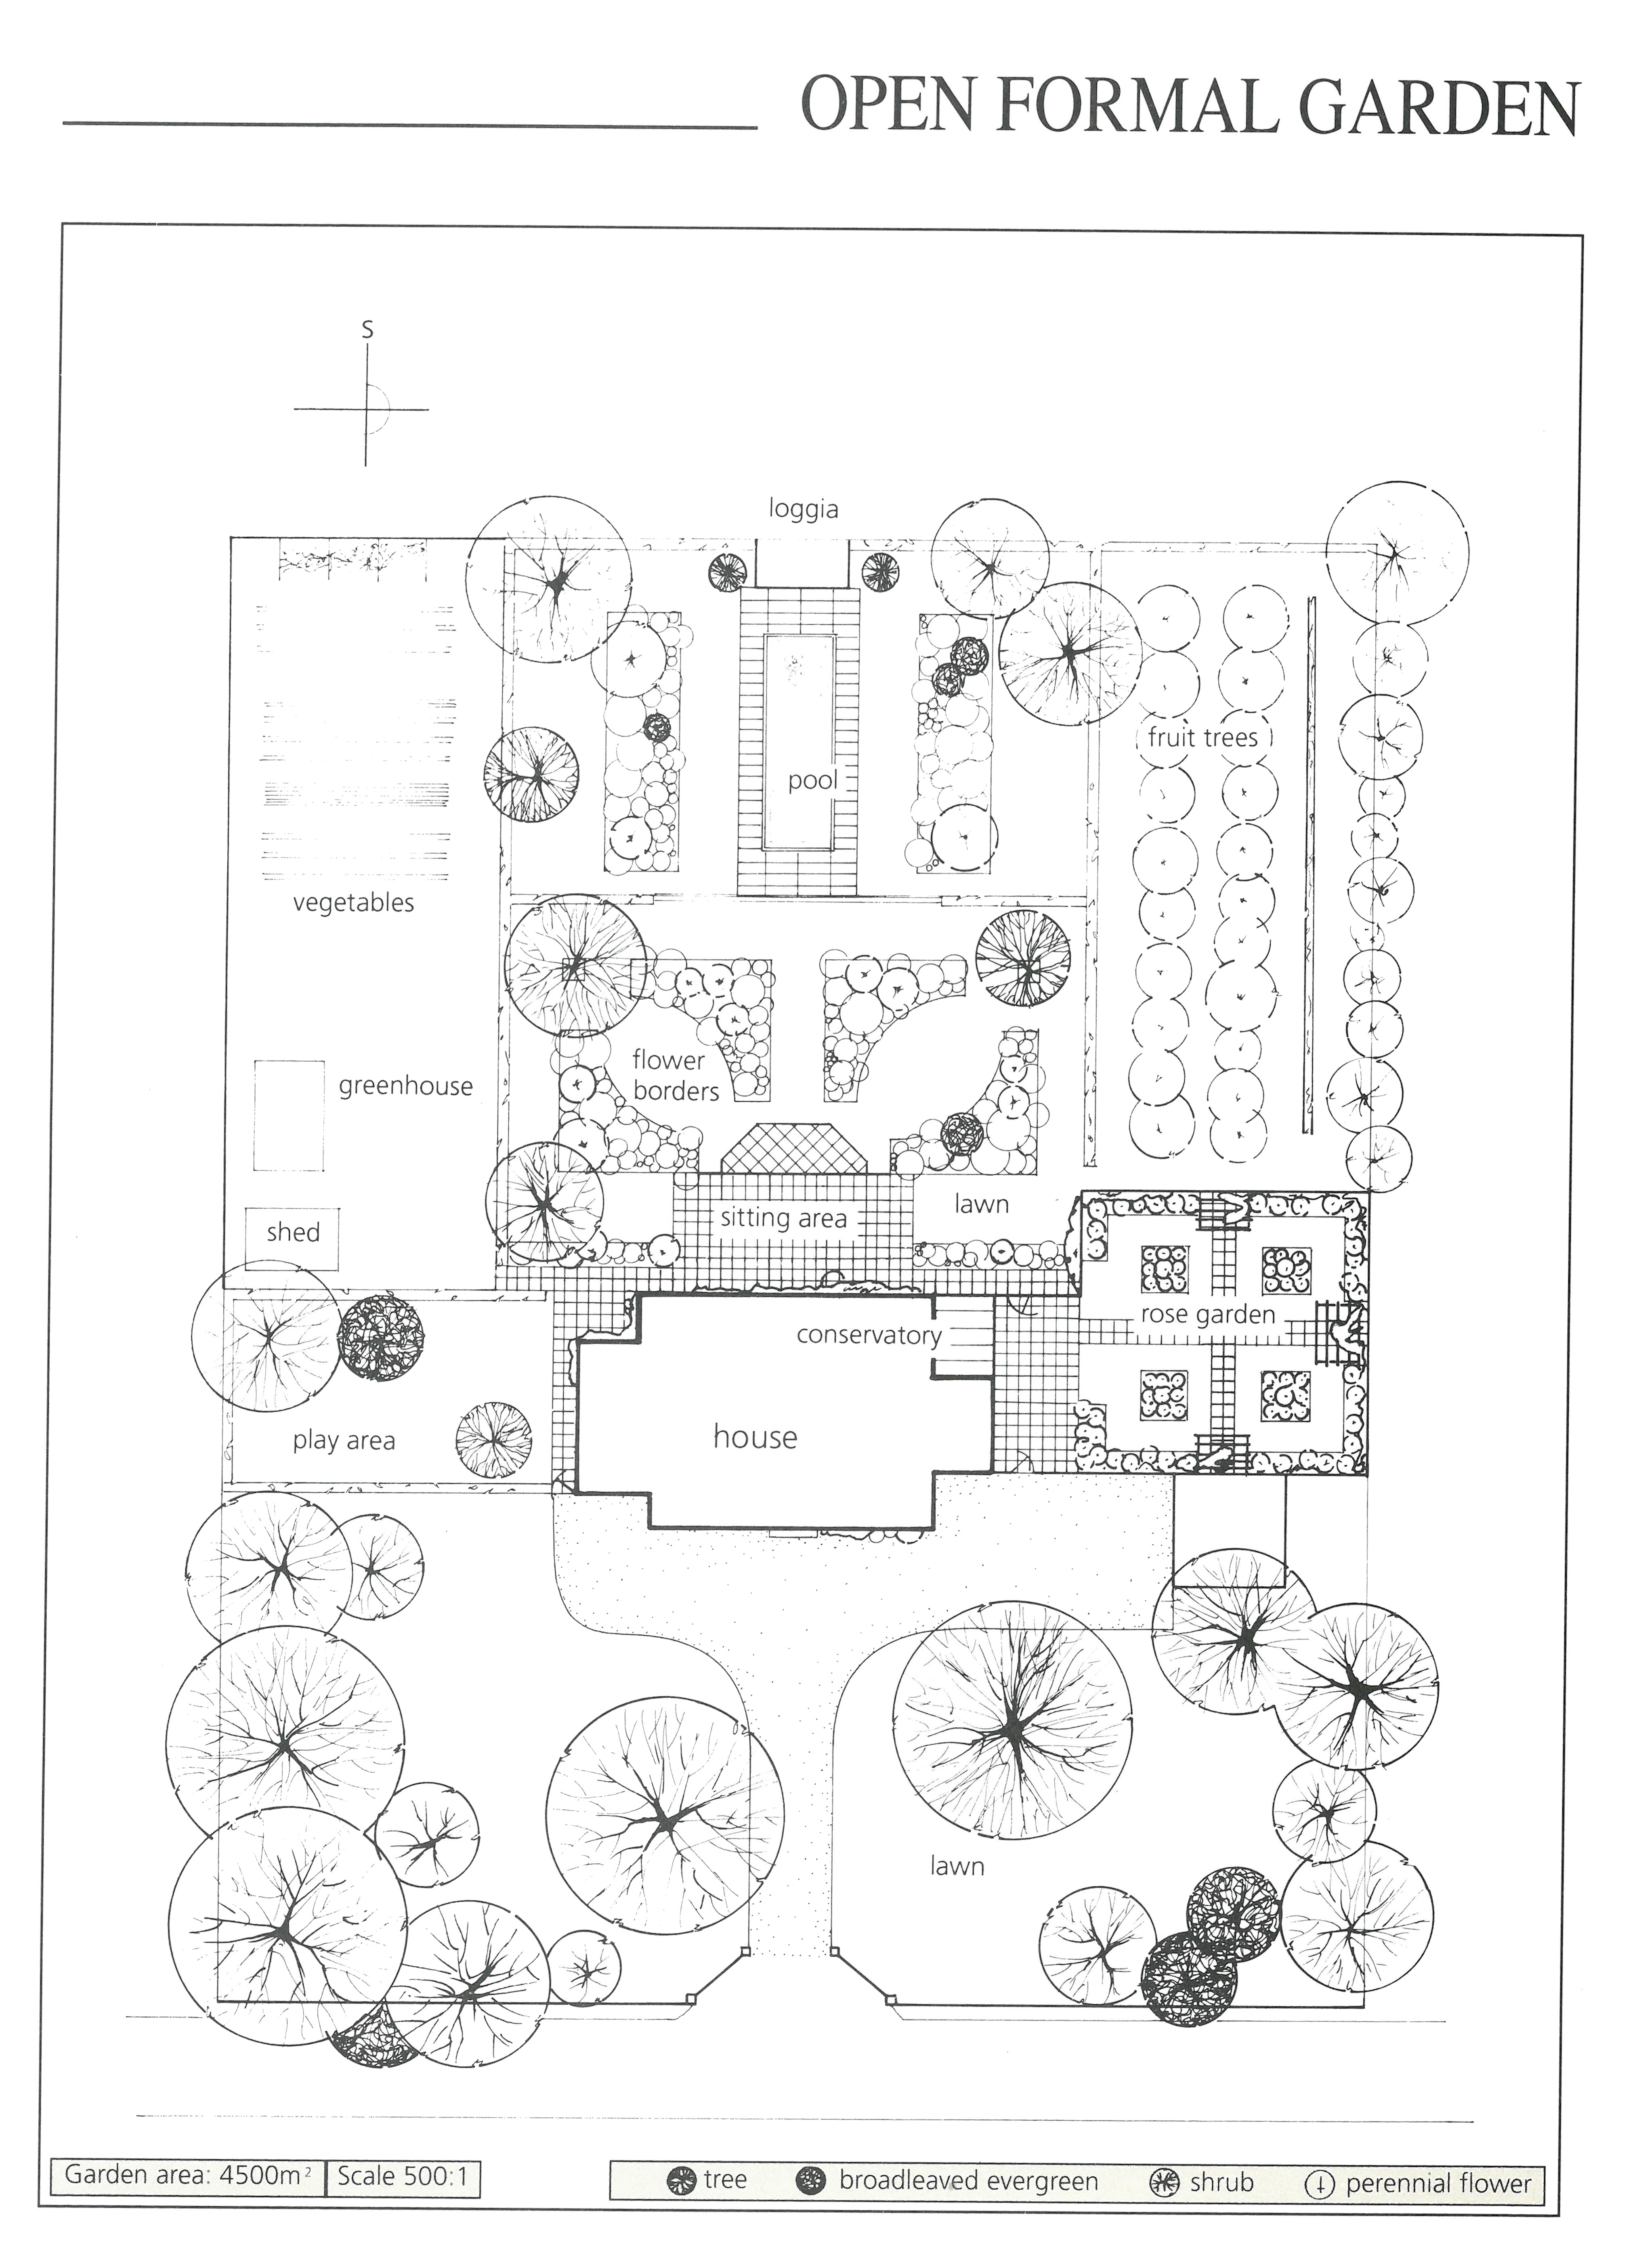
Case Study No. 6
Click here to view bigger sized drawing
Hard landscaping:
A straight drive approaches the house directly and divides the front garden almost evenly. High walls (2.5 m) and hedges divide the front from the back garden. The back garden has a central axis leading from a raised terrace paved with 60 cm square concrete slabs, passing between formal borders, to a formal lily pond and loggia in a partially enclosed garden.
The pool area is fifteen centimetres below the general level. Vegetable and fruit gardens are hidden behind hedges flanking the main garden. A formal paved rose garden and a conservatory adjoin the west side of the house.
Planting:
A few large trees decorate the front lawn area. The main ornamental area has some smaller trees to ‘lift’ the flatness of paving, lawns, borders and hedges. The hedges provide shelter and backdrop for the colourful perennial flowers and shrubs in the borders.
The rose garden has bedding roses, shrub roses and climbers on the walls (2.5 m high) and pergolas. Small shrubs and perennial flowers spill onto paving, and together with climbers, help to link the house and garden.
Garden style:
A very formal style with strong symmetry. A central axis dominates and secondary axes between the small curved borders provide additional interest and focal points.
Maintenance and cost:
Heavy maintenance; mowing, edges, vegetables, roses, borders. Expensive; extensive paving, earthworks, formal pool, rose garden, conservatory.
Assessment:
Low wire fences all around, steeply sloping ground (fall 1 in 11), house faces west, elevated and exposed.

Scanner Q76
Case Study No. 5
Click here to view bigger sized drawing
Hard landscaping:
A driveway curves up the slope and joins the front of the terrace on which the house is built, providing car parking space. The ground slopes away from the front of this terrace. A wall and broad border divides the back garden from the front. Behind the house, the terrace opens into a broad sweep with a paved area of 40 cm square concrete slabs laid diamond pattern, and an informal pool.
A paved path leads to a flight of ten (12 cm) steps that provide access to a second terrace with a little summerhouse. This provides a sitting area when the sun goes around to the front of the house.
Planting:
The entire boundary of the site is planted with trees to provide shelter and to reduce to a minimum the area of sloping ground that needs mowing. Only the small lawn area in front of the house is sloping; the other lawns are level. The banks created by the terraces are planted with shrubs and some perennial flowers nearest the house. The house itself has plants and climbers to link it to the garden.
Garden style:
An informal style with heavy planting to relieve the flat, artificial terraces and help to link them with the countryside. The terraces will help the house to ‘sit down’ into the landscape and also reduce exposure. The higher terrace gives a platform of privacy for sitting out.
Maintenance and cost:
Relatively little maintenance; mowing, weeding. Relatively expensive; earthworks (best done at construction stage), paving, pool, summerhouse.
Assessment
Low walls and hedges (1.5 m high) all around, level ground, house faces east, exposed to the south-east. Problem – to hide a tennis court.

Scanner Q76
Case Study No. 4
Click here to view bigger sized drawing
Hard landscaping:
A driveway provides access and parking for cars. It is bounded on one side by trees, and lawn with trees on the other. A trellis fence and wall divides the back garden from the front. The back garden is further divided by a wall and hedge into a kitchen garden and a tennis court area.
A path serves the tennis area that has a paved area of 40 cm square concrete slabs. A larger paved area with a conservatory adjoins the south side of the house and has a view onto a curving border backed by hedges.
Planting:
Two large groups of native trees with a few ornamental garden trees and shrubs reduce the mowing area of the front lawn, providing shelter for the house and paved area on its exposed side. The paved area near the house has small shrubs and perennial flowers spreading onto it. The ornamental border surrounding the back lawn has trees, shrubs, perennial flowers and bulbs.
A tennis court is nice to have, but ugly to look at! The planting hides the entrance to the tennis area and the hedge (2.5m high) hides the court itself. The two ends of the tennis area, outside the wire fence, are planted with trees and shrubs mostly. These provide decoration and shelter. The planting is fancier near the tennis sitting area.
Garden style:
An informal style with a formal touch in the diamond pattern and the conservatory. The hedge hides the court and, in turn, has its own straight flatness broken by the border.
Maintenance and cost:
Moderate maintenance; mowing, vegetables, large border. Expensive; tennis court, conservatory, paving.
Assessment:
Low wall, wire fence and hedges (1.8 m high) all around, level ground, house faces east, exposed to south west.
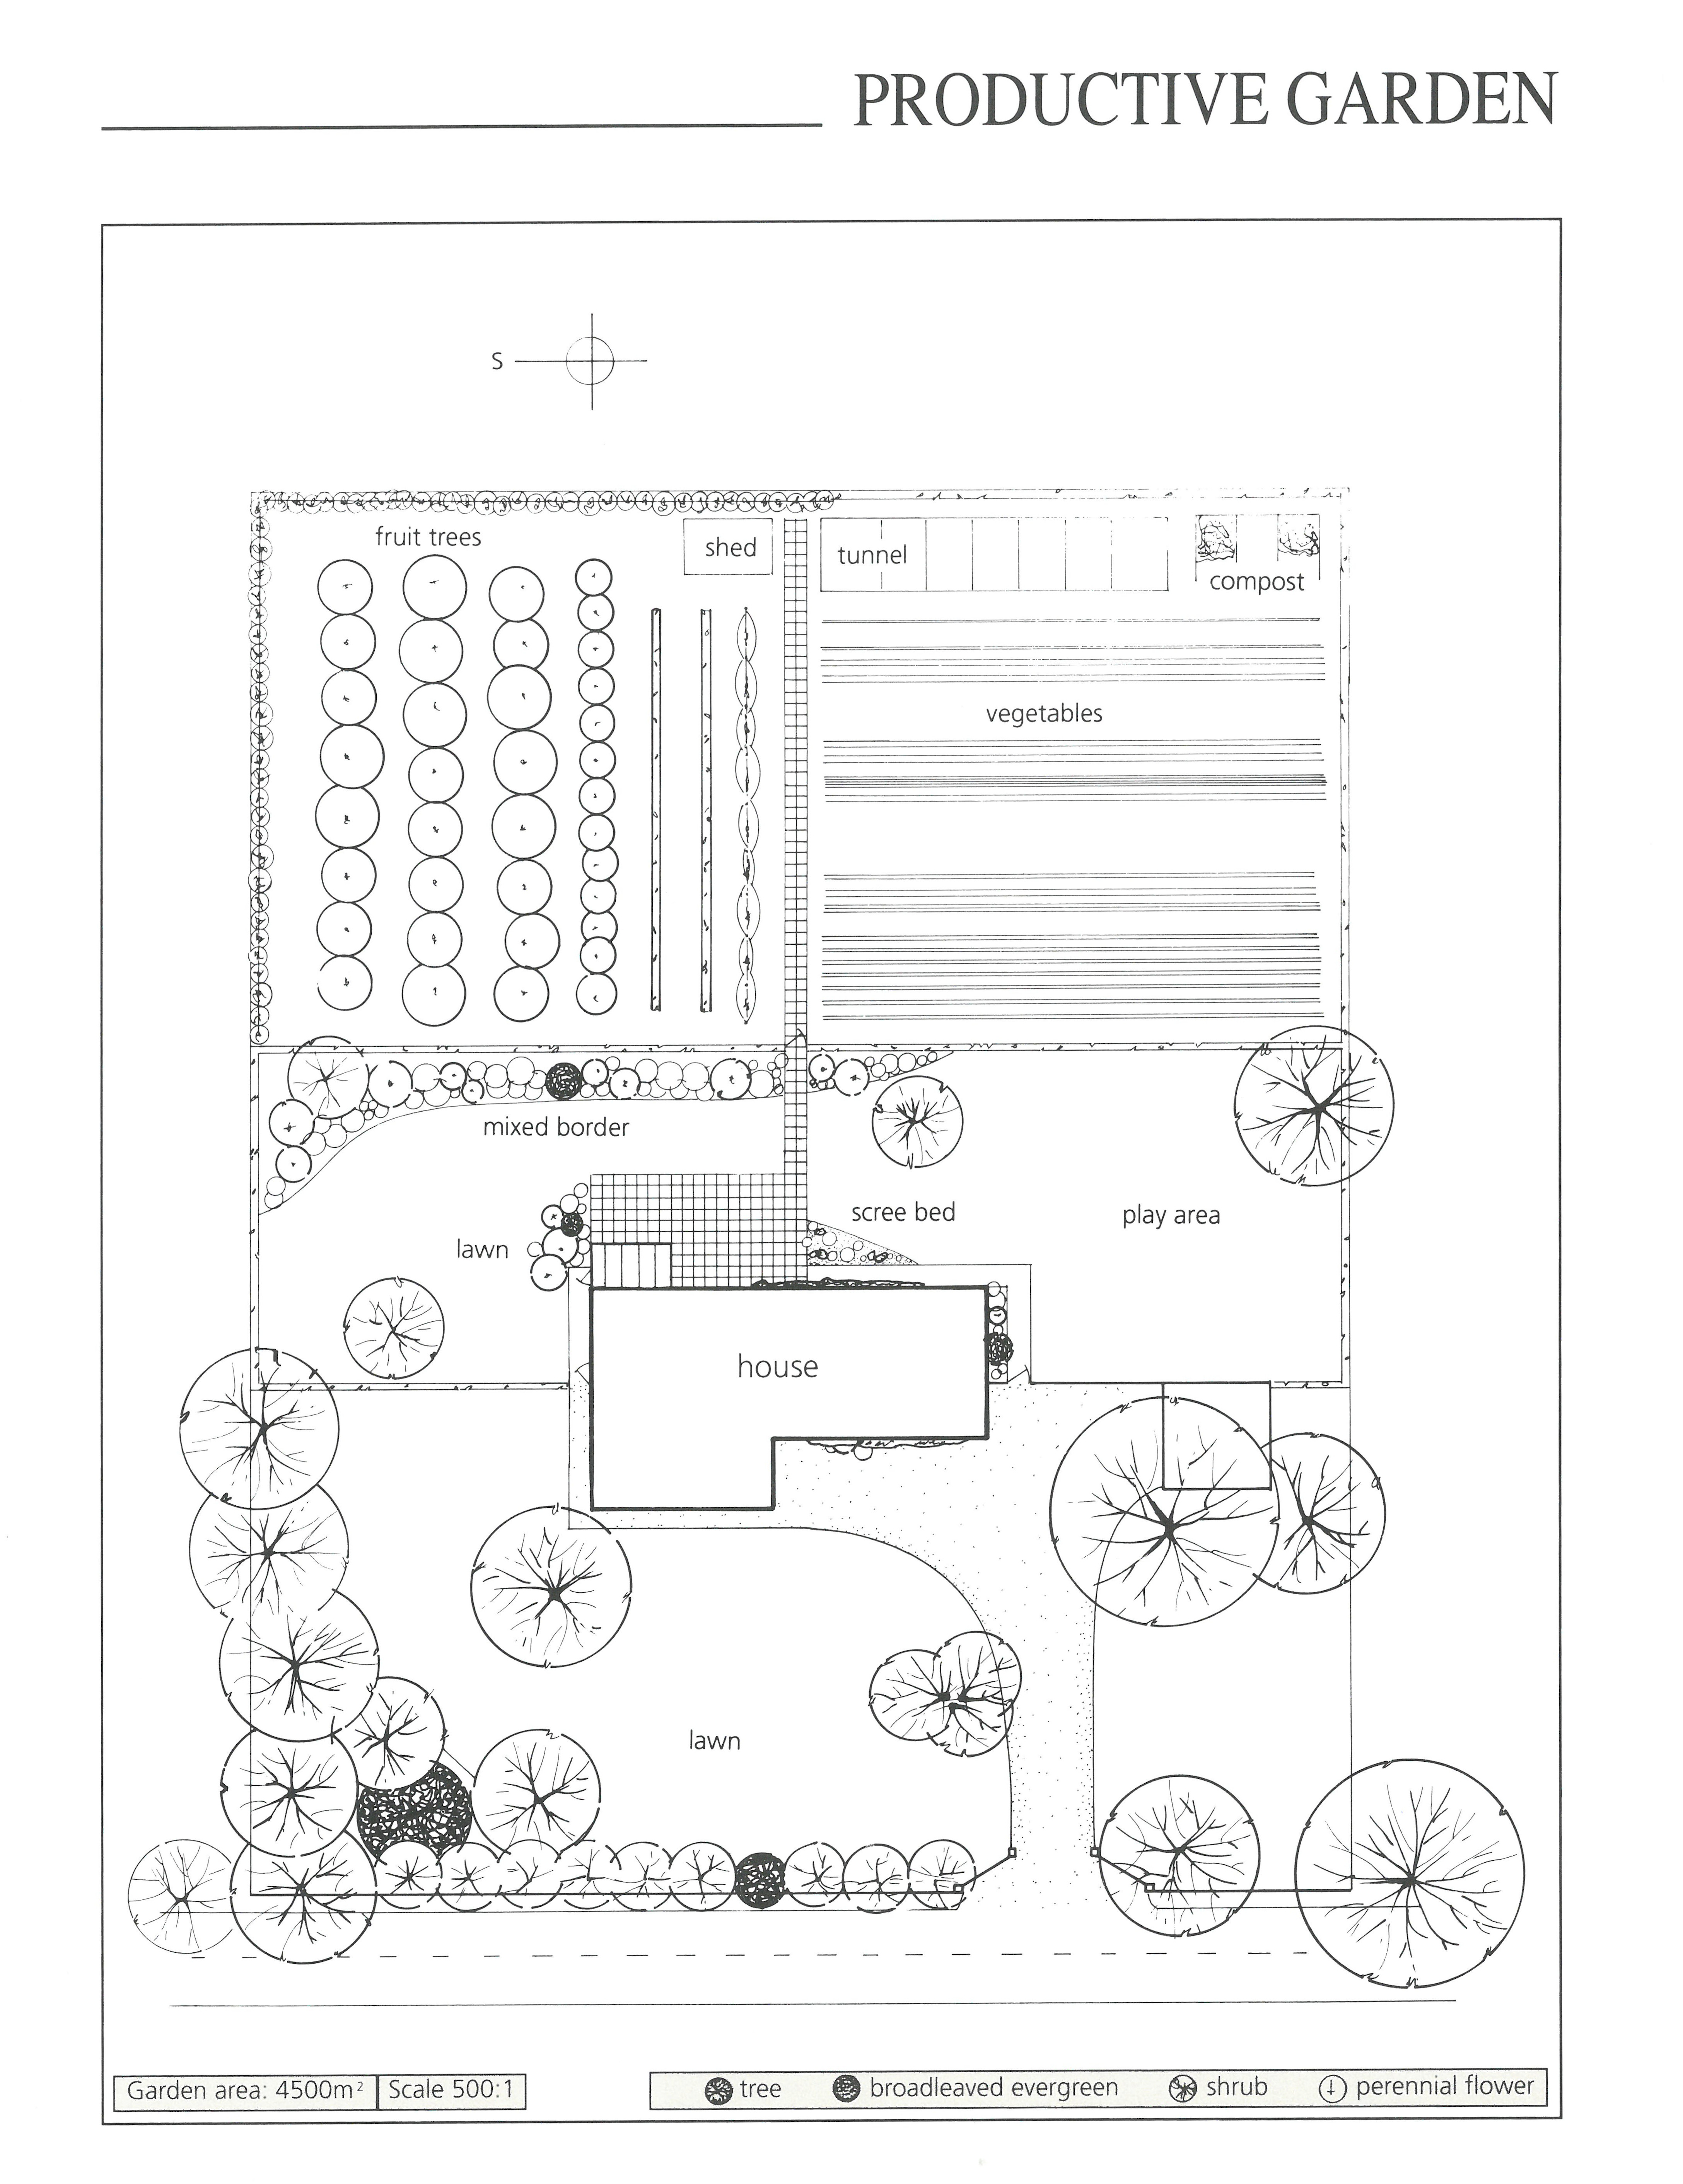
Case Study No. 3
Click here to view bigger sized drawing
Hard landscaping:
A driveway provides access and hard standing for cars. The back garden is divided into two parts; an ornamental area and a large kitchen garden. The ornamental area has a conservatory and paved area of 60 cm square concrete slabs. There is a mixed border and a scree bed where it can be seen from the house. The kitchen garden has an access path of slabs leading to a shed and polythene tunnel.
Planting:
The front garden has two lawn areas, reduced in size by some tree planting in a corner of the larger area. There is a specimen group of three trees. A row of mixed species screens the front of the house from the road, reducing noise. Climbers on the house link it with the garden. The mixed border in the back garden has shrubs, perennial flowers and bulbs.
There are a few specimen trees set in the area of lawn, part of which is intended as a play area. The ornamental area is bounded by hedging. The kitchen garden is bounded by high hedges on two sides and a shelter screen (4 m high) to the south west.
Garden style:
A simple, informal style with the kitchen garden divided away from the rest. Borders and beds are used to break the straight lines of boundaries and hedges.
Maintenance and cost:
Considerable maintenance; large vegetable area, mowing, watering in the tunnel and conservatory. Moderately expensive; conservatory, paving, polythene tunnel.
Assessment:
Low walls to the front and wire fences around the back garden, level ground, house faces south, not exposed.
Scanner Q76
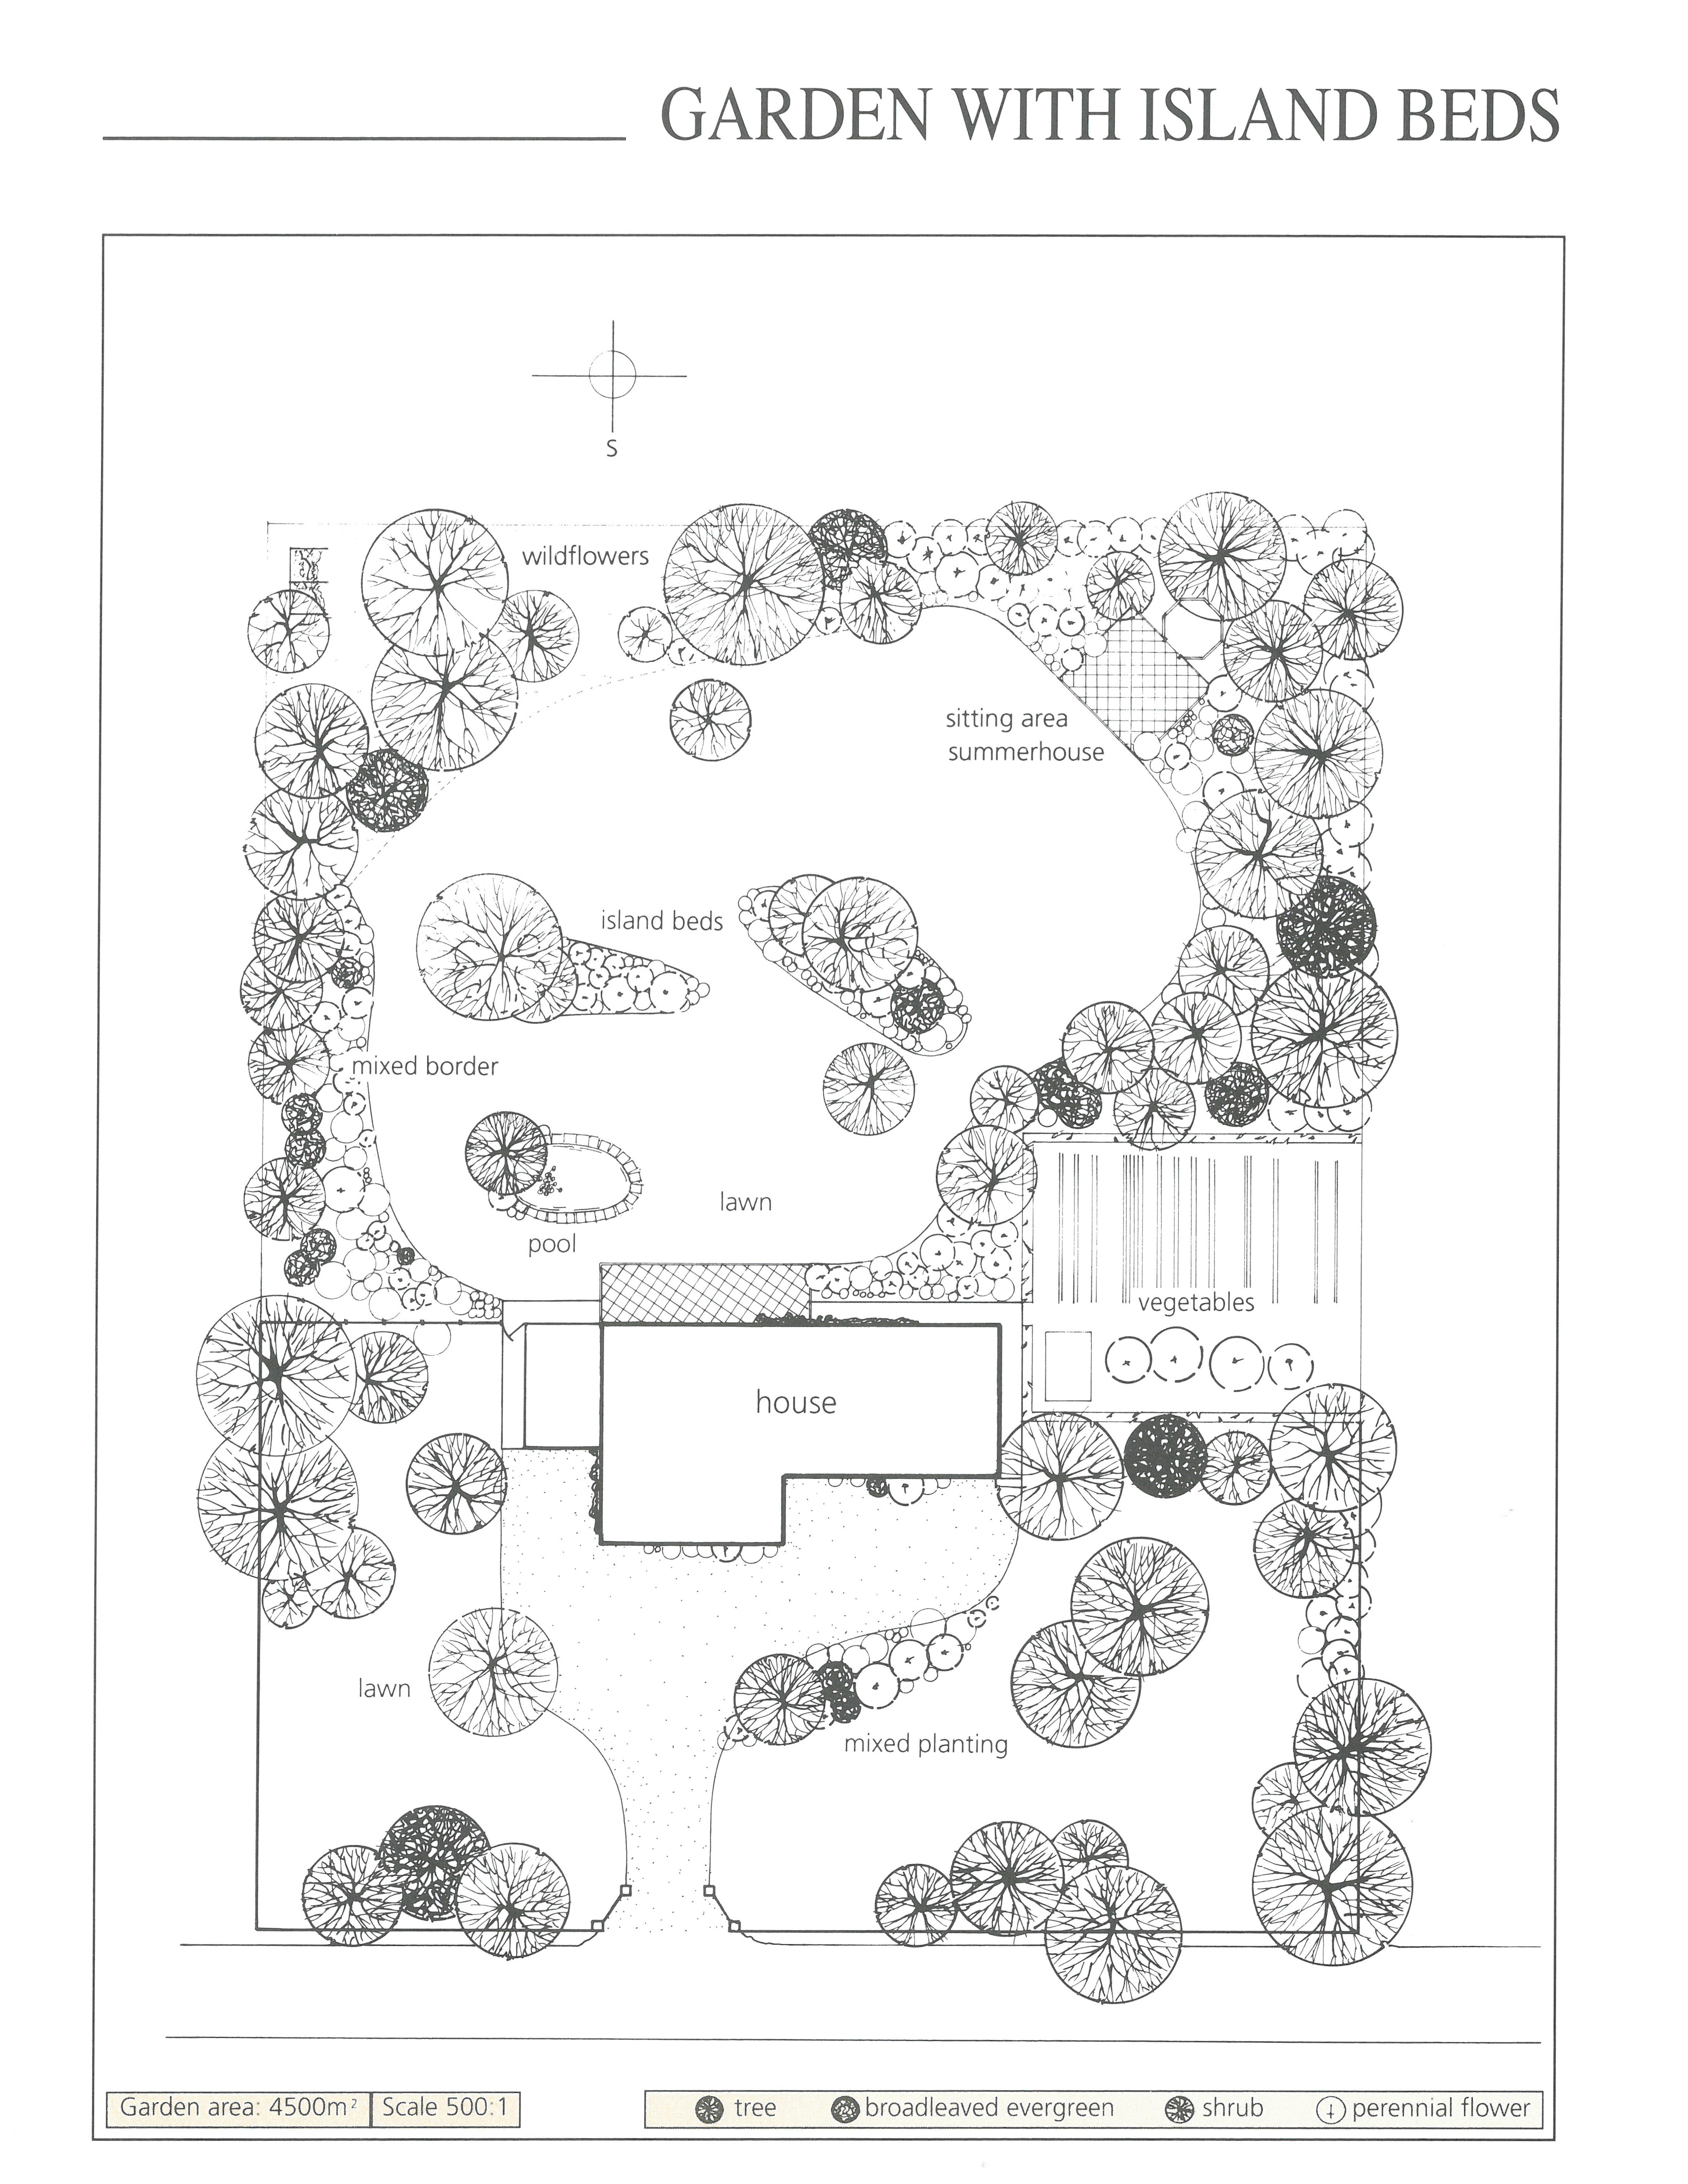
Case Study No. 1
Click here to view bigger sized drawing
Hard landscaping:
The front garden is divided by a driveway that also provides parking in front of the house. There is a vegetable garden to the side with a shed. In the back garden, there are two paved areas, one of these with a summerhouse set back from the house to get the sun. An informal pool and two island beds divide and decorate the lawn area. Curving borders hide the boundaries.
Planting:
The front garden has mostly lawn and trees with some shrubs. A hedge surrounds the vegetable garden. There are trees throughout the back garden borders, but near the house and the distant paved area, they are accompanied by shrubs, perennial flowers and bulbs. Native species at the boundary. There are some specimen trees set in the sweeping expanse of lawn.
The corner opposite the summerhouse is treated as wildflower meadow. The island beds have trees, shrubs, perennial flowers and bulbs. They divide the garden and screen off the second sitting area. The house has climbers and plants to help it link with the garden.
Garden style:
An informal style with a formal touch in the main paved area and summerhouse. This is hidden from first view to make a surprise. The island beds offer several routes around the garden.
Maintenance and cost:
Considerable maintenance; mowing, vegetables, large borders. Moderately expensive; paving, summerhouse, pool, plants.
Assessment:
Wooden fences (1.8 m high) and walls, ground sloping away from the house (fall 1 in 100), garden faces west, overlooked.
Scanner Q76
Case Study No. 7
Click here to view bigger sized drawing
Hard landscaping:
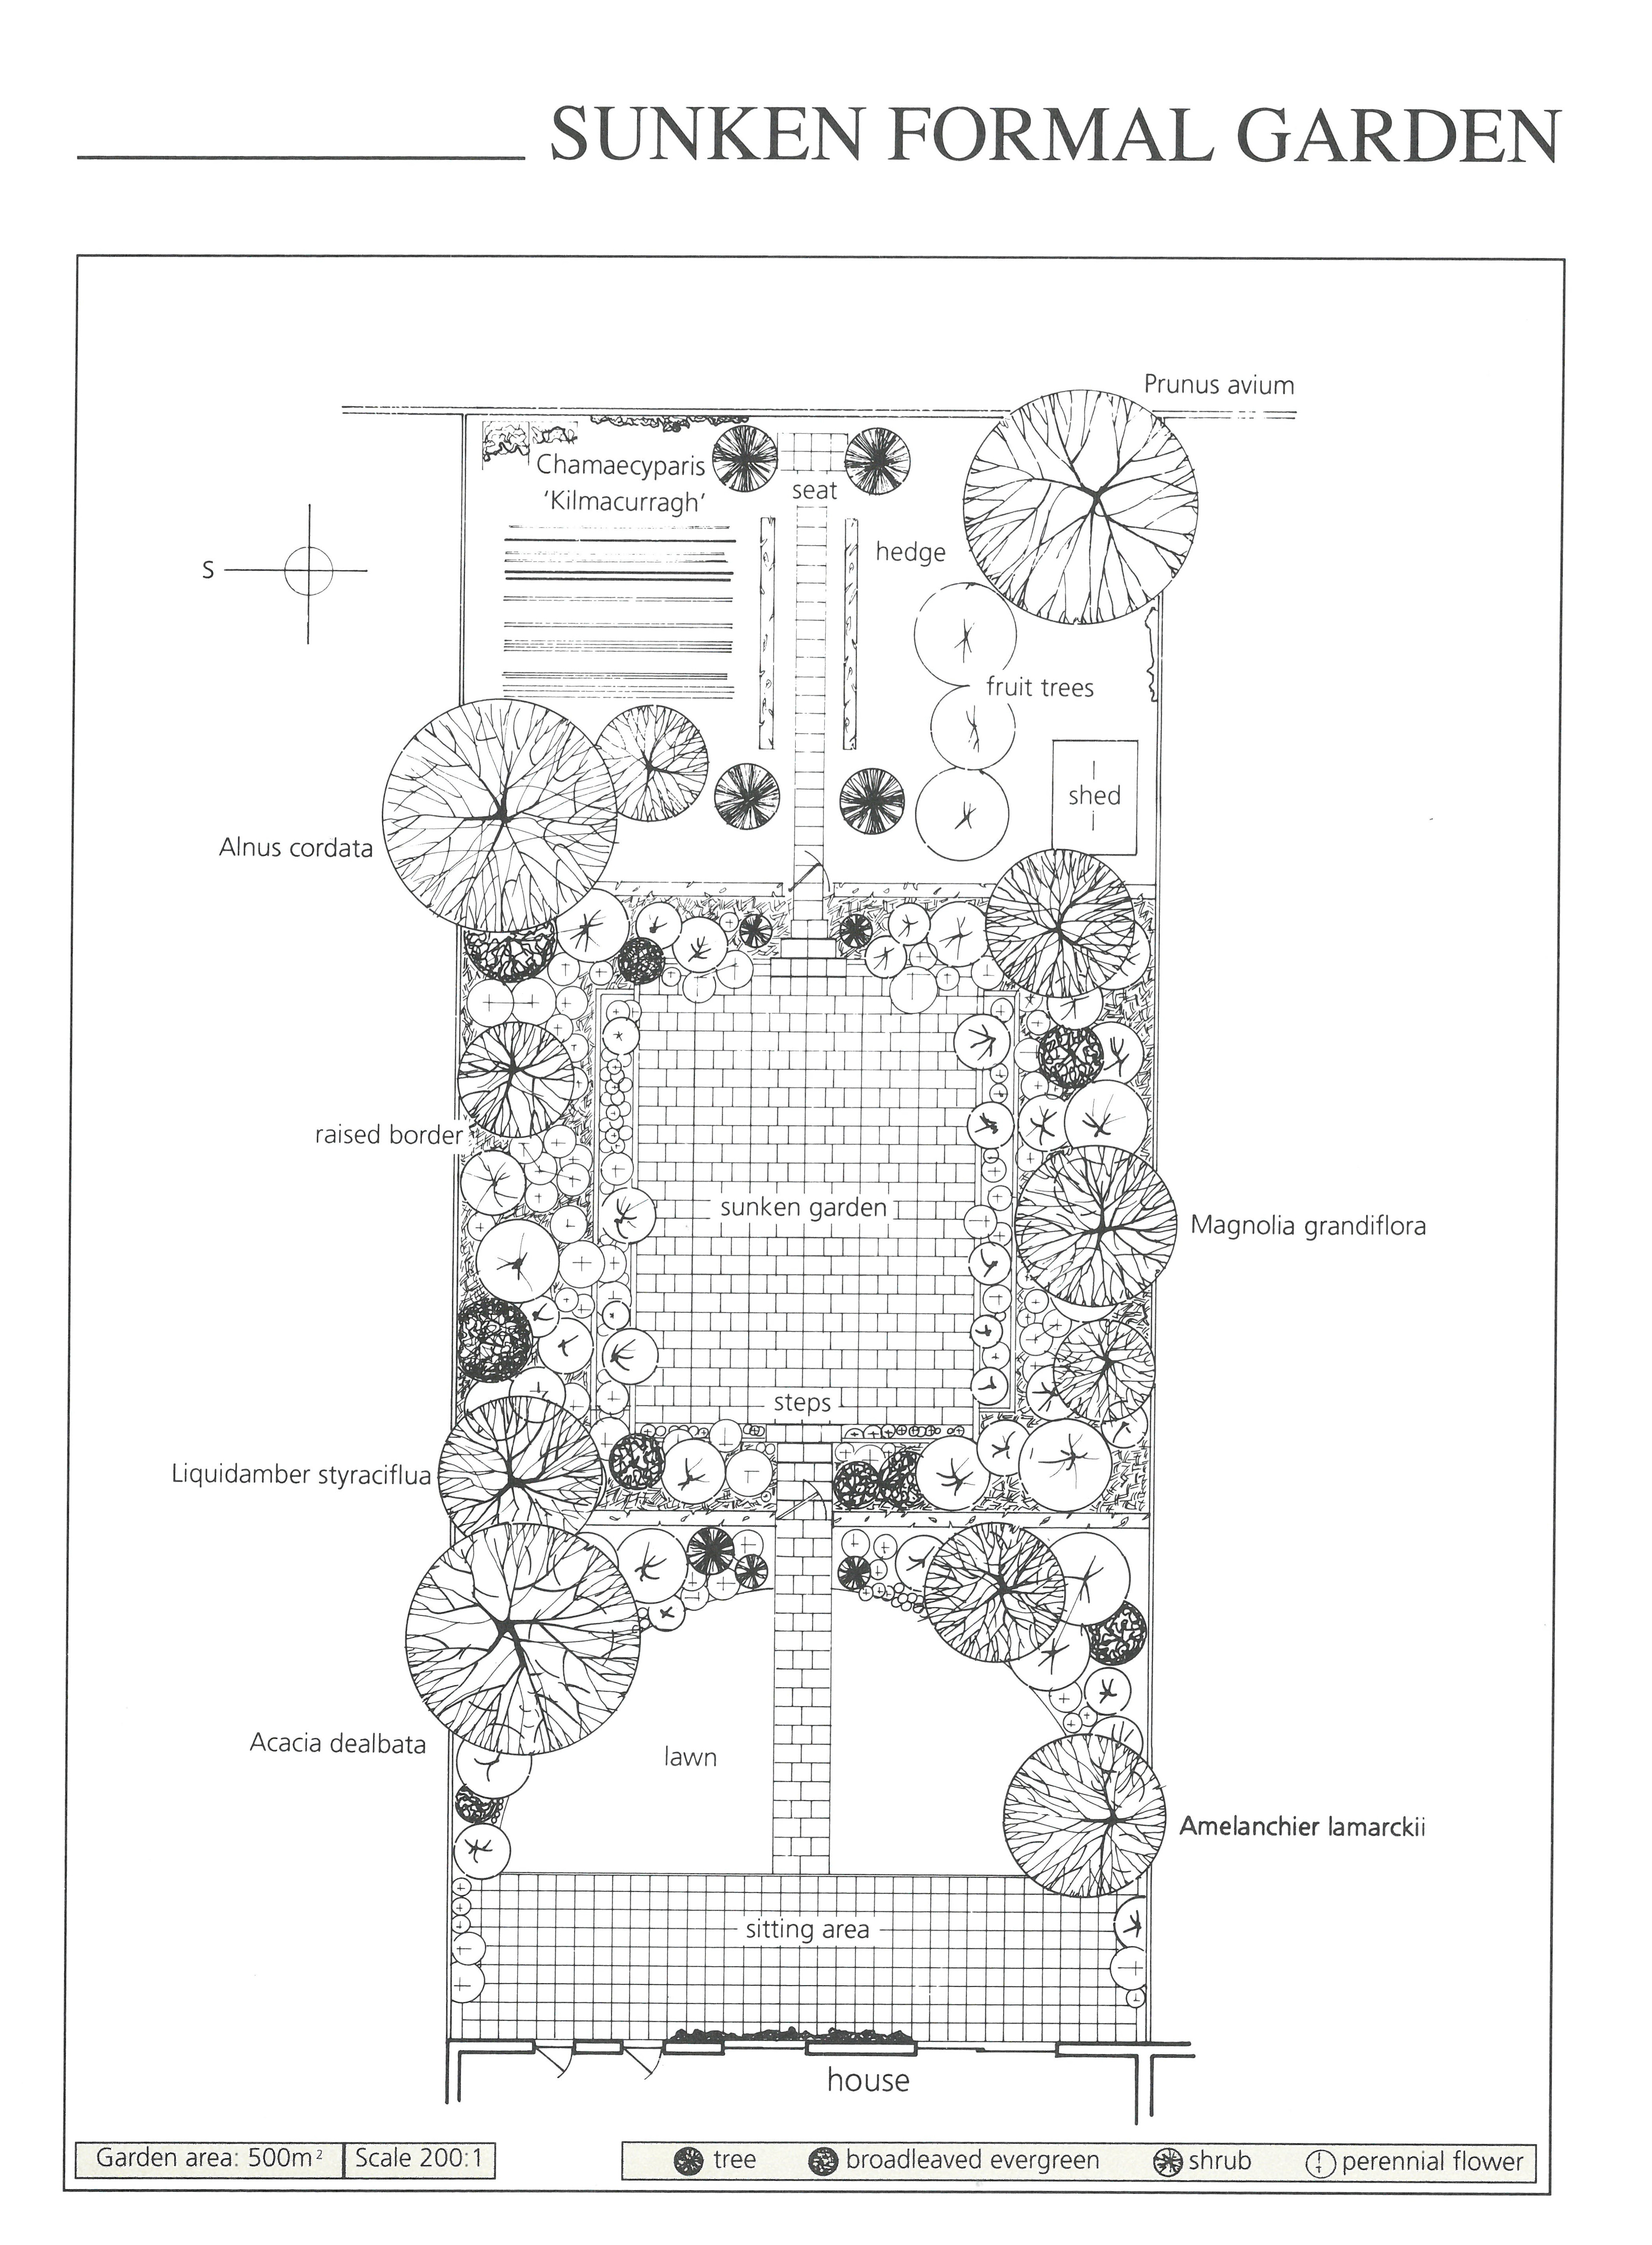
The garden is divided into three areas, semicircular garden, sunken garden and kitchen garden. An area of 40 cm square concrete paving slabs adjoins the back of the house. It is linked to the sunken garden by a staggered path of 40 cm square slabs and 40 cm by 60 cm rectangular slabs. A wrought iron gate opens onto three steps (10 cm each) down to the sunken garden.
The soil from the sunken area is used to bring up the level of the vegetable area. A paved area of staggered courses of the same slabs is bounded by a narrow border that is backed by a thirty centimetre retaining wall, and mixed straight borders. Another set of steps and gate leads to the vegetable garden and shed.
Planting:
Trees provide privacy and ‘lift’ the flat-topped borders, fences and the two hedges that divide the garden. Eight columnar conifers emphasise the central axis; tall ones to the back foreshorten the length. These, and two short lengths of hedge, mask the view of the vegetable area from the sunken garden. The borders are planted with a mixture of shrubs, perennial flowers and bulbs.
Garden style:
A formal style with strong central axis and not-quite-symmetrical planting that is partly symmetrical, partly not. A garden of considerable variety and interest. This design could be used on level ground also.
Maintenance and cost:
Moderate maintenance; small lawn, small vegetable area. Relatively expensive; paving, retaining walls, gates, earthworks.
Assessment:
Wooden fences (1.8 m high) and wall, level ground, garden faces north, overlooked all round.

Scanner Q76
Case Study No. 6
Click here to view bigger sized drawing
Hard landscaping:
A pergola of boards (15 x 3.8 cm), set 25 centimetres apart, divides the garden. The pergola is ornamental in its own right and it also serves to hide the large sitting area of 60 cm square concrete slabs. There is an informal pool and ornamental borders around the paved area. The pergola cuts through a border that divides to run along the boundaries.
A smaller paved area behind the house acts as a service area and links the house and garden. A service path links the paved areas; it cuts through a curve on the longer border.
Planting:
Narrow, columnar trees screen off the main sitting area from being overlooked; larger trees on either side of the garden cut off the view from neighbouring houses. The borders are planted with a mixture of shrubs (including shade-bearers), perennial flowers and bulbs. Two specimen trees are planted in the lawn area to set it off.
There is a small lawn within the screened area to provide a foil for the border plants and to create a feeling of space. A leafy effect is created by using a lot of plants and climbers.
Garden style:
An informal style, the pergola being used in an informal way by placing it at an angle and hiding its access path. The pergola would allow a intriguing glimpse of the screened area when viewed from the house.
Maintenance and cost:
Moderate maintenance; mowing, weeding, tidying. Relatively expensive; pool, paving, pergola.
Assessment:
Fence (1.8 m high) and hedges (2 m high) with wall at back, level ground, garden faces west, overlooked from rear.

Scanner Q76
Case Study No. 5
Click here to view bigger sized drawing
Hard landscaping:
The garden is laid out to a pattern of curbing borders with an island bed in the middle. Hard standing for a garden seat is located at the back wall. A large paved area of 60 cm square concrete slabs is bounded by an informal pool and a scree bed. There is a group of clay pots beside the pool for ornament. A shed and compost area are tucked away in a corner.
Planting:
Trees give height to the borders and the island bed, and provide privacy from the back. The borders and beds are planted with shrubs (including broadleaved evergreens), perennial flowers and bulbs. The garden is very suited to bulbs because of the shade of trees.
The garden seat is hidden from view of the house by the planting and is only revealed by approaching it along either of the two grass walkways around the island bed. The scree provides interest close to the sitting area, and the planting around the pool and paving softens the hard materials.
Garden style:
A very informal style suitable for growing a wide range of plants especially shrubs. The pool divides the garden informally, as do the curves of the island. Views down the grass alleyways lend interest and encourage the curious to explore.
Maintenance and cost:
Considerable maintenance; lots of plants, edges, some mowing. Relatively expensive; paving, pool and a large number of plants.
Assessment; Wooden fences (1.8 m high), level ground, garden faces north, somewhat overlooked all round.

Scanner Q76
Case Study No. 4
Click here to view bigger sized drawing
Hard landscaping:
The garden is divided in two by a trellis fence that screens off a paved sitting area of 40 cm square concrete slabs laid diamond pattern. This area is surrounded by mixed borders. There is a second narrow paved area of 60 cm square concrete slabs beside the house with some pots for decoration. The main area of the garden has mixed borders on either side.
Planting:
The hidden paved area’s borders are the main ornamental feature of the garden because this area is sunniest. A mixture of shrubs, perennial flowers and bulbs is used for shape and colour; trees in this planting provide proportion and privacy. The main area of the garden has a broad sweep of lawn with a specimen tree near the house and other trees planted in the mixed borders.
There are mostly shade tolerant shrubs and flowers because of the shade cast by the house and the trees. These trees provide privacy for the sitting area viewed from the neighbouring houses. The shrubs in the wider border hide the entrance to the hidden garden.
Garden style:
An informal style with formal touches such as the trellis and the diamond pattern square paved area. There is a formal feel to the hidden garden, set within an informal structure. The borders in the hidden garden could be raised about ten centimetres, if desired.
Maintenance and cost:
Relatively easy to maintain; mowing, weeding, tidying. Moderately expensive; some paving, a lot of plants, trellis.
Assessment
Walls and fences (1.8 m high), gentle slope (fall 1 in 100), garden faces south, not overlooked.
Scanner Q76
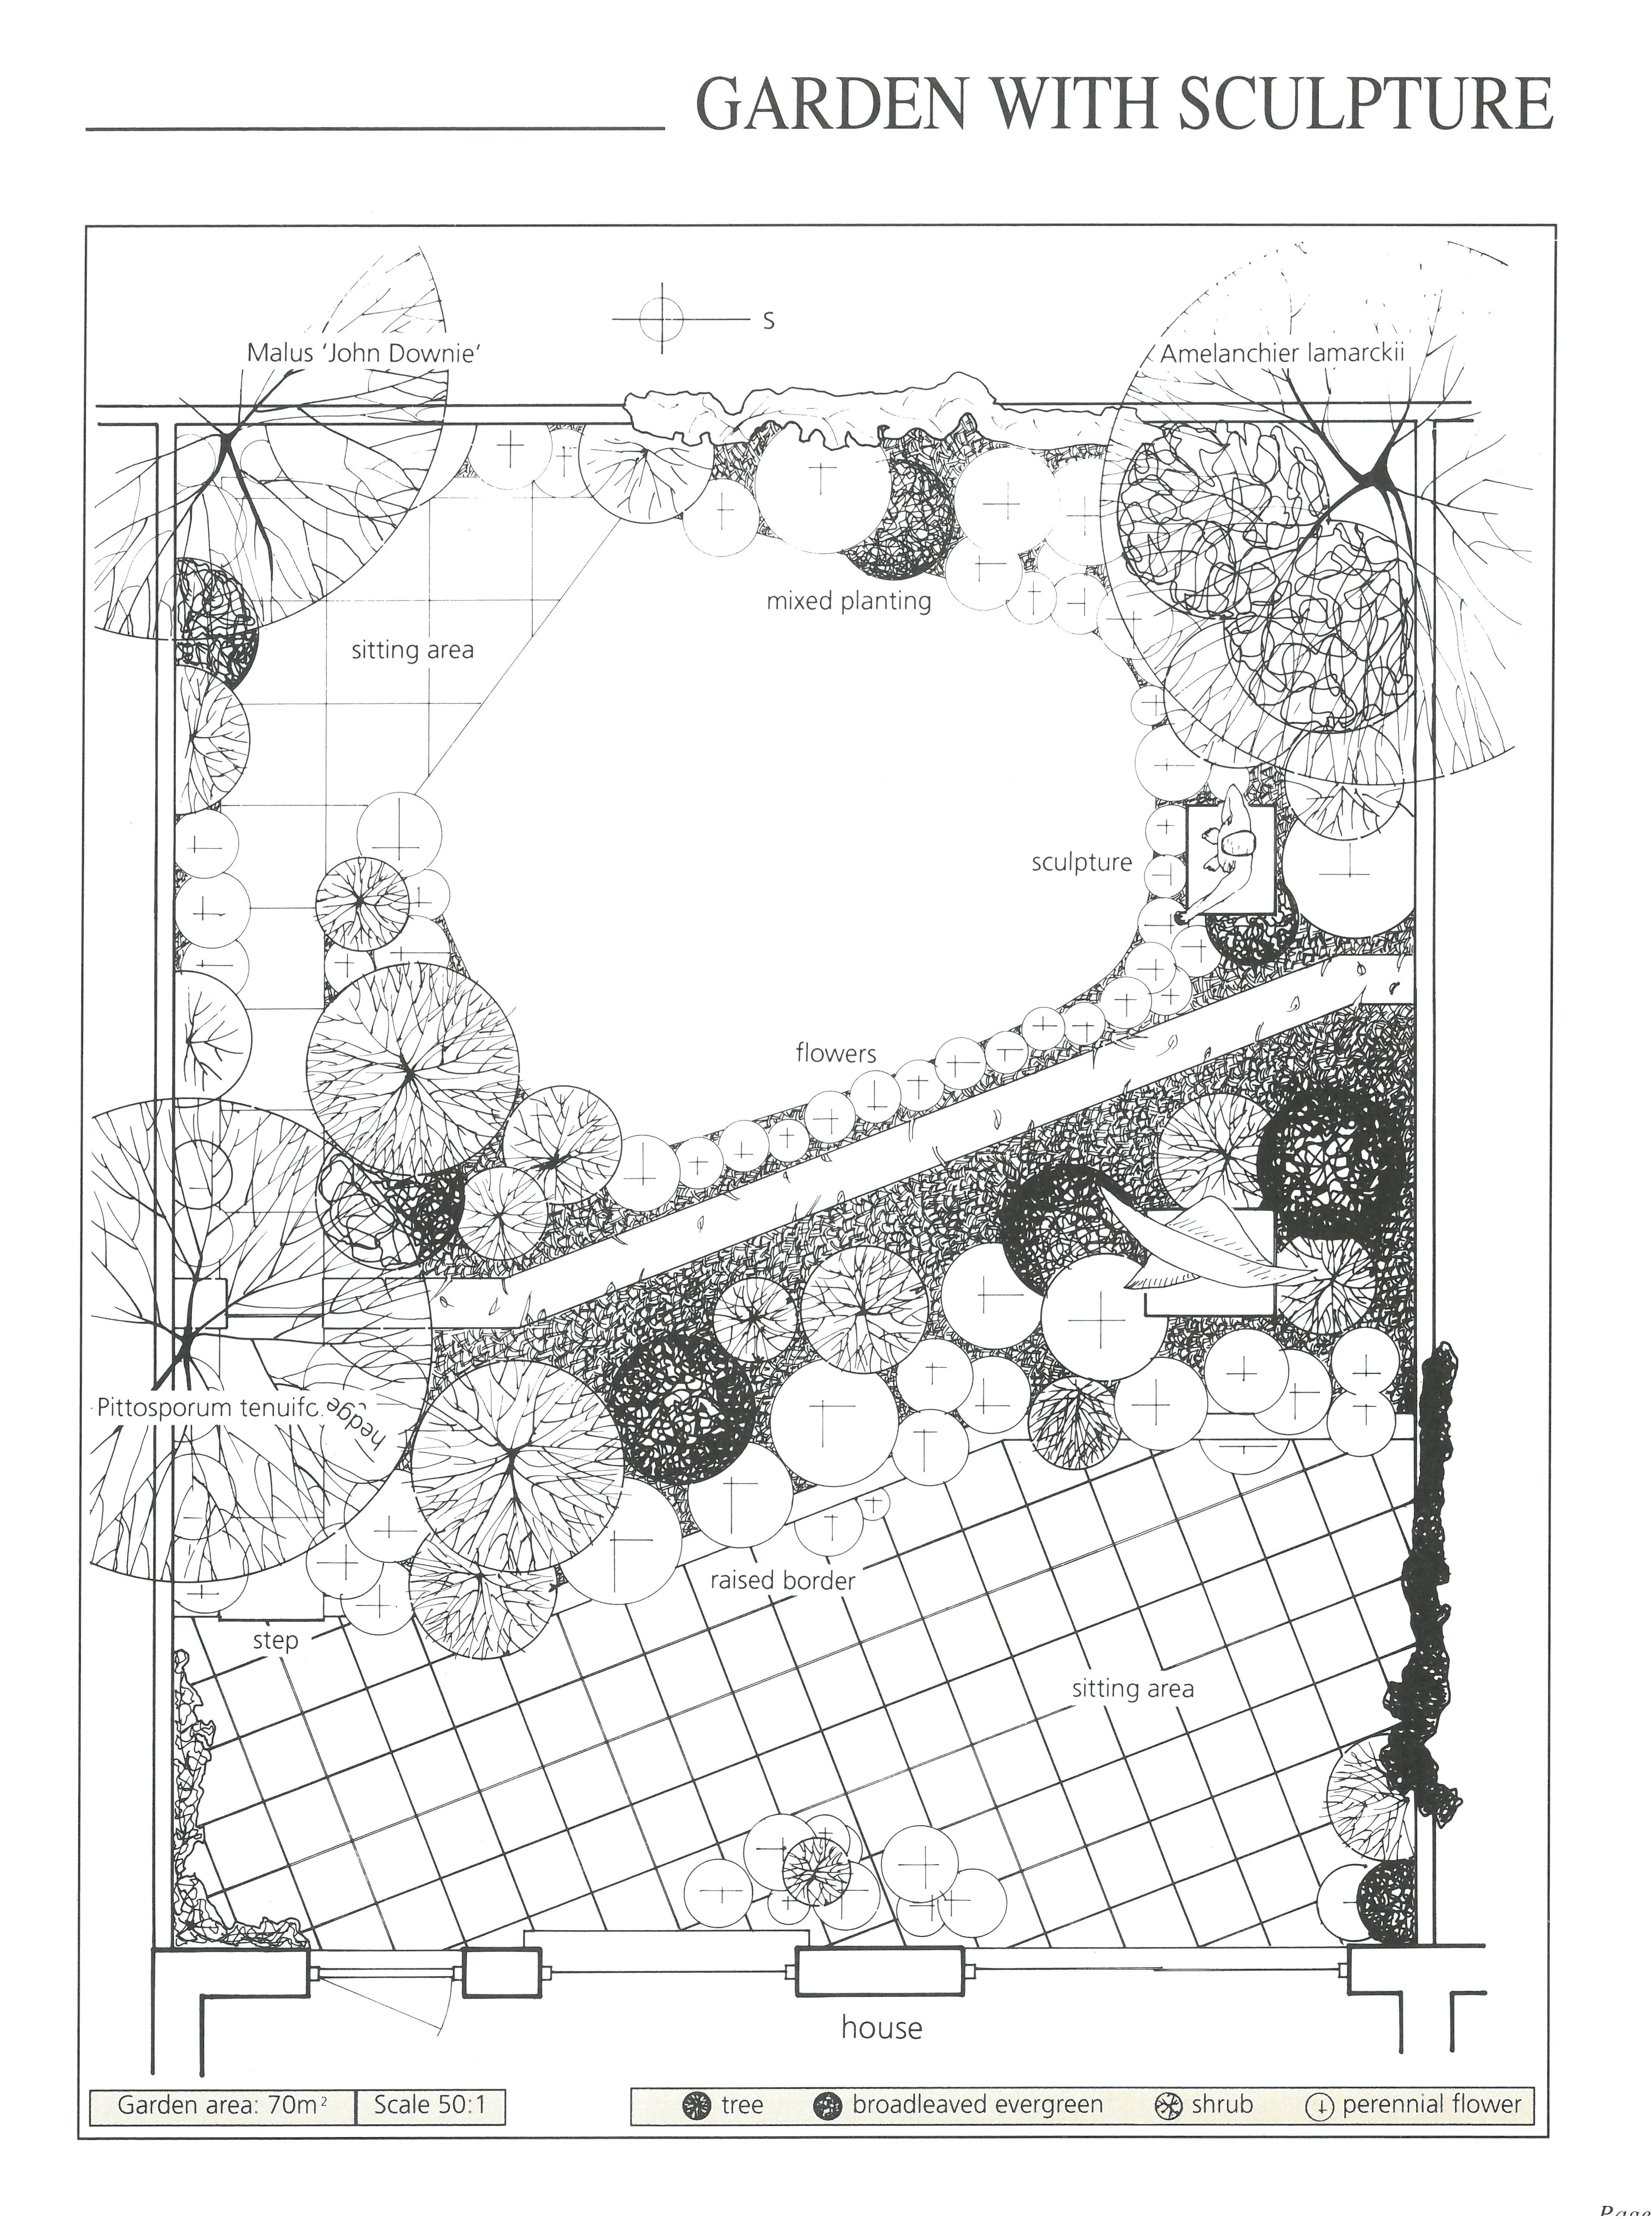
Case Study No. 3
Click here to view bigger sized drawing
Hard landscaping:
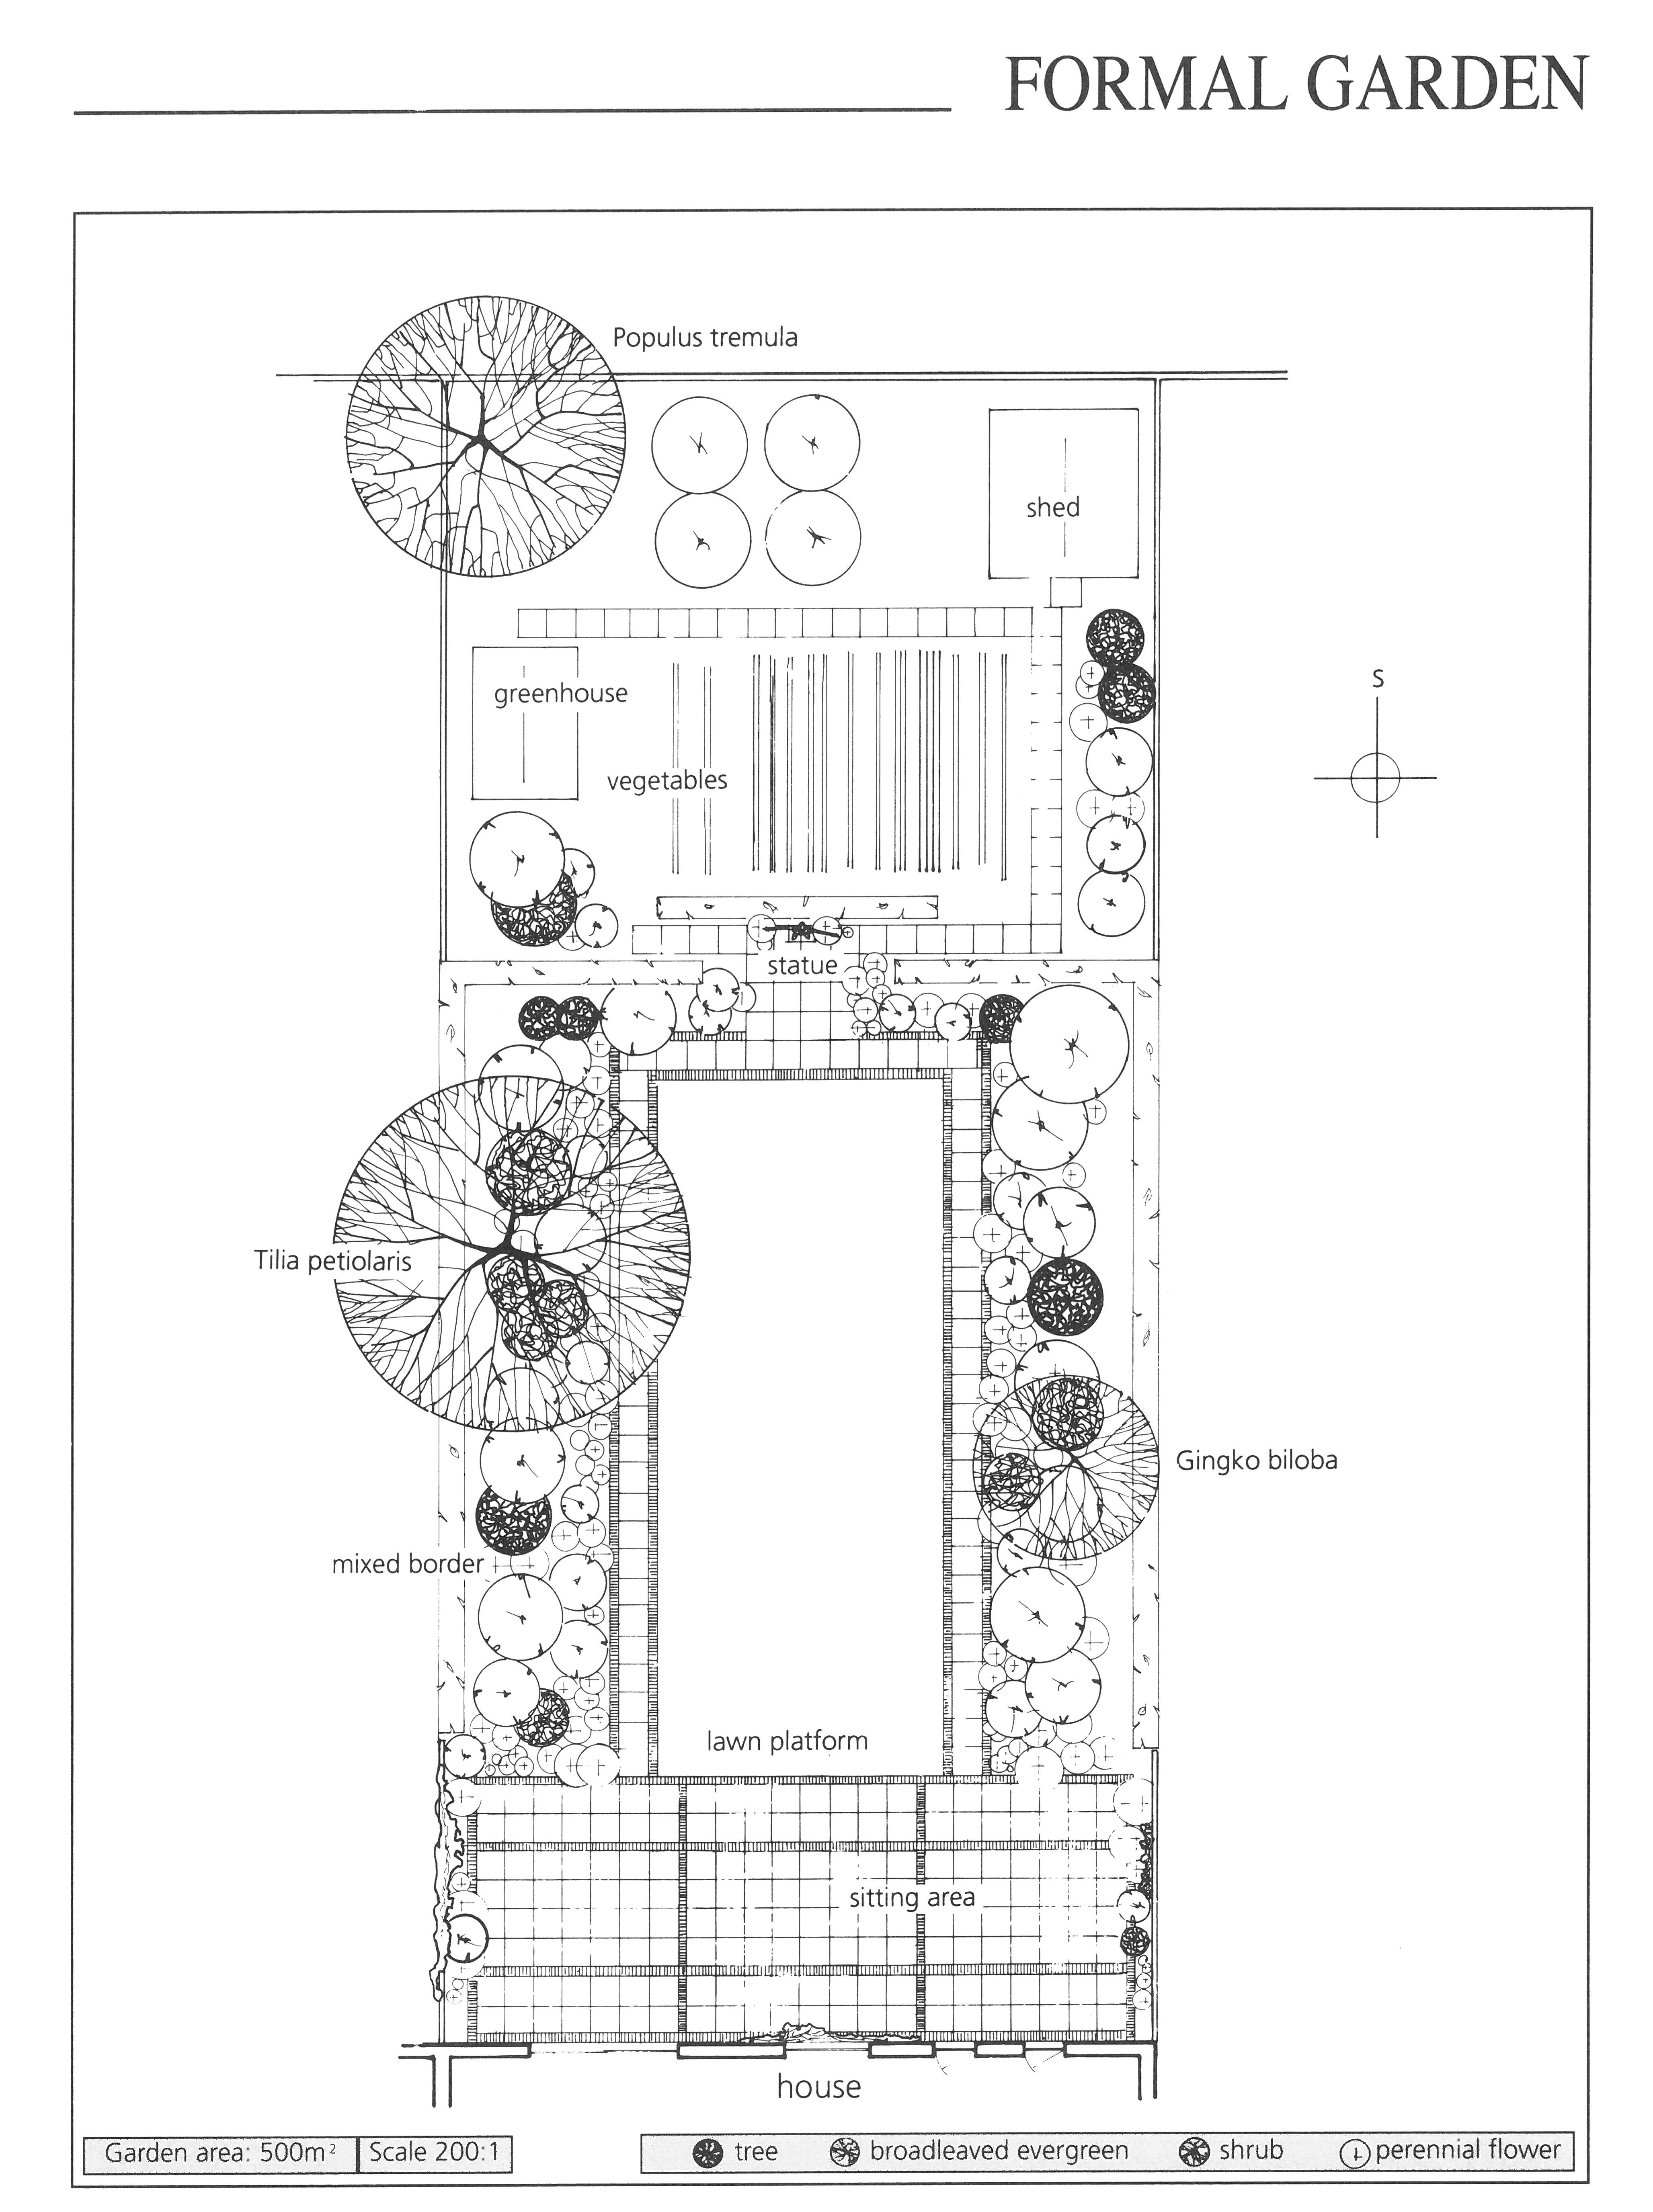
The garden is divided into two areas, an ornamental area and a kitchen garden. The ornamental area is divided into a paved area with 60 cm square grey concrete slabs and red bricks laid on edge, a lawn area and two straight borders marked out by paths of concrete paving and bricks. A piece of sculpture is set on the central axis of the garden where the ornamental paths meet the service paths to the vegetable area.
Planting:
The central lawn area is a slightly raised (10 cm), grass platform. The ornamental area is backed by hedges to make a foil for the border plants. These are mostly shrubs with perennial flowers to the front of the border, spilling onto the paths. Little mixed beds flank the paved area and provide rooting for climbers on the walls. A couple of trees, one of eight metres crown, ‘lift’ the flatness of the hedges and lawn area.
Garden style:
A formal symmetrical style with matching rectangular patterns in the paved area, paths and borders, setting off the informality of plants. The colour and shape of the plants, especially the uneven sized trees break the symmetry. The sculpture emphasises the symmetry. The lawn platform could alternatively be lower than the paved area, making a sunken lawn.
Maintenance and cost:
Considerable maintenance; vegetables, mowing, hedges. Formality needs to be tidy. Relatively expensive; extensive paving, sculpture, greenhouse, a lot of plants.
Assessment:
Hedge, wooden fence (1.5 m high), wall at rear; level ground, garden faces west, overlooked from second storey. Problem – to hide a service path and oil tank.
Scanner Q76
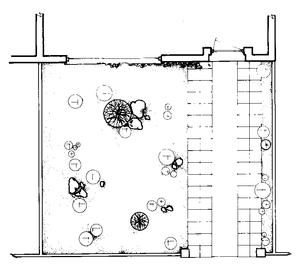
Case Study No. 2
Click here to view bigger sized drawing
Hard landscaping:
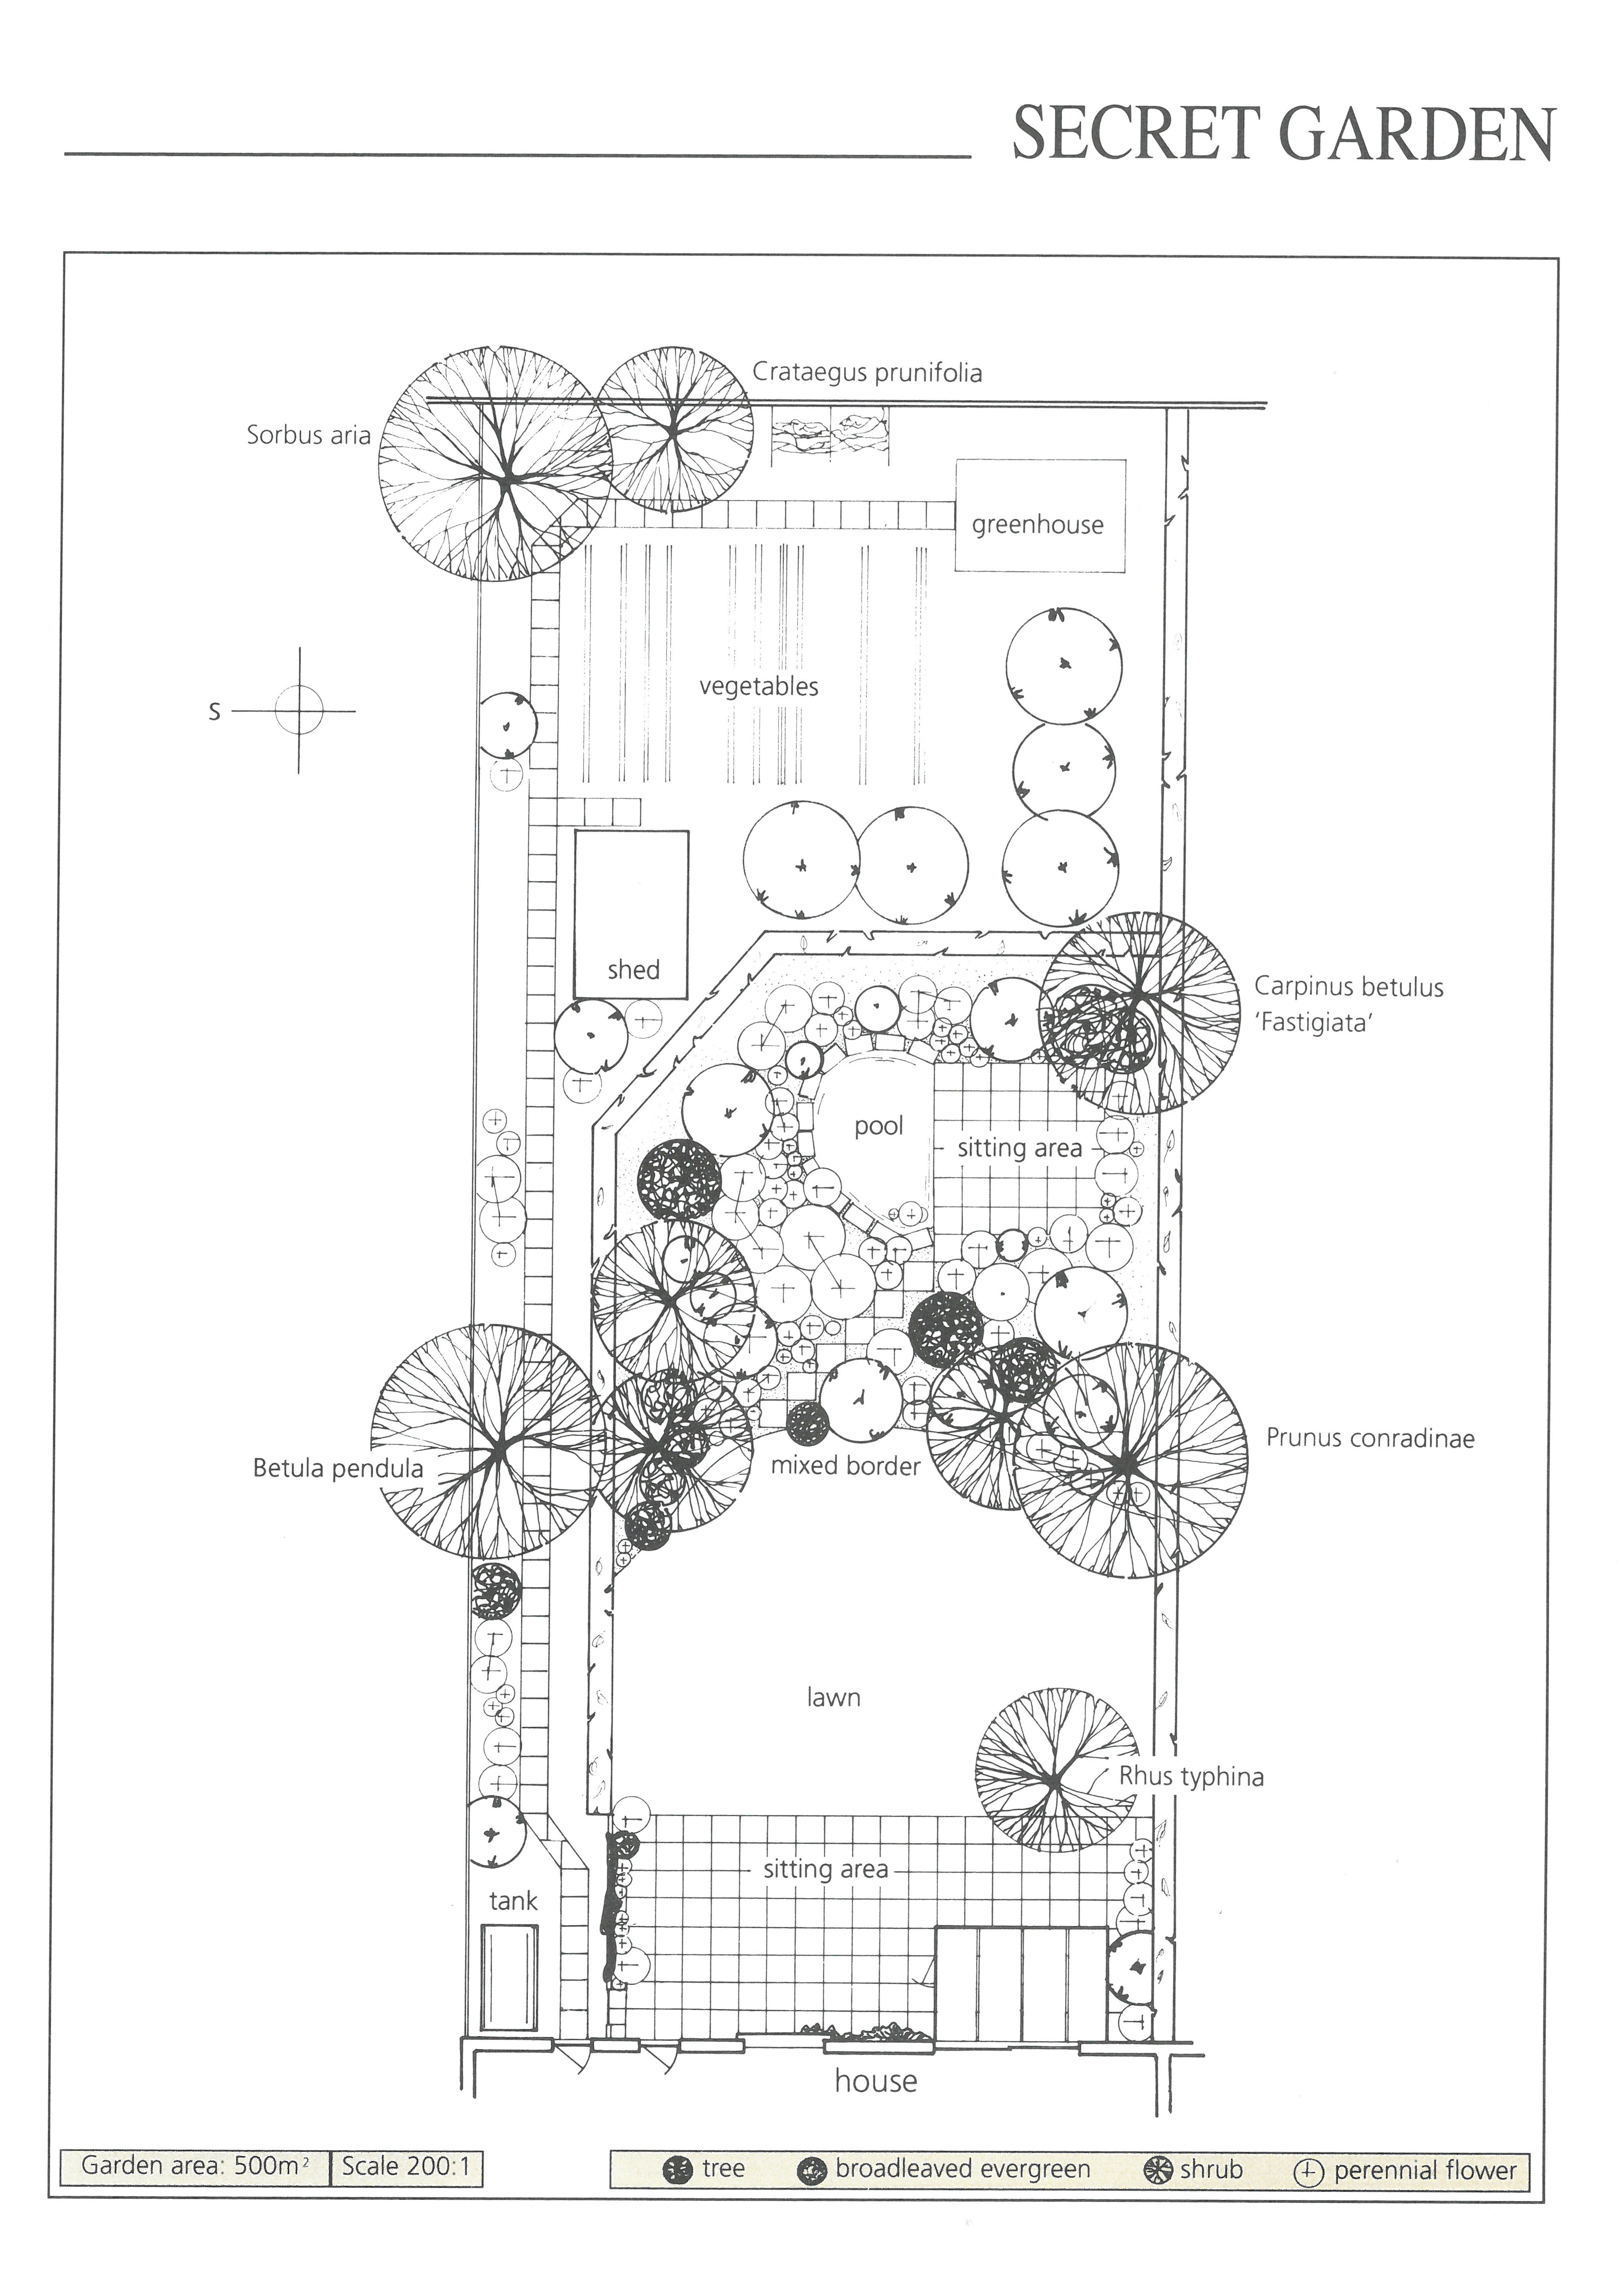
The garden is wide enough to have a service path run behind a screen wall and hedge to a kitchen garden at the back with a shed and a greenhouse. The ornamental area is further divided into a paved area of 60 cm square concrete slabs with a conservatory, a lawn area and a ‘secret’ garden with small paved area and pool This self-contained garden is hidden within a deep border.
Planting:
The lawn area links the paving and conservatory to the deep border, which contains the bulk of the garden’s ornamental plants. Those near the lawn are tall to hide the secret garden and its access pathway. Some trees help to divide the different parts and also provide privacy. There is a specimen tree near the large paved area. Both sitting areas have ornamental planting but the secret area has most. This is a mixture of shrubs and perennial flowers. The hedge and some of the shrubs are evergreens. A few plants decorate the service path to the fruit and vegetable area.
Garden style:
A semi-formal style, the straight lines of the hedge and paved areas bring in a formal element and make a good foil for the informality of plants. The secret area could be sunken to reinforce its seclusion.
Maintenance and cost:
Considerable maintenance; vegetables, greenhouse, conservatory, mowing, weeding. Relatively expensive; conservatory, paving, pool, greenhouse.
Assessment:
Hedge and wooden fence (1.8 m high) on either side, wall at the back, slightly sloping ground near the house (fall 1 in 50), garden faces west, not overlooked.

Scanner Q76
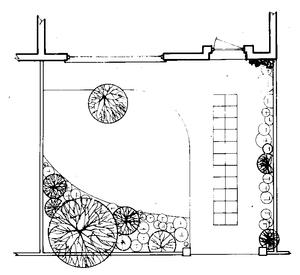
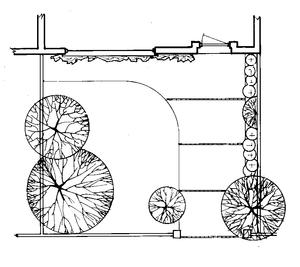
Case Study No. 1
Click here to view bigger sized drawing
Hard landscaping:
A low (30 cm), retaining wall divides the area paved with 60 cm square concrete slabs from the lawn terrace. A trellis fence (1.8 m high) divides the terraced area from the service area to the rear. A path of slabs runs through a border to this area that contains a storage shed, compost area, clothesline and children’s swing.
Steps placed at an angle lead the eye away from the service path. A broad curving border mulched with shredded bark skirts a lawn area and narrow beds from two sides of the paved area. Some clay pots ‘break’ up the area of paving.
Planting:
Lawn covers the middle terrace and the service area, which doubles as a private sitting area, screened off by the trellis. A number of trees, both inside and outside, provide structure and background. The borders are planted with a varied mixture of shrubs (including broadleaved evergreens), perennial flowers and bulbs.
The clay pots have permanent plants as well as annuals. Climbers are trained on the trellis fence, boundaries and house wall. Columnar plants ‘lift’ the flat surfaces of the fences.
Garden style:
An informal style that seeks to counterbalance the narrow straightness of the site. The division helps to give each of the three areas a sense of proportion.
Maintenance and cost:
Medium maintenance; mowing, weeding, less work as the garden matures. Moderately expensive; paving and trellis the significant cost items.
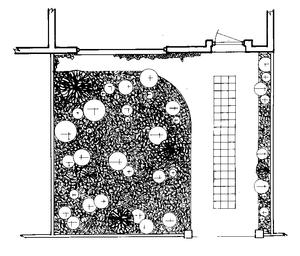
Assessment
High walls (1.8 m), garden faces west, not overlooked.
Scanner Q76
Case Study No. 7
Click here to view bigger sized drawing
Hard landscaping:
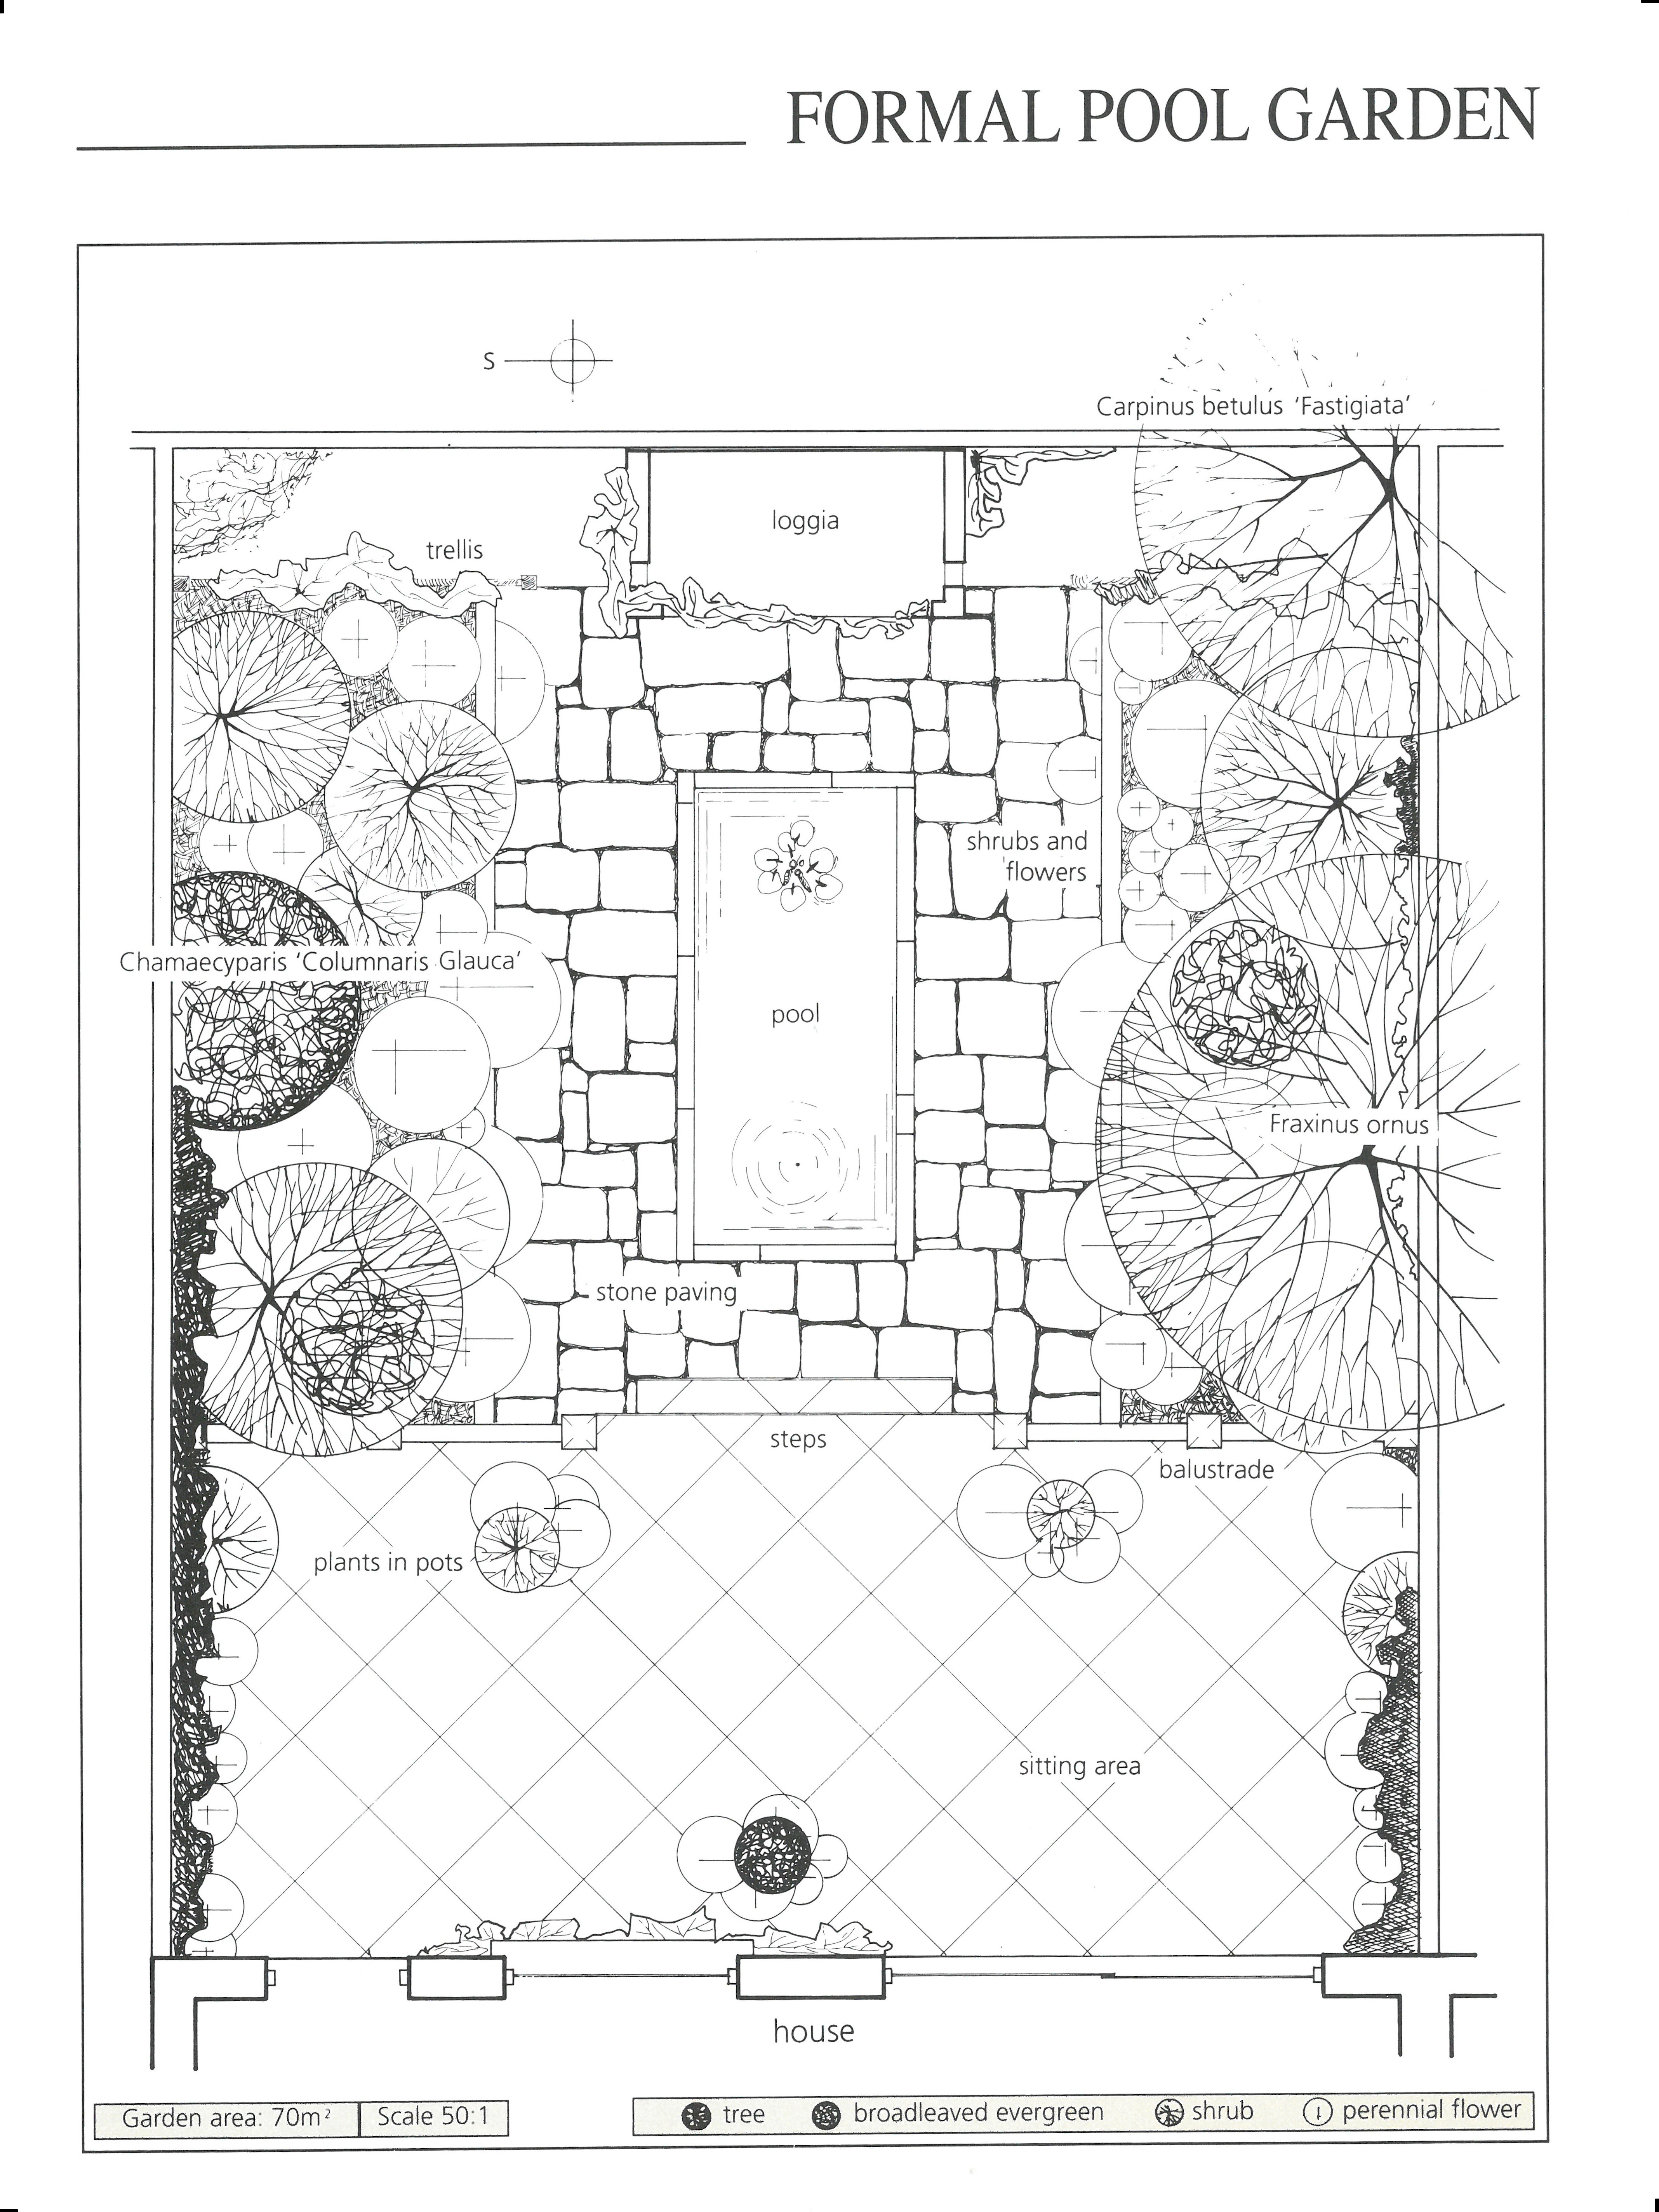
The garden is in two parts; a slightly raised (20 cm) terrace paved with 40 cm square concrete slabs, and a lower area of stone paving with a formal pool and raised (15 cm) borders with low retaining wall of the same height. A low balustrade (60 cm) of concrete divides the two areas; two ten centimetre steps provide access.
At the end of the garden facing the terrace across the pool is a small loggia. Trellis fence on either side of the loggia hides service areas. Some containers relieve the flat, hardness of the paved area. Hidden floodlighting and white lights under water for dramatic night-time effect.
Planting:
Two columnar trees emphasise the lines of the pool, loggia and straight borders. Two others, on clean stems, have rounded crowns to contrast. The borders have a mixture of small shrubs, perennial flowers and a lot of bulbs for year-round interest. The pots on the paved area have colourful annuals and a few more permanent plants. Climbers decorate the walls and make use of the vertical space.
Garden style:
A very formal style with strong symmetry, the informality of plants providing strong contrast. A lot of hard materials – paving, balustrade and loggia providing a great deal of interest and setting off plants well.
Maintenance and cost:
Easily maintained when established; some watering. Expensive; loggia, formal pool, paving, balustrade, lighting.
Assessment:
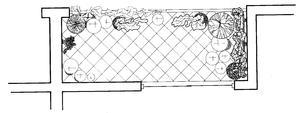
Wooden fences (1.8 m high), sloping ground (fall 1 in 50), garden faces west, overlooked.
Scanner Q76
Case Study No. 6
Click here to view bigger sized drawing
Hard landscaping:
A low (20 cm) retaining wall built of broken concrete slabs, and capped with halved slabs, divides the garden. The soil excavated from the paved area was used to terrace the lawn area above. The area of 40 cm square concrete paving slabs was laid diamond pattern for ornamental interest.
Some beds of various sizes have been made by not paving out to the boundary. A flight of two (10 cm) steps has been made with the same paving slabs to provide access to the terrace area. A curved bed at the back of the terrace provides space for plants. Lighting would highlight the paved area at night, in particular the steps.
Planting:
A lawn area covers the top terrace. There are two specimen standard trees in this area. These two and a third in the back border, provide privacy for the sitting area. The border and paved area beds have a variety of shrubs and perennial flowers. Climbers help to soften the lines of the wooden fences, and provide additional interest.
Garden style:
A semi-formal style; the formal straight lines associated with the geometric shapes of the paving and steps, the curve with the more informal border. The steps lead attention to one side across the garden to deflect from its short length. The design could be used on ground sloping either towards the house, as here, or away from it.
Maintenance and cost:
Some maintenance; mowing, weeding and tidying. Reasonably expensive; paving, lighting, earthworks, especially if labour is hired.
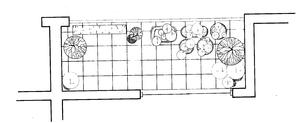
Assessment:
High walls (1.8m), ground slopes towards house (fall 1 in 50), faces east, overlooked to rear.
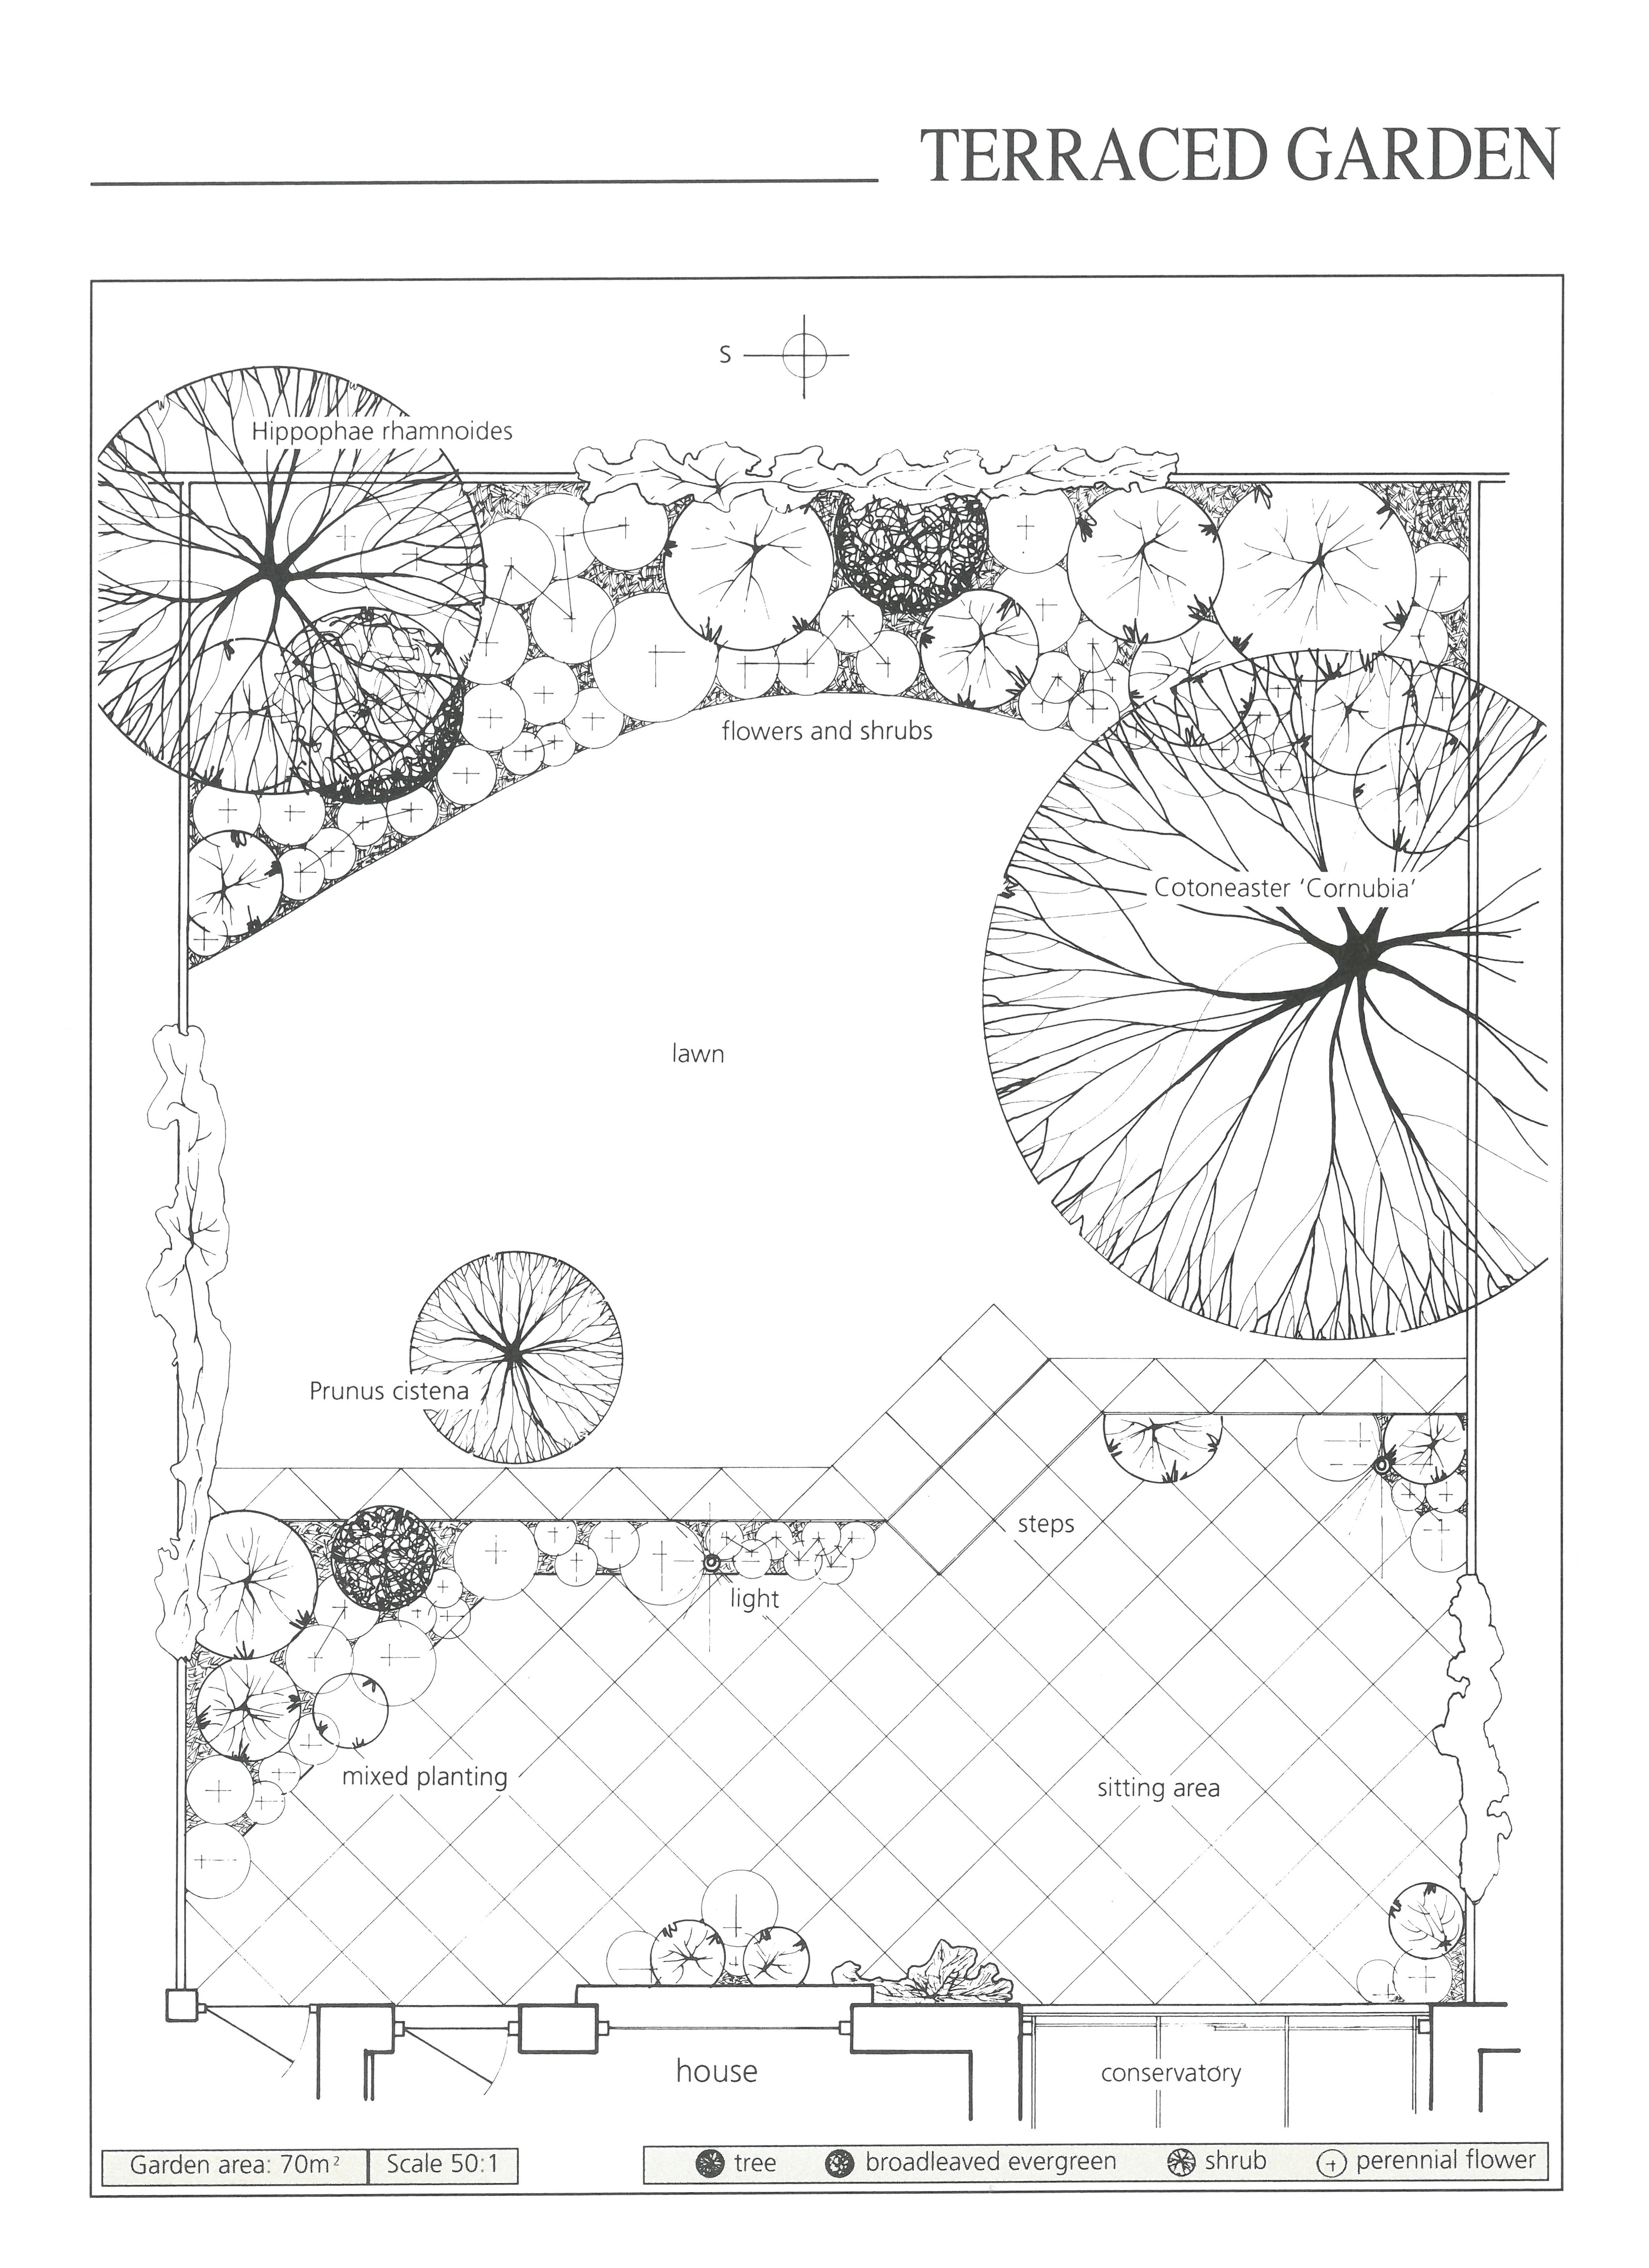
Case Study No. 5
Click here to view bigger sized drawing
Hard landscaping:
An area of 40 cm square concrete paving slabs, laid diamond pattern, joins the back of the house and is bounded by a low retaining wall (10 cm), the earth from the paved area being banked up. Some pots ‘break up’ the paved area.
A paved path links this area to a second small paved area hidden from view behind a hedge that divides the garden at an angle. One piece of sculpture is placed in the angle of the hedge, a second in the hidden part of the garden. Lamps dramatically light the sculpture at night.
Planting:
Three trees with clear stems, and the hedge, provide privacy. Borders on either side of the hedge are planted with shrubs, perennial flowers and bulbs for year-round interest. A small lawn is a foil for plants and sculpture. No strong colour is used, and mostly green plants are placed near the sculpture.
Garden style:
A semi-formal style with the paving in diamond pattern and the hedge picking up that line. The hedge (1.5 m) causes enclosure in a small garden, but adds mystery and variety. The pieces of sculpture distract from the feeling of enclosure, adding powerful interest in a small space.
Maintenance and cost:
Moderate maintenance; tiny lawn, weeding, tidying. Expensive; sculpture, paving, lighting. Semi-mature trees might be used for quick effect.