Post category: Garden Skills
A very wide range of irrigation equipment is available for garden use. Being made of modern plastic materials, it is relatively inexpensive. Much of this can be installed by the home owner, but larger gardens might need the services of a professional installer.
A hose, and perhaps a sprinkler, are essential in a large garden with a lot of watering to be done, or a garden on dry soil. A garden with a lot of pots will need a hose to speed up the frequent watering required. Very handy attachments such as storage reels for hoses are available. Sprinklers can be attached to tap timers to control the amount of water delivered.
A soak-hose, or leaky hose, has pores that allow water to seep out, gently watering the soil along its length. This can be left in position for long periods if necessary, for instance to establish a hedge in dry ground.
Fixed irrigation systems with drippers or small sprinklers are available for large and small gardens, and fixed lines with drippers are very convenient for watering containers, especially baskets and window boxes that might be inaccessible.
A set irrigation system is very convenient if watering must be repeatedly carried out, for instance, in the dry shade of trees.
Spade
The basic gardening tool is the spade, used for digging, planting, hoeing, shovelling, and cutting lawn edges. Long-handled spades have more leverage when digging, but the short-handled spade encourages the user to grip the handle lower down – more under the load, and to use the leg muscles more.

The T-piece, or D-piece on the short-handle type, gives some twisting leverage – a help when turning over spadefuls of soil during digging. Use whatever feels comfortable; for example, tall people do not usually like short-handled spades.
Rake
A rake can be used to make a fine seedbed, to open and close seed-drills, to remove lawn clippings and leaves, to tear out moss and dead grass, and to freshen up gravelled areas and flower beds. Long, even strokes of a rake are best, so a long handle is essential. The head should not be very wide, or too narrow. The teeth should be straight, or only slightly curved, and set not too far apart.
Hoe
There are basically two types of hoe: push hoe and draw hoe. With a push hoe, the user moves backwards on to the un-hoed ground, and thus avoids walking on the newly-hoed weeds. With a draw hoe, the user moves forward towards the un-hoed ground and walks on the newly-hoed area. Raking off the hoed weeds is essential to prevent re-rooting.
A draw hoe is easier to use because the weight of the arms is brought down to help with the weed-cuting action, whereas the pushing action of a push hoe requires the weight of the arms to be lifted at the same time.
A draw hoe can also be used in a standing position with a sweeping brush action to control light weed growth, and this gives the back a rest. A good hoe of either type should be of solid material and have a long handle. It is the main weapon against weeds.
Trowel
A planting trowel is essential for planting bedding and vegetable plants. The handle should be fairly short, and broad and smooth at the end for comfort in the palm of the hand. The blade should come up close to the end of the handle.
Ideally, the blade should be slightly curved – making it easier to take out a planting hole quickly, but not so curved as to have moist soil stick to it. The trowel can also be used to assist hand-weeding. Little hand-forks are useful for this.
Secateurs
The secateurs, or pruners, is the basic pruning tool. Essential for roses or fruit trees, it will be needed for shrubs on occasion, too. Secateurs are ideal for dead-heading, and for cutting flowers and foliage for indoor use.
The type with a curved blade cause less damage to the bark of the pruned stem. Buy a good quality secateurs because, being better designed, they are easier to use, and last longer. A comfortable hand-grip is important.
Hedge-clippers
A hedge clippers is essential if there is a hedge to be trimmed, but they can also be used to keep lawn edges neat. Hedge-clippers should not be used on shrubs, except in certain cases, such as heather, broom and lavender where there are a lot of shoots close together.
It is useful for trimming rockery perennials after flowering. A big range of sizes and designs is available. Choose one with a lock-nut assembly, which allows it to be tightened properly.
Watering can
A watering can has a vital role in ensuring the establishment of young plants of all kinds. It can also be used to apply weedkillers on paths and lawns. It can be used as a substitute for a sprayer to apply insecticides too. Most watering cans are sold in a 10 litre size, which is ideal – not too heavy when full.
Use a watering can rose of a fine droplet size for a wider range of uses, including watering seedlings and applying weedkillers. If the can is used frequently for weedkilling, it might be advisable to have a separate can for that purpose to avoid mishaps if it not properly washed out.
Garden fork
A garden fork can be used for digging; it is an essential piece of equipment on stony ground. It is useful for picking up debris such as prunings. For compost-making, it is a tool without which it is difficult to keep the heap tidy. Though not suitable for digging, a dung fork is more useful for the other tasks mentioned.

A fork is good for digging stony ground
Lopping shears
A long-handled lopping shears is useful if a lot of roses, or fruit bushes are grown, and it is handy for pruning shrubs too, making it much easier to reach down into the tangle of branches and easier to reach high branches too. It will deal with branches too large for the secateurs, because the long handles give the user more leverage.
Edging shears
An edging shears is very useful if there is a lot of lawn edging to be cut around flower beds and pathways. The long handles make this job easier on the back. Awkward to use at first, the edging shears takes a little practice.
Riddle or garden sieve
A riddle is necessary if garden soil must be sieved for home-made composts, it is very useful for sieving out coarse pieces of moss peat.
Garden line
A simple piece of equipment for getting lines of vegetables, bedding, roses and hedging straight. A good line can be made from coloured nylon builder’s line, tied to and wound around two pieces of metal rod or hardwood, about 30 centimetres long.
Pruning saw
A pruning saw is a very useful tool in an established garden with trees and shrubs, it is essential if sizeable branches have to be removed. A bow-saw is necessary for tree branches and can be used to cut up firewood as well.
Vegetable area and flower beds or borders
Cultivated areas, such as the vegetable area and flower beds, should first be made weed-free by removing perennial weeds while digging, or by using Resolva or Roundup in early summer, if the ground has been neglected.
Early digging in the vegetable area buries weeds before seed formation. Cultivated soil may be kept free of weeds before the vegetables or flowers are sown or planted, by hoeing, or spraying with Weedol, when the weeds are still small. Where vegetables or flowers have been sown or planted, only hoeing and hand-weeding may be used.
Established shrub borders, rose beds and fruit plantations
New planting should be treated as above, for a year or two. After that, hoeing and Weedol may be used to dispose of annual weeds. Tumbleweed, Roundup or Brushwood Killer may be used to carefully ‘spot-treat’ perennial weeds.
Paths, driveways, patios
Where there are no plants that might be damaged, chemical weed killers and preventers are ideal. It is often difficult to hoe or handweed in these situations because weeds have their roots between slabs or cracks in concrete. Specially formulated mixtures of weed-killing and weed-preventing chemicals are sold for use on these areas.
These are used as a single dose solution to both existing weeds and germinating weed seeds and are applied in spring or early summer, such as Pathclear.
Moss and algae can be killed on paths, walls or tarmac by spraying with Mosgo or mosskillers. Sweeping paths and drives to prevent debris building up helps to prevent moss and algae. If tree seedlings, brambles or briars need to be killed, use Brushwood Killer. Asulox will kill bracken.
Chemical weedkillers work by destroying the foliage, or by poisoning the weed plant’s internal system. Weedol, Gramoxone and Basta destroy the foliage, the green top of the plant. If the weeds sprayed are annuals without storage roots, they die. Perennial weeds survive Weedol, Gramoxone and Basta in the same way as they survive hoeing.
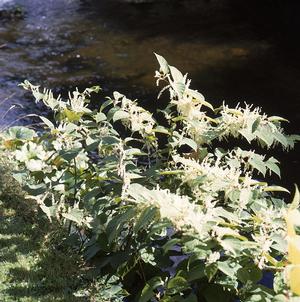
Deep-rooted japanese knotweed is difficult to kill without chemicals .
Tumbleweed, Roundup and Brushwood Killer work by poisoning the weed’s internal system, which means they have the ability to kill perennial weeds. These chemicals are taken in by the foliage and then passed right down into the storage root system. This makes them more effective than digging for the disposal of perennial weeds.
These translocated weedkillers are very specific though in the way they work, and in what they kill. Roundup kills both grasses and broadleaved weeds. It needs six hours without rain, after application. Brushwood Killer kills broadleaved weeds only and growth must be active. Repeat applications may be necessary. Read the instructions carefully.
There are several chemicals that may be used to stop weed seeds from germinating. These are called residual weedkillers and are used in combination with the contact weedkillers to control weeds on paved areas.
The application of a layer of material free from weeds or weed seeds is very effective in preventing weeds. Weed seeds germinate but die because they lack adequate light. Loose mulches, such as compost, manure, bark, grass clippings, peat or gravel must be thick enough to block out light.
These only work when applied to weed-free soil, and in the case of manure and compost must be well-rotted and weed-free themselves. Organic mulches have to be topped up every couple of years, because they break down, themselves providing excellent rooting conditions for blown-in weeds.
Gravel must be kept free of fallen leaves, for the same reason. Thick black polythene is an excellent mulch, and may even be used to kill existing weeds, but it tends to split and break up after a few years. A combination of polythene and gravel is long-lasting, the gravel shielding the polythene from the sun. But weed seeds can begin to grow in the gravel.
Weed-preventing fabrics are better than polythene for this purpose because they allow water to pass through to the soil beneath. Plant debris, that would build up and provide rooting material for weeds, is more likely to rot down and pass through to the soil beneath.
Old carpet, or thick layers of newspaper or cardboard, can be used as light-excluding mulches to achieve weed control. These do not last very long but can be very effective while they last.
Hand weeding
Pulling up weeds by hand from among garden plants is the oldest and surest way of separating out the unwanted. Weeding by hand is very effective, but slow, and suitable only in close to plants where hoeing might cause damage. An old kitchen knife is a useful aid to hand-weeding.
Shake the soil off the roots of weeds after pulling them up and collect them in a heap or a weeding bucket as the work is carried out. This approach prevents the weeds rooting again, as many weeds are capable of doing.
Hoeing
Hoeing is a quick, effective, safe and cheap way of controlling weeds, with little or no damage to crop plants. Hoeing must be done while the weeds are small. The ideal stage is when they have one or two ‘true’ leaves, and are just a couple of centimetres high. The hoe separates the top from the root, and the weed seedling dies.
Hoeing too early might only move the seedlings about, because the root may not be deep enough to be caught by the hoe. Hoeing at the right stage will kill perennial weed seedlings before they get a chance to develop their storage root survival system. Hoe on a warm, bree day, so that the weeds dry out before they get a chance to root again.
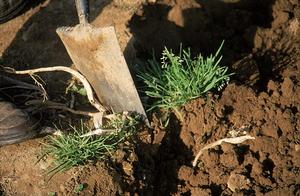
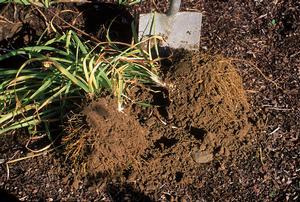
Digging
Perennial weeds that have developed their storage roots will not be controlled by hoeing – they simply grow new leaves. Instead, they must be dug out. Use a fork or spade, and make sure to get the entire storage root system. Leave the lifted weeds on a hard surface to die.
A weed is a plant in the wrong place – grass is okay in a lawn, but not in the flower bed alongside. Weeds compete with garden plants for space, light, water and nutrients.
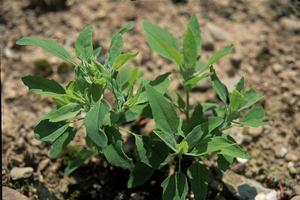
Young seedlings of fat hen weed
Annual weeds are wild plants with a remarkable ability to produce seed quickly and in large quantities. They grow fast, reach flowering size in a matter of weeks and shed seed – each new generation spanning as little as eight or ten weeks.
Under natural conditions, the annual weeds exploit temporary disturbance of the soil and in the garden, they are weeds of cultivated ground, taking advantage of the soil being broken up for crop plants.
It is essential to prevent them getting big enough to produce seed. They have no other means of survival or spread, so the cycle is easily broken. There is a reservoir of weed seed in the soil, which is added to each season.
If seed production is prevented, the reservoir declines as the weed seeds get older and lose their ability to germinate. There is a lot of truth in the saying – ‘one year’s seeding is seven years weeding’. Common annual weeds include groundsel, shepherd’s purse, chickweed, annual meadow grass and speedwell.
The perennial weeds are persistent weeds that, once established, spread until they take over the available ground space. They survive over winter by dying back to a network of thick, fleshy storage roots, or a tight rosette of leaves. Each year the storage root network becomes more extensive, and this is the main method by which these weeds spread.

Broadleaved dock – a troublesome weed
They may be controlled by removing the root system completely, or by killing it with weedkiller. Removal is difficult, since even small pieces of root may be enough for the weed to regenerate. Ground made free of perennial weeds is reasonably easy to keep clear.
Hoeing will prevent establishment from seed, and if the root ball of every new plant is checked for the presence of perennial weed roots, there is no way they can get in.
Perennial weeds infest both cultivated and uncultivated ground. They prefer less actively cultivated ground, such as a shrub border, where their root systems will not be disrupted so much.
Only a few, such as bindweed and scutch, are vigorous enough to tolerate continuous disturbance. Other common perennial weeds include nettles, docks, bishop weed, creeping thistle and dandelion. Many lawn weeds are perennials too, principally within lawn areas but also occur in flower beds, especially dandelion, clover, buttercup and daisies.
Living plants act in the same way as mulches to prevent weeds – by blocking access to light. Any low-growing, spreading plant, either woody or herbaceous, can be used, some being better than others. A few weeds will always appear through gaps – especially in the early years. On occasion, the ground cover itself may become a nuisance.
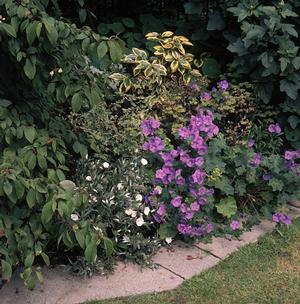
Lots of plants – no room for weeds
Commonly used ground cover plants include hardy geranium, St John’s wort, vinca, ivy, ajuga, lamium, acaena and bergenia. But any plant that spreads to cover the ground with foliage can be considered as ground cover and this means most perennial flowers and shrubs.
The principle is to cover the soil with desirable plants to deny weeds the space, moisture, light and nutrients they need. If garden plants are well planted and cared for until they are established, they will compete strongly with weeds, and greatly reduce the effort of weeding.
Garden compost
Good hygiene – clearing away old crops and weeds – is an important preventative measure against pests, diseases and weeds. In addition, there is always a lot of grass clippings, and foliage from hedge-trimming and pruning – not to mention fallen leaves! The best way of disposing of this material, turning it into a valuable asset – garden compost – is to set up a compost heap.

All sorts of plant material can go on the compost heap .
Simply stack up a 25 centimetre layer of plant waste in an out-of-the-way corner. Start another layer of plant material and repeat the procedure until the heap is about 90 centimetres high, and 150 centimetres square.
Timber or galvanised sheeting can be used to retain the sides of the heap. Turning the heap speeds up the process. The compost is best left for a year or so, but can be used after six months if sufficiently decomposed.
Leaf mould
Leaf mould for use as an ingredient of potting compost – a peat substitute – can be made by gathering leaves in autumn and placing them in a separate heap made in the same way as described for a compost heap. Place and old carpet on top to keep moisture in and maintain a little downward pressure on the heap. Do not add soil or any other material.
The leaves will rot down and can be turned after one year. They may need to be watered in dry weather. After a second year, the leaf mould will be dark and crumbly and it can be run through a shredder to break it down and make it finer.
Potting compost
Home-made potting composts can be quite satisfactory. They are made from soil, peat or leaf mould, and sand in the ratio 7:3:2 by volume. The soil should be good quality garden soil, sieved to remove big stones.
For seed compost, the soil can be sterilised by cooking in an old saucepan, or such like, for about half an hour, but this is not necessary for potting compost, and it is not even desirable because it destroys useful soil predators and parasites that offer a good level of protection against vine weevil larvae.
The steam generated by heating the soil kills pests, diseases and weeds. After about half an hour of good steam, allow the soil to cool and then mix it with the new peat and sand. The latter should be clean horticultural sand, and if not, sterilise it too. Do not use sea sand.
Into the mix, put John Innes Base Fertiliser at the rate specified on the pack. This varies depending on how rich a compost is to be prepared. Compost for seedlings and small plants need not be rich – older plants need more food. Lime will need to be added if the soil used is acidic.
Outdoors, plants depend on natural rainfall but watering can be necessary if rainfall has been inadequate, or if a plant’s root system is not properly established. Seedlings, young plants – especially vegetables – and plants growing in shallow or dry soil, are principally at risk. Watering is obviously necessary indoors. The sections on Greenhouse Growing and House Plants go into some detail.
Plant requirements
Normal summer rainfall is at least 50 millimetres per month. This amount closely matches plant requirements. Twenty-five millimetres of rain is equivalent to almost 25 litres of water per square metre. If there has been no rain for a week, plants need about 12.5 litres per square metre – perhaps even more if the weather has been very hot. Established plants with deep roots can keep going in a spell of drought, but young plants may come under stress.
Water application
Apply water to vegetables, lawns, flower beds and borders and rockeries with a hose and sprinkler. Allow enough time for an adequate amount to be delivered, letting it soak down where it will be effective. Heavy, short bursts are no good – the water just runs off.
When watering larger plants, make a little dyke around them and fill it inside with water. Re-fill it, if the water disappears quickly. Shallow rooting shrubs such as rhododendron often need this attention, even as established plants. Wall shrubs, too are very drought-prone because to the rain-shadowing effects of the wall.
Scattering out powders or granules by hand is quite a difficult skill that can only be acquired by practice. Start by measuring the area of ground over which the substance is to be scattered. Simply pace out the length and width, and calculate the area.
Multiply the area by the application rate per square metre, and then measure out, or buy, enough of the substance for the area. Divide the quantity evenly into two buckets.
Aim to spread the material in parallel strips about 2 steps wide.
Put a stick one step in front from the edge at one end. From the opposite end, walk directly towards the stick, spreading as you go – as evenly as possible. When you reach the stick, move it over two steps, and do another strip.
If there are only six strips, half the quantity in the bucket should be gone after three. Adjust the rate of application accordingly. Spread from the second bucket, in strips at right angles to the first strips. This helps to even out the application.
When spreading fertilisers around trees or shrubs, roughly estimate the extent of the spread of the branches, by pacing the diameter of the canopy spread, which is the extent of the root system too. Measure this distance in two directions at right angles, and multiply the two figures.
This method gives an over-estimate of about 25 percent, because a plant root system is roughly circular not square, but normal paces are likely to be less than one metre in any case and the over-estimate compensates for this.
Is it necessary to spray?
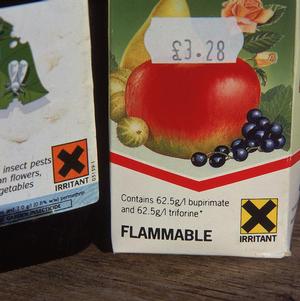
The aim of spraying is to water as a carrier to apply a chemical substance accurately and safely. The chemical might be a weed-killer, insecticide, fungicide, or foliar feed. Some of these can be harmful to plants, animals and the environment, and the user, when not properly used.
Chemical sprays should only be used when necessary, and there are very few situations in the garden where a routine spray is justified.
In terms of disease control, blackspot of roses, pear and apple scab and potato blight are four diseases that can be depended upon to appear under Irish conditions, and that need to be routinely sprayed against. If resistant varieties are grown, even this limited use of sprays may no be necessary.
As regards pests, much depends on the particular pest involved, the amount of damage it may cause, and the numbers of the pest present. Greenflies, slugs and caterpillars can cause problems on fruit and vegetable crops and may need to be controlled. Codling moth can be troublesome on apple trees. Red spider mite and whitefly can be a problem in the greenhouse.
Special caution should be exercised when using insecticides because many of them are poisons. Ways of dealing with a problem, other than spraying, should be considered first. These include cultural practices, barrier methods, growing resistant varieties and growing some else entirely. The section on Pests and Diseases has more on this.
As regards weeds, there is no weed problem that cannot be controlled by non-chemical means, but weedkillers can be very convenient and effective. If they are used properly, the weedkillers available to home gardeners pose relatively little risk to the user, to plants, or to the environment.
If you decide to use a spray, make sure to apply it correctly according to the packet instructions.
Correct application
First, make sure that the chemical is capable of doing the job required. Next, ensure that both the crop and the pest, disease or weed are at the right stage for it to work. Too early, or too late, can be a waste of time.
Make sure the weather conditions are right. Do not spray on windy days, because the chemical can get on to the wrong plants. Do not spray on hot, sunny days, for fear of scorching the plant foliage. Do not spray while foliage is wet, or when rain threatens, unless the chemical is rain-fast.
The cool, calm conditions of evening are often a good time for spraying. Mix the correct amount of material in the appropriate quantity of water, and make sure it is thoroughly dissolved. Do not use extra spray chemical “for good measure”. Not only is this wasteful and potentially dangerous, but might even give a poorer result than the correct amount.
Apply sprays under fairly high pressure, and thoroughly wet all foliage, top and undersides of leaves, and the centre of the plant. Apply enough liquid to give ‘run-off’, when the first drops drip from the leaves. A single correct application will be more effective than repeated bad spraying, causing less damage to the environment.
Spraying precautions
General safety precautions include the following: reading the label on the bottle or packet and any other supplied leaflets; keeping the chemical, in its original pack along with the instructions, in a safe place; staying out of the spray mist and wearing rubber gloves and protective gear, if advised in the literature.
Caution when using chemicals
Chemicals may not be poisonous, but they can cause severe skin irritations and allergic reactions. In some cases, these are caused by solvents and adjuvants in the spray product, not be the active ingredient itself. Dispose of empty bottles and packets by placing them in the rubbish bin – do not burn them or wash them out.
Rinse the sprayer, at least twice, immediately after spraying, using washing up liquid ideally, and pour the rinse water onto soil in a little-used corner – not down the drain.
Drainage is necessary if there are springs that cause wet spots in the garden; if water flows down from higher ground; or if, in winter, water lies in pools for more than one day after rain stops.

Plastic land drainage pipe has little slots
If there are springs, or water flowing from higher ground, a drain will be necessary to intercept the surplus.
The pipes, plastic land drainge or clay drainage tiles, should be laid to give a fall of about 30 centimetres in 30 metres. Make sure there is an outfall such as an existing stream or drainage ditch to drain the water into.
When water lies on a flat surface for long periods after rain without draining away, the problem is often caused by a layer of compacted soil below the surface. The passage of heavy machinery during building can compact the soil so much that water cannot escape to the subsoil below. Compaction often gets better with time but can take decades to clear, and sometimes does not clear.
Dig holes with a spade, or use a crowbar to make small holes through the compacted layer as deeply as possible. Fill the holes to nearly the surface with stone chippings. These holes should be about two metres apart if they are dug out with a spade, or 60 centimetres apart if made with a crow bar.
If this does not solve the problem, and the wet area is too small to warrant a pipe drain, or there is no outfall for drainage, put in a soak-hole. This can be made any size or depth, but to be effective it should be at least 60 centimetres square and 75 centimetres deep, or the equivalent. This is filled with fairly large stones or bricks or rubble, with finer gravel near the top and finished with about 25 to 30 cm of soil, or covered with paving, in which case the gravel can come to the surface almost. Short pipe drains can be run into the soak-hole to extend its drainage area. Digging out a hole of this size creates quite a lot of spoil to dispose of.
Remember that a wet spot can be used to grow bog plants, avoiding the need for drainage. if the wet spot is not in an important area.
In a newly acquired but established garden, carefully assess the existing shrubs or trees with a view to retaining those of good quality or suitable location. Wait until spring if it is suspected that there are stocks of bulbs or good quality perennial plants that have died back for winter. Old shrubs and hedges that are not in good condition and not to be retained should be taken out, roots and all. Large trees may require expert attention.
Clear the planting site of stones, masonry, old concrete, iron, bits of timber, old tree roots or any other rubbish. Cut down tall weeds and grass, with a strimmer. Spray the area with Roundup.
If weeds such as bindweed, docks or nettles re-appear, spray the area again or use Brushwood Killer. If bracken is a problem, use Asulox – available from agricultural merchants.Do not waste effort cultivating the ground until all vegetation is dead; only then should it be dug, or ploughed and rotavated, if the area is large.
Digging with a spade is the main method of cultivating garden soil. The idea is to break the hard surface of the top-soil, mix the upper and lower layers and bury dead plant material, weeds or manure.
Use the spade edge to bury weeds and debris
Digging to the depth of a garden spade is adequate for most purposes. Take spadefuls of reasonable size, and make sure to turn the spadeful upside down. Break up lumps with the back or the edge of the spade. Dig a piece of ground in stages. Ease into it, doing very little the first day.
Carry out as much digging as possible before the year ends to allow winter frosts to break down lumps, making the soil easier to get ready for seed sowing or planting, and to expose hibernating pests and diseases to predators and to harsh weather.
Dig in organic material, such as rotted manure, compost, straw or peat if the ground is being prepared for permanent planting. Each year, part of the vegetable area should have organic material applied to maintain soil structure.
Sowing conditions
Seeds need warm, moist conditions for germination. They must have air too, or they might rot without sprouting. Seeds are sown outdoors only when the soil is warm and moist enough, but since conditions can be controlled indoors, seed sowing is possible all year round.

Broad bean seeds
Some seeds have built-in dormancy. This is usually a hard seedcoat, or chemical contained within, that prevents seeds germinating before the winter. Dormancy is usually broken by a period of exposure to cold, leaving the seeds ready to germinate right at the start of the growing season.
Seed packets usually carry instructions about breaking dormancy, if this is a factor for a particular type of seed.
Sowing seeds outdoors
Vegetables, many flowers, trees and shrubs can be raised from seed sown outdoors. Dig the soil well in advance of sowing. Break down all lumps and rake the soil until it is fine. The soil should neither be too wet nor too dry.
A useful test is to squeeze a handful of soil into a ball; if it does not fall apart at a touch, it is too wet; if it does not even form a ball, it is too dry. Rake in a dressing of general fertiliser at 70 grams per square metre, before sowing.
Use a garden line to keep the row straight. Draw a little drill mark in the fine soil with a stick. Sow the seed at the depth and spacing suggested on the seed packet, cover lightly, and mark the row with a label. The packets also give suggestions on sowing dates. These usually cover between eight and ten weeks, to allow for British conditions.
For Ireland, as a general rule, take the middle four weeks, leaning towards the first two in the south and east, and the second two in the midlands and north.
When the young plants are large enough, thin them to their final spacing, or lift and transplant them to their final spacing. Thin by selecting strong plants at the required intervals and removing the rest.
Sowing seeds indoors
By sowing indoors, it is easier to provide warm, moist conditions, which makes it possible to germinate more difficult seeds. Seeds are sown in trays or pots of seed compost.

Seeds sown in pots and labelled
Make sure that the trays are clean, and use only good quality seed compost – for example, Shamrock Seed and Potting Compost, Bio Seed and Cutting Compost, Fison’s Levington Compost.
Water the trays before sowing, but not too much or the seeds may rot. Sow the seeds evenly and thinly, and cover lightly with fine compost shaken from a sieve, or vermiculite. Cover the tray with a sheet of glass and a sheet of paper.
Place in an appropriate temperature – a warm room, propagator or greenhouse for most types of seed, the hot press for the few that like a high temperature. Watch carefully for germination.
Remove the paper when the first seedlings emerge, and the glass a few days later. When the seedlings are large enough to handle, which is after ten days, prick them out into trays of fresh compost, at 5 by 5 centimetres, or into small individual pots.
Ease them gently from the compost, holding them by the seed leaves to avoid damage to the stem. Water lightly with a fine spray, after transferral.
There are several ways of raising new plants that do not involve seed sowing. These include division, cuttings, layering and grafting, and they have the advantage of exactly reproducing the parent, since the new plant is raised vegetatively from a part of the parent.
Division
Many plants reproduce naturally by vegetative means, using runners, bulbils, offsets or just additional crowns. These can be raised as new plants as soon as they have produced a few roots of their own, and sometimes even before.
Day lily planted divided
Simply separate them from the parent, cutting runners, breaking away bulbils and offsets, and dividing or cutting away groups of healthy crowns. Division is the main method of raising new plants of perennial flowers, many house plants and quite a few rockery plants.
Indoor cuttings
Semi-hardwood cuttings are rooted indoors – under protection of some sort. ‘Semi-hardwood’ describes the stage of growth of the shoot from which the cutting is made. In July, August and September, the young shoots have almost fully extended, and they begin to turn woody at the base as part of the ripening process before winter. These young shoots are full of growth and vigour, and root relatively easily.
Potting on rooted euonymus cuttings
Prepare cuttings between 5 and 15 centimetres long depending on the type of plant. Trim the base with a sharp blade, just below a leaf or pair of leaves. Remove the leaves from the bottom half of the cutting and dip it in rooting powder, such as Keriroot, Murphy Rooting Powder, Bio Roota, Strike or Seradix.
Insert the cuttings into trays or pots of 50:50 peat/sand mix, at about 5 by 5 centimetres apart. Use only clean horticultural sand. Firm the cuttings and water them lightly.
Tie a white polythene sheet or bag over the pot or tray, piercing a few small holes to let air in.
Place the tray in a shaded part of a greenhouse, or in a bright, but sunless, window in the house. Semi-hardwood cuttings can also be placed in a shaded garden frame in trays, or, if a lot of cuttings are to be rooted, inserted directly into the same peat/sand mixture in the frame itself.
The taking of semi-hardwood cuttings is a suitable way of propagating a wide range of shrubs. The same technique is used, without polythene, for alpines and some house plants such as campanula, fuchsia, geraniums, ivy, busy lizzie, and succulents.
When the cuttings begin to produce new leaves, remove the polythene, and water as necessary until roots appear at the drainage holes. This may only take six weeks with fast growers. At this stage, the cuttings should be potted singly, in 8 centimetre pots of good potting compost, and grown on – unless it is getting into late autumn.
In that case, leave the potting-up until March or April. The young plants can be potted into larger pots, or planted out into nursery beds, to put on some size before planting into their permanent positions.
Outdoor cuttings
Although not suitable for such a wide range of trees and shrubs as the semi-hardwood method, this technique is both simple and effective. In late autumn, at the end of the growing season, the young shoots will have become quite woody and hard – hence ‘hardwood’ cuttings.
Take 25 to 30 centimetre pieces of the young shoots. Leaves might or might not be present – some kinds are deciduous, other evergreen. Trim the shoot below a bud and take off any lower leaves. Insert the cuttings in 15 centimetre deep trenches, with some clean sand at the bottom, in a sheltered part of the garden.
Fill back the top-soil and firm well. Space the cuttings 15 to 30 centimetres apart. Trees and shrubs for which this technique is suitable include poplar, willow, blackcurrant, gooseberry, griselinia, escallonia, forsythia, roses, bay laurel, dogwood, tamarisk and flowering currant.
Leave the cuttings in position for a year keeping them free of weeds. The following autumn, plant them in nursery rows, or into their final position.
Layering
For shrubs that are difficult to root, such as rhododendron and clematis, or when only one or two new plants are required, layering is a useful technique. Select a branch that is young and bends to ground level fairly easily. Remove leaves if they are in the way.
Make a 5 centimetre sloping cut in the branch, cutting halfway through. Insert a match stick to keep the wound open, and dust with rooting powder. Make a shallow depression in the soil; fill it with good compost and a little sand mixed in; press the branch gently down onto this; and pin it in place with a strong piece of bent wire.
Heap on some more compost. Place a heavy stone, or sod, on top, to keep the whole arrangement steady. Layering is done in June or July and the new plant is cut away when it has clearly rooted, usually eighteen months later.
A form of layering called air layering can be used if branches do not reach soil level. Prepare the branch in the manner described and place a plastic bag with the bottom removed over the rooting point, tying it below. Fill the bag with moist compost and tie it again above the compost to hold it tight. The weight of the layering bag may need to be supported.
Preparation for planting
Dig the ground, break up lumps and remove large stones to make it easy for the plant roots to grow out into the soil. The addition of organic material, such as well-rotted compost, encourages quick rooting.
If fertiliser is needed, it should always be applied before planting, because the plant will need ready access to food. About 70 grams per square metre of general fertiliser such as 7:6:17, 10:10:20, John Innes Base, Growmore, or General Purpose Fertiliser should be used if the soil not the best, or to get the plants off to a fast start.
Planting
When the ground is ready, take out a hole wide enough to allow the roots to be fully spread out, and deep enough to allow the plant to be at the same depth as before lifting. Place it in the hole, making sure it is upright, spread out the roots, and lightly cover them with good, fine soil.
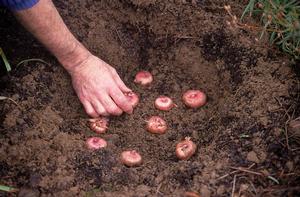
Planting gladiolus corms
If a plant is pot bound – the roots wrapping around the root ball, gently tear out the surface of the root ball to encourage rooting into the surrounding soil. This is especially important for trees and shrubs, particularly evergreens, because the roots can stay wrapped round and offer poor anchorage. Poorly anchored shrubs and trees often blow over when they become top-heavy after a few years of growth.
Firm the covered roots gently. Then fill the hole and firm well, with hands or feet – depending on the size of the plant. Firming makes sure the roots are in contact with the soil, but do not over-
firm.
Watering
Be sure to always water immediately after planting, unless the ground is already moist and the weather is rainy, but even in that case, be prepared to water a few days later should expected rain not materialise. Watering is especially important if the weather is dry or windy.
Apart from helping the roots to settle in, watering, like the priming of a pump, establishes the capillary rise of moisture up through the soil. Avoid planting where water-logging may occur. The roots actually drown for lack of oxygen, and rot, often causing the death of the plant itself.
If in doubt, dig a few test holes about one and half times the depth of the spade and see how the water table behaves. If water fills the holes, and is slow to drain away – taking more than a day or so, it is unwise to plant any species other than those known to like wet soil conditions.
Support
Apart from its role as gatherer of water and plant nutrients, a major function of the plant root system is to anchor it to the soil. When a plant is moved, losing some of its roots, it probably will no longer be adequately anchored.
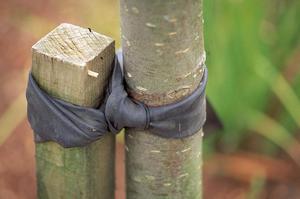
Young tree well tied to short stake
While small plants can be simply firmed well in the ground, not over-doing the firming, trees and tall shrubs especially need to be staked. The stake should be driven after the hole is dug, but before planting.
Temporary shelter, by means of a screen of hessian or plastic wind break material, is useful for conifers, which tend to blow over. The shelter screening also prevents the tree foliage getting dried out by the wind.
Semi-mature trees will need more than one stake, or they might need to be supported by guy wires that are in turn anchored well to strong short stakes or steel posts, or buried anchors of heavy timber.
Timing
The correct planting times for the various types of plants are given where the plants are described. In general, plants suffer least set-back when moved during dormancy – they have less foliage and the weather is moist and cool. As a result, they do not come under stress so quickly.
When plants are moved while in full growth – bedding plants and vegetable transplants – make the move as quickly as possible, and water before and after. Container and pot-grown plants suffer no damage to their root system, and so can be safely planted at any time – though they should be watered until well established.
The aim is to improve plant performance: better fruit or vegetables, better shape, better flowers or foliage. Very often, training is just a matter of facilitating the plant’s own growth pattern.

Make sure training ties are not too tight
Training should always be done in time. Do not delay until the plant has got on with the job, on its own, and then try to change it. Since a lot of tying and staking is involved in training, make sure that the ties or stakes themselves do not cause any damage.
Use soft ties that break, or expand. Never tie a plant with wire, or plastic twines that do not rot. Un-do ties before they get too tight, and check for loose ties before winter, to avoid damage. Details on training are given for plants of various where appropriate.
Pruning is the removal of part of a plant. The simplest form of pruning is to use the fore-finger and thumb to pinch out a soft growing point. This simple action can put a stop to extension growth and encourages side-shoots to grow.
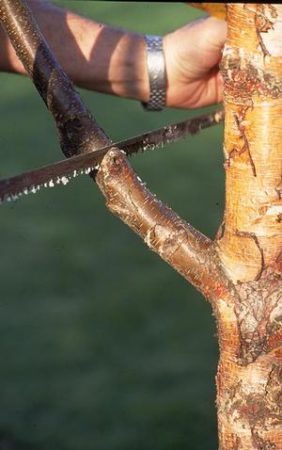
First cut to avoid tearing the tree trunk
Dis-budding is the rubbing out of surplus shoots or flower buds and is sometimes used to increase the size of the remaining flowers. Dead-heading means removing flowers that have dropped their petals, preventing seed production which has a tendency to weaken plants and reduce flowering in the following year.
These are types of pruning, but what is generally taken to mean pruning is the removal of branches, or parts of branches. There is a balance in any plant between root and top. Pruning away part of the top creates an imbalance since the remainder has more root serving it and, as a result, grows more rapidly.
The part removed will be replaced by young growth, thus pruning both rejuvenates a plant and changes its shape. Skilful and careful pruning can actually improve plant shape, but bad pruning can destroy it. Any pruning means injury to the plant and all pruning should be clean and neat and properly carried out.
When removing the lower branches of trees, cut partway through the branch first to avoid tearing the tree trunk. Then cut through the top to remove the branch. Finally carefully remove the branch ‘snag’, leaving the branch ‘collar’ intact.
The strimmer is a modern replacement for the scythe, but it is far more versatile at cutting rough grass and weeds. Being electrically operated, or petrol-engined, it is very easy to use. Powerful wheel-mounted brush woodcutters are available for large gardens. Be sure to wear eye and ear protection and cover the skin against aerosol and debris.
An electric- or petrol-engine powered hedge cutter is essential for large hedges, even for small lengths of hedge. The finish is not as good as that achieved by hand. Single-sided models are safer to use and adequate for home use. Wear suitable eye and ear protection.
A powered edging tool is useful for gardens with a lot of lawn edging and for less able-bodied gardeners. A range of types is available, including petrol-engined types.
A rotavator or power cultivator is useful if a lot of vegetables are grown in a large garden but, otherwise, it not be used much. It can be hired by the hour, or the day, for a particular job, such as a new border, or indeed a new garden.
A powered scarifier to remove moss and dead grass ‘thatch’ can be hired as required. The other power tools mentioned can be hired too, including and tools required only occasionally.
The lawn mower is the most expensive piece of garden equipment, but it is a ‘must’ in practically all gardens. Lawn-mowers can be hired but are needed so regularly that a purchase soon pays for itself. For a small lawn, to about 100 square metres, a push-mower is adequate.
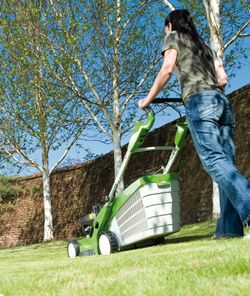
Lawn mower
Between 100 and 200 square metres, an electric mower is ideal. These models are cheap and easy to operate, and give a neat finish but should be used regularly because they cannot cope with tall, rough grass.
For lawn areas over 200 square metres, there are large electric rotary mowers that are suitable and cheaper than petrol motor mowers, but the cable for electric mowers can be inconvenient, and there are now battery powered mowers without a cable.
Much over 250 square metres and certainly over 500 square metres, a petrol-engined mower is likely to be used. Of course, petrol mowers can be used on lawns of any size, even small areas – there is the cost factor but this can be outweighed by ease of use and speed of cutting.
Always choose a mower that will do the job comfortably – the lawn is more likely to be cut as often as it should be, and the mower itself will last longer by not being forced beyond its capacity.
‘Cylinder’ mowers have a cylinder of curved blades that cut the grass by pinching it against a fixed blade. ‘Rotary’ mowers have a single blade than spins at high speed cutting the grass in the process.
Cylinder mowers cut the grass more evenly, leaving a smoother finish, but rotary mowers can take rougher conditions, longer grass and wetter grass. Rotary mowers are not as safe as cylinder mowers, being more likely to throw out stones, although modern designs have better safety features.
The rotary type delivers the cut grass more efficiently into a grass-bag – an important point. Mulching mowers are rotary mowers designed to cut the grass very finely and blow it back into the sward.
Mulching mowers give good results with dry grass but the mower model should be dual purpose – capable of carrying a grass bag for use when the grass is damp, which is likely early and late in the season.
A sprayer of some kind is an essential piece of equipment, particularly if roses or fruit trees are grown. It can be used for applying insecticides, fungicides and weedkillers, and the application of foliar feeds.
In a small garden, and for house plants, a small hand-sprayer or mister is adequate. For most gardens, a 5 litre sprayer is ideal. Pressurised first and carried around, it is easy to use and very effective.
In a medium to large garden, with more than a couple of dozen rose bushes, half a dozen fruit trees, potatoes to be sprayed, and weedkillers to be applied to paths and driveway, a knapsack sprayer would be appropriate.
Knapsack sprayers hold 15 or 20 litres of spray solution and are carried on the back, the smaller size is much more manageable, but the larger one can always be part-filled. The spray is pressurised by hand pumping in the course of delivery.
Modern knapsack sprayers, brands such as Cooper Pegler, mostly have plastic tanks that make them lighter and cheaper. Check before buying that a full range of spare parts is available.
Wheelbarrow
While a strong plastic bucket will do in the smallest gardens, a wheelbarrow is essential in most gardens. It is also essential if a garden is being started from scratch. The quality and durability of wheelbarrows varies considerably.
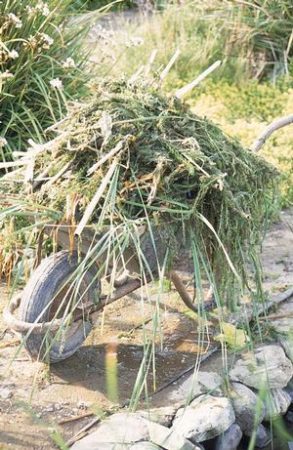
A strong wheelbarrow has many uses
If the garden is small and there is little work for a wheelbarrow, a lightweight model would be adequate. Of light construction, these do not last very well and do not take heavy use. If heavy materials, such as large rocks or concrete blocks, must be carried, a wheelbarrow of strong construction will be necessary.
Lightly constructed wheelbarrows are light and easy to use, usually made of pressed steel or aluminium and plastic. Strongly built models have a sturdy steel frame, galvanised steel body or impact-resistant plastic, and large rubber wheel. Wheels with pumped tyres are much easier to use on soft ground.