Post category: Techniques
Garden compost
Good hygiene – clearing away old crops and weeds – is an important preventative measure against pests, diseases and weeds. In addition, there is always a lot of grass clippings, and foliage from hedge-trimming and pruning – not to mention fallen leaves! The best way of disposing of this material, turning it into a valuable asset – garden compost – is to set up a compost heap.

All sorts of plant material can go on the compost heap .
Simply stack up a 25 centimetre layer of plant waste in an out-of-the-way corner. Start another layer of plant material and repeat the procedure until the heap is about 90 centimetres high, and 150 centimetres square.
Timber or galvanised sheeting can be used to retain the sides of the heap. Turning the heap speeds up the process. The compost is best left for a year or so, but can be used after six months if sufficiently decomposed.
Leaf mould
Leaf mould for use as an ingredient of potting compost – a peat substitute – can be made by gathering leaves in autumn and placing them in a separate heap made in the same way as described for a compost heap. Place and old carpet on top to keep moisture in and maintain a little downward pressure on the heap. Do not add soil or any other material.
The leaves will rot down and can be turned after one year. They may need to be watered in dry weather. After a second year, the leaf mould will be dark and crumbly and it can be run through a shredder to break it down and make it finer.
Potting compost
Home-made potting composts can be quite satisfactory. They are made from soil, peat or leaf mould, and sand in the ratio 7:3:2 by volume. The soil should be good quality garden soil, sieved to remove big stones.
For seed compost, the soil can be sterilised by cooking in an old saucepan, or such like, for about half an hour, but this is not necessary for potting compost, and it is not even desirable because it destroys useful soil predators and parasites that offer a good level of protection against vine weevil larvae.
The steam generated by heating the soil kills pests, diseases and weeds. After about half an hour of good steam, allow the soil to cool and then mix it with the new peat and sand. The latter should be clean horticultural sand, and if not, sterilise it too. Do not use sea sand.
Into the mix, put John Innes Base Fertiliser at the rate specified on the pack. This varies depending on how rich a compost is to be prepared. Compost for seedlings and small plants need not be rich – older plants need more food. Lime will need to be added if the soil used is acidic.
Outdoors, plants depend on natural rainfall but watering can be necessary if rainfall has been inadequate, or if a plant’s root system is not properly established. Seedlings, young plants – especially vegetables – and plants growing in shallow or dry soil, are principally at risk. Watering is obviously necessary indoors. The sections on Greenhouse Growing and House Plants go into some detail.
Plant requirements
Normal summer rainfall is at least 50 millimetres per month. This amount closely matches plant requirements. Twenty-five millimetres of rain is equivalent to almost 25 litres of water per square metre. If there has been no rain for a week, plants need about 12.5 litres per square metre – perhaps even more if the weather has been very hot. Established plants with deep roots can keep going in a spell of drought, but young plants may come under stress.
Water application
Apply water to vegetables, lawns, flower beds and borders and rockeries with a hose and sprinkler. Allow enough time for an adequate amount to be delivered, letting it soak down where it will be effective. Heavy, short bursts are no good – the water just runs off.
When watering larger plants, make a little dyke around them and fill it inside with water. Re-fill it, if the water disappears quickly. Shallow rooting shrubs such as rhododendron often need this attention, even as established plants. Wall shrubs, too are very drought-prone because to the rain-shadowing effects of the wall.
Scattering out powders or granules by hand is quite a difficult skill that can only be acquired by practice. Start by measuring the area of ground over which the substance is to be scattered. Simply pace out the length and width, and calculate the area.
Multiply the area by the application rate per square metre, and then measure out, or buy, enough of the substance for the area. Divide the quantity evenly into two buckets.
Aim to spread the material in parallel strips about 2 steps wide.
Put a stick one step in front from the edge at one end. From the opposite end, walk directly towards the stick, spreading as you go – as evenly as possible. When you reach the stick, move it over two steps, and do another strip.
If there are only six strips, half the quantity in the bucket should be gone after three. Adjust the rate of application accordingly. Spread from the second bucket, in strips at right angles to the first strips. This helps to even out the application.
When spreading fertilisers around trees or shrubs, roughly estimate the extent of the spread of the branches, by pacing the diameter of the canopy spread, which is the extent of the root system too. Measure this distance in two directions at right angles, and multiply the two figures.
This method gives an over-estimate of about 25 percent, because a plant root system is roughly circular not square, but normal paces are likely to be less than one metre in any case and the over-estimate compensates for this.
Is it necessary to spray?
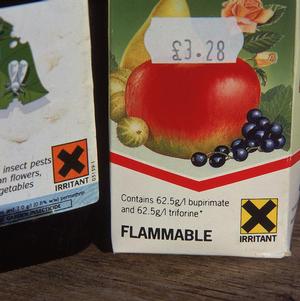
The aim of spraying is to water as a carrier to apply a chemical substance accurately and safely. The chemical might be a weed-killer, insecticide, fungicide, or foliar feed. Some of these can be harmful to plants, animals and the environment, and the user, when not properly used.
Chemical sprays should only be used when necessary, and there are very few situations in the garden where a routine spray is justified.
In terms of disease control, blackspot of roses, pear and apple scab and potato blight are four diseases that can be depended upon to appear under Irish conditions, and that need to be routinely sprayed against. If resistant varieties are grown, even this limited use of sprays may no be necessary.
As regards pests, much depends on the particular pest involved, the amount of damage it may cause, and the numbers of the pest present. Greenflies, slugs and caterpillars can cause problems on fruit and vegetable crops and may need to be controlled. Codling moth can be troublesome on apple trees. Red spider mite and whitefly can be a problem in the greenhouse.
Special caution should be exercised when using insecticides because many of them are poisons. Ways of dealing with a problem, other than spraying, should be considered first. These include cultural practices, barrier methods, growing resistant varieties and growing some else entirely. The section on Pests and Diseases has more on this.
As regards weeds, there is no weed problem that cannot be controlled by non-chemical means, but weedkillers can be very convenient and effective. If they are used properly, the weedkillers available to home gardeners pose relatively little risk to the user, to plants, or to the environment.
If you decide to use a spray, make sure to apply it correctly according to the packet instructions.
Correct application
First, make sure that the chemical is capable of doing the job required. Next, ensure that both the crop and the pest, disease or weed are at the right stage for it to work. Too early, or too late, can be a waste of time.
Make sure the weather conditions are right. Do not spray on windy days, because the chemical can get on to the wrong plants. Do not spray on hot, sunny days, for fear of scorching the plant foliage. Do not spray while foliage is wet, or when rain threatens, unless the chemical is rain-fast.
The cool, calm conditions of evening are often a good time for spraying. Mix the correct amount of material in the appropriate quantity of water, and make sure it is thoroughly dissolved. Do not use extra spray chemical “for good measure”. Not only is this wasteful and potentially dangerous, but might even give a poorer result than the correct amount.
Apply sprays under fairly high pressure, and thoroughly wet all foliage, top and undersides of leaves, and the centre of the plant. Apply enough liquid to give ‘run-off’, when the first drops drip from the leaves. A single correct application will be more effective than repeated bad spraying, causing less damage to the environment.
Spraying precautions
General safety precautions include the following: reading the label on the bottle or packet and any other supplied leaflets; keeping the chemical, in its original pack along with the instructions, in a safe place; staying out of the spray mist and wearing rubber gloves and protective gear, if advised in the literature.
Caution when using chemicals
Chemicals may not be poisonous, but they can cause severe skin irritations and allergic reactions. In some cases, these are caused by solvents and adjuvants in the spray product, not be the active ingredient itself. Dispose of empty bottles and packets by placing them in the rubbish bin – do not burn them or wash them out.
Rinse the sprayer, at least twice, immediately after spraying, using washing up liquid ideally, and pour the rinse water onto soil in a little-used corner – not down the drain.
Drainage is necessary if there are springs that cause wet spots in the garden; if water flows down from higher ground; or if, in winter, water lies in pools for more than one day after rain stops.

Plastic land drainage pipe has little slots
If there are springs, or water flowing from higher ground, a drain will be necessary to intercept the surplus.
The pipes, plastic land drainge or clay drainage tiles, should be laid to give a fall of about 30 centimetres in 30 metres. Make sure there is an outfall such as an existing stream or drainage ditch to drain the water into.
When water lies on a flat surface for long periods after rain without draining away, the problem is often caused by a layer of compacted soil below the surface. The passage of heavy machinery during building can compact the soil so much that water cannot escape to the subsoil below. Compaction often gets better with time but can take decades to clear, and sometimes does not clear.
Dig holes with a spade, or use a crowbar to make small holes through the compacted layer as deeply as possible. Fill the holes to nearly the surface with stone chippings. These holes should be about two metres apart if they are dug out with a spade, or 60 centimetres apart if made with a crow bar.
If this does not solve the problem, and the wet area is too small to warrant a pipe drain, or there is no outfall for drainage, put in a soak-hole. This can be made any size or depth, but to be effective it should be at least 60 centimetres square and 75 centimetres deep, or the equivalent. This is filled with fairly large stones or bricks or rubble, with finer gravel near the top and finished with about 25 to 30 cm of soil, or covered with paving, in which case the gravel can come to the surface almost. Short pipe drains can be run into the soak-hole to extend its drainage area. Digging out a hole of this size creates quite a lot of spoil to dispose of.
Remember that a wet spot can be used to grow bog plants, avoiding the need for drainage. if the wet spot is not in an important area.
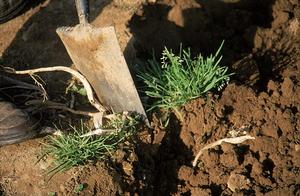
In a newly acquired but established garden, carefully assess the existing shrubs or trees with a view to retaining those of good quality or suitable location. Wait until spring if it is suspected that there are stocks of bulbs or good quality perennial plants that have died back for winter. Old shrubs and hedges that are not in good condition and not to be retained should be taken out, roots and all. Large trees may require expert attention.
Clear the planting site of stones, masonry, old concrete, iron, bits of timber, old tree roots or any other rubbish. Cut down tall weeds and grass, with a strimmer. Spray the area with Roundup.
If weeds such as bindweed, docks or nettles re-appear, spray the area again or use Brushwood Killer. If bracken is a problem, use Asulox – available from agricultural merchants.Do not waste effort cultivating the ground until all vegetation is dead; only then should it be dug, or ploughed and rotavated, if the area is large.
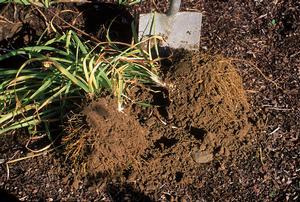
Digging with a spade is the main method of cultivating garden soil. The idea is to break the hard surface of the top-soil, mix the upper and lower layers and bury dead plant material, weeds or manure.
Use the spade edge to bury weeds and debris
Digging to the depth of a garden spade is adequate for most purposes. Take spadefuls of reasonable size, and make sure to turn the spadeful upside down. Break up lumps with the back or the edge of the spade. Dig a piece of ground in stages. Ease into it, doing very little the first day.
Carry out as much digging as possible before the year ends to allow winter frosts to break down lumps, making the soil easier to get ready for seed sowing or planting, and to expose hibernating pests and diseases to predators and to harsh weather.
Dig in organic material, such as rotted manure, compost, straw or peat if the ground is being prepared for permanent planting. Each year, part of the vegetable area should have organic material applied to maintain soil structure.
Sowing conditions
Seeds need warm, moist conditions for germination. They must have air too, or they might rot without sprouting. Seeds are sown outdoors only when the soil is warm and moist enough, but since conditions can be controlled indoors, seed sowing is possible all year round.

Broad bean seeds
Some seeds have built-in dormancy. This is usually a hard seedcoat, or chemical contained within, that prevents seeds germinating before the winter. Dormancy is usually broken by a period of exposure to cold, leaving the seeds ready to germinate right at the start of the growing season.
Seed packets usually carry instructions about breaking dormancy, if this is a factor for a particular type of seed.
Sowing seeds outdoors
Vegetables, many flowers, trees and shrubs can be raised from seed sown outdoors. Dig the soil well in advance of sowing. Break down all lumps and rake the soil until it is fine. The soil should neither be too wet nor too dry.
A useful test is to squeeze a handful of soil into a ball; if it does not fall apart at a touch, it is too wet; if it does not even form a ball, it is too dry. Rake in a dressing of general fertiliser at 70 grams per square metre, before sowing.
Use a garden line to keep the row straight. Draw a little drill mark in the fine soil with a stick. Sow the seed at the depth and spacing suggested on the seed packet, cover lightly, and mark the row with a label. The packets also give suggestions on sowing dates. These usually cover between eight and ten weeks, to allow for British conditions.
For Ireland, as a general rule, take the middle four weeks, leaning towards the first two in the south and east, and the second two in the midlands and north.
When the young plants are large enough, thin them to their final spacing, or lift and transplant them to their final spacing. Thin by selecting strong plants at the required intervals and removing the rest.
Sowing seeds indoors
By sowing indoors, it is easier to provide warm, moist conditions, which makes it possible to germinate more difficult seeds. Seeds are sown in trays or pots of seed compost.

Seeds sown in pots and labelled
Make sure that the trays are clean, and use only good quality seed compost – for example, Shamrock Seed and Potting Compost, Bio Seed and Cutting Compost, Fison’s Levington Compost.
Water the trays before sowing, but not too much or the seeds may rot. Sow the seeds evenly and thinly, and cover lightly with fine compost shaken from a sieve, or vermiculite. Cover the tray with a sheet of glass and a sheet of paper.
Place in an appropriate temperature – a warm room, propagator or greenhouse for most types of seed, the hot press for the few that like a high temperature. Watch carefully for germination.
Remove the paper when the first seedlings emerge, and the glass a few days later. When the seedlings are large enough to handle, which is after ten days, prick them out into trays of fresh compost, at 5 by 5 centimetres, or into small individual pots.
Ease them gently from the compost, holding them by the seed leaves to avoid damage to the stem. Water lightly with a fine spray, after transferral.
There are several ways of raising new plants that do not involve seed sowing. These include division, cuttings, layering and grafting, and they have the advantage of exactly reproducing the parent, since the new plant is raised vegetatively from a part of the parent.
Division
Many plants reproduce naturally by vegetative means, using runners, bulbils, offsets or just additional crowns. These can be raised as new plants as soon as they have produced a few roots of their own, and sometimes even before.
Day lily planted divided
Simply separate them from the parent, cutting runners, breaking away bulbils and offsets, and dividing or cutting away groups of healthy crowns. Division is the main method of raising new plants of perennial flowers, many house plants and quite a few rockery plants.
Indoor cuttings
Semi-hardwood cuttings are rooted indoors – under protection of some sort. ‘Semi-hardwood’ describes the stage of growth of the shoot from which the cutting is made. In July, August and September, the young shoots have almost fully extended, and they begin to turn woody at the base as part of the ripening process before winter. These young shoots are full of growth and vigour, and root relatively easily.
Potting on rooted euonymus cuttings
Prepare cuttings between 5 and 15 centimetres long depending on the type of plant. Trim the base with a sharp blade, just below a leaf or pair of leaves. Remove the leaves from the bottom half of the cutting and dip it in rooting powder, such as Keriroot, Murphy Rooting Powder, Bio Roota, Strike or Seradix.
Insert the cuttings into trays or pots of 50:50 peat/sand mix, at about 5 by 5 centimetres apart. Use only clean horticultural sand. Firm the cuttings and water them lightly.
Tie a white polythene sheet or bag over the pot or tray, piercing a few small holes to let air in.
Place the tray in a shaded part of a greenhouse, or in a bright, but sunless, window in the house. Semi-hardwood cuttings can also be placed in a shaded garden frame in trays, or, if a lot of cuttings are to be rooted, inserted directly into the same peat/sand mixture in the frame itself.
The taking of semi-hardwood cuttings is a suitable way of propagating a wide range of shrubs. The same technique is used, without polythene, for alpines and some house plants such as campanula, fuchsia, geraniums, ivy, busy lizzie, and succulents.
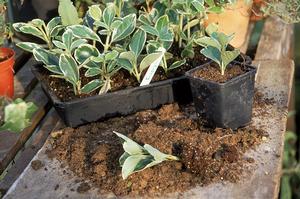
When the cuttings begin to produce new leaves, remove the polythene, and water as necessary until roots appear at the drainage holes. This may only take six weeks with fast growers. At this stage, the cuttings should be potted singly, in 8 centimetre pots of good potting compost, and grown on – unless it is getting into late autumn.
In that case, leave the potting-up until March or April. The young plants can be potted into larger pots, or planted out into nursery beds, to put on some size before planting into their permanent positions.
Outdoor cuttings
Although not suitable for such a wide range of trees and shrubs as the semi-hardwood method, this technique is both simple and effective. In late autumn, at the end of the growing season, the young shoots will have become quite woody and hard – hence ‘hardwood’ cuttings.
Take 25 to 30 centimetre pieces of the young shoots. Leaves might or might not be present – some kinds are deciduous, other evergreen. Trim the shoot below a bud and take off any lower leaves. Insert the cuttings in 15 centimetre deep trenches, with some clean sand at the bottom, in a sheltered part of the garden.
Fill back the top-soil and firm well. Space the cuttings 15 to 30 centimetres apart. Trees and shrubs for which this technique is suitable include poplar, willow, blackcurrant, gooseberry, griselinia, escallonia, forsythia, roses, bay laurel, dogwood, tamarisk and flowering currant.
Leave the cuttings in position for a year keeping them free of weeds. The following autumn, plant them in nursery rows, or into their final position.
Layering
For shrubs that are difficult to root, such as rhododendron and clematis, or when only one or two new plants are required, layering is a useful technique. Select a branch that is young and bends to ground level fairly easily. Remove leaves if they are in the way.
Make a 5 centimetre sloping cut in the branch, cutting halfway through. Insert a match stick to keep the wound open, and dust with rooting powder. Make a shallow depression in the soil; fill it with good compost and a little sand mixed in; press the branch gently down onto this; and pin it in place with a strong piece of bent wire.
Heap on some more compost. Place a heavy stone, or sod, on top, to keep the whole arrangement steady. Layering is done in June or July and the new plant is cut away when it has clearly rooted, usually eighteen months later.
A form of layering called air layering can be used if branches do not reach soil level. Prepare the branch in the manner described and place a plastic bag with the bottom removed over the rooting point, tying it below. Fill the bag with moist compost and tie it again above the compost to hold it tight. The weight of the layering bag may need to be supported.
Preparation for planting
Dig the ground, break up lumps and remove large stones to make it easy for the plant roots to grow out into the soil. The addition of organic material, such as well-rotted compost, encourages quick rooting.
If fertiliser is needed, it should always be applied before planting, because the plant will need ready access to food. About 70 grams per square metre of general fertiliser such as 7:6:17, 10:10:20, John Innes Base, Growmore, or General Purpose Fertiliser should be used if the soil not the best, or to get the plants off to a fast start.
Planting
When the ground is ready, take out a hole wide enough to allow the roots to be fully spread out, and deep enough to allow the plant to be at the same depth as before lifting. Place it in the hole, making sure it is upright, spread out the roots, and lightly cover them with good, fine soil.
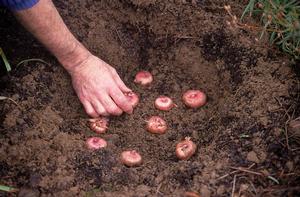
Planting gladiolus corms
If a plant is pot bound – the roots wrapping around the root ball, gently tear out the surface of the root ball to encourage rooting into the surrounding soil. This is especially important for trees and shrubs, particularly evergreens, because the roots can stay wrapped round and offer poor anchorage. Poorly anchored shrubs and trees often blow over when they become top-heavy after a few years of growth.
Firm the covered roots gently. Then fill the hole and firm well, with hands or feet – depending on the size of the plant. Firming makes sure the roots are in contact with the soil, but do not over-
firm.
Watering
Be sure to always water immediately after planting, unless the ground is already moist and the weather is rainy, but even in that case, be prepared to water a few days later should expected rain not materialise. Watering is especially important if the weather is dry or windy.
Apart from helping the roots to settle in, watering, like the priming of a pump, establishes the capillary rise of moisture up through the soil. Avoid planting where water-logging may occur. The roots actually drown for lack of oxygen, and rot, often causing the death of the plant itself.
If in doubt, dig a few test holes about one and half times the depth of the spade and see how the water table behaves. If water fills the holes, and is slow to drain away – taking more than a day or so, it is unwise to plant any species other than those known to like wet soil conditions.
Support
Apart from its role as gatherer of water and plant nutrients, a major function of the plant root system is to anchor it to the soil. When a plant is moved, losing some of its roots, it probably will no longer be adequately anchored.
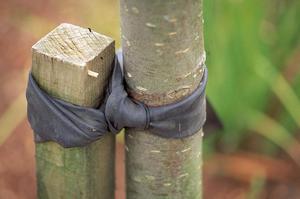
Young tree well tied to short stake
While small plants can be simply firmed well in the ground, not over-doing the firming, trees and tall shrubs especially need to be staked. The stake should be driven after the hole is dug, but before planting.
Temporary shelter, by means of a screen of hessian or plastic wind break material, is useful for conifers, which tend to blow over. The shelter screening also prevents the tree foliage getting dried out by the wind.
Semi-mature trees will need more than one stake, or they might need to be supported by guy wires that are in turn anchored well to strong short stakes or steel posts, or buried anchors of heavy timber.
Timing
The correct planting times for the various types of plants are given where the plants are described. In general, plants suffer least set-back when moved during dormancy – they have less foliage and the weather is moist and cool. As a result, they do not come under stress so quickly.
When plants are moved while in full growth – bedding plants and vegetable transplants – make the move as quickly as possible, and water before and after. Container and pot-grown plants suffer no damage to their root system, and so can be safely planted at any time – though they should be watered until well established.
The aim is to improve plant performance: better fruit or vegetables, better shape, better flowers or foliage. Very often, training is just a matter of facilitating the plant’s own growth pattern.

Make sure training ties are not too tight
Training should always be done in time. Do not delay until the plant has got on with the job, on its own, and then try to change it. Since a lot of tying and staking is involved in training, make sure that the ties or stakes themselves do not cause any damage.
Use soft ties that break, or expand. Never tie a plant with wire, or plastic twines that do not rot. Un-do ties before they get too tight, and check for loose ties before winter, to avoid damage. Details on training are given for plants of various where appropriate.
Pruning is the removal of part of a plant. The simplest form of pruning is to use the fore-finger and thumb to pinch out a soft growing point. This simple action can put a stop to extension growth and encourages side-shoots to grow.
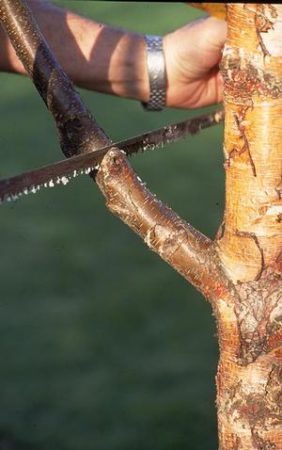
First cut to avoid tearing the tree trunk
Dis-budding is the rubbing out of surplus shoots or flower buds and is sometimes used to increase the size of the remaining flowers. Dead-heading means removing flowers that have dropped their petals, preventing seed production which has a tendency to weaken plants and reduce flowering in the following year.
These are types of pruning, but what is generally taken to mean pruning is the removal of branches, or parts of branches. There is a balance in any plant between root and top. Pruning away part of the top creates an imbalance since the remainder has more root serving it and, as a result, grows more rapidly.
The part removed will be replaced by young growth, thus pruning both rejuvenates a plant and changes its shape. Skilful and careful pruning can actually improve plant shape, but bad pruning can destroy it. Any pruning means injury to the plant and all pruning should be clean and neat and properly carried out.
When removing the lower branches of trees, cut partway through the branch first to avoid tearing the tree trunk. Then cut through the top to remove the branch. Finally carefully remove the branch ‘snag’, leaving the branch ‘collar’ intact.