Post category: Vegetable Growing
Begin using vegetables as soon as they are big enough, while still immature. Carrots, beetroot, peas, celery, turnips, scallions, lettuce, french beans, courgettes, cabbage, cauliflower and broccoli can be used before they attain full size.
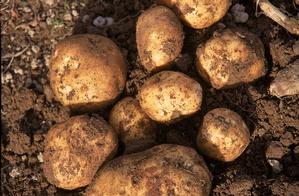
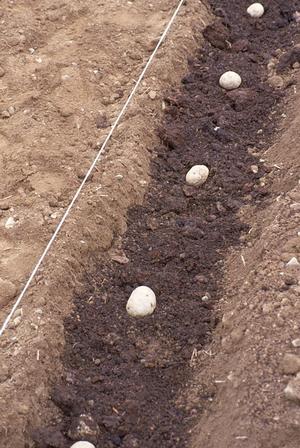
Newly lifted potatoes
These are very tasty at an immature stage and using them early helps both to extend the period of use, and avoid gluts. Only pick as much as is needed at a time. Harvest vegetables in the cool of morning.
Many vegetables keep for only a short time after harvesting. Freezing is a possibility with some types – peas, beans, sprouts, broccoli, cauliflower, carrots, sweet corn, courgettes and tomatoes pulped. Herbs can be frozen in ice cubes.
Root vegetables store well in pits outdoors, protected by a cover of straw and soil, or in a cool shed. This approach is successful with carrots, swedes, turnips, parsnips, beetroot, potatoes and even hard round-headed cabbage. Guard against rats and mice in outdoor pits.
Onions store well when properly dried after harvest. Peas and french beans can be allowed to mature for drying too. Herbs dried slowly store well or they can be frozen loose.
Pests
If ground preparation was good, there should be no perennial weeds. If these appear, dig them out, or spot treat them with Roundup. Vegetables cannot compete with weeds. Begin with weed-free ground and aim to keep it clean.
Weeds should be controlled before they go to seed
Control weed seedlings as soon as they appear. Do not allow weeds to get much beyond the seedling stage and never allow them to flower. If no weeds seeds are produced the reservoir fo weeds seeds in the soil will be depleted and weed control made a lot easier in future. The first flush of weeds comes up usually before the vegetable seedlings. When these weeds controlled, the subsequent flushes will not be as strong.
Light hoeing between rows gets rid of the majority. Hand-weed the actual rows of vegetables. Chemical weed control is not a possibility in the vegetable garden, except on pathways, especially if these are permanent. As the vegetable plants fill their allotted spaces, their leaves, especially those of the leafy kinds actively help to keep weeds under control, and relatively few weeds germinate, but these should be controlled.
As soon as crops go over, remove the remaining plants and weeds, and dig the ground. This prevents seeding, discourages pests, and leaves the ground ready for the next crop. Timeliness is all important for successful weed control in vegetables.
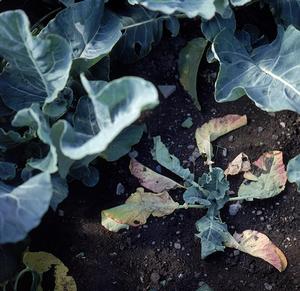
Cabbage root fly damage
Quite a range of pests attacks vegetables. Very many of these are occasional or unusual and are not worth taking precautions against. Some, however, can be relied upon to make an appearance. They include greenflies, cabbage root fly, carrot root fly, cabbage caterpillars, slugs and snails and pigeons. Details on these pests are given in Pests.
Diseases
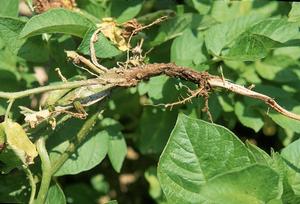
Potato black leg disease
Not many diseases cause problems in the vegetable garden – those that do are mainly soil borne. Among them are onion white rot and clubroot of the Cabbage family. Blight on potatoes will almost certainly appear, but other diseases are occasional rather than certain. Details of these diseases are given in Diseases.
Most kinds of vegetables are sown in March and April and there is often a glut in late July and August. Try to avoid sowing all the vegetables at about the same time.
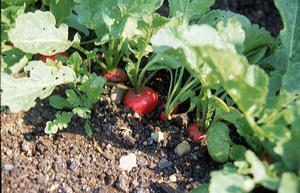
Radish only needs six weeks to mature
Sow early varieties in early spring, indoors if possible, to provide supplies in early to mid-summer; sow maincrop varieties in late spring for use from mid-summer to autumn, and for storage into winter; sow early varieties of quick-maturing types in mid-summer for late autumn supplies of tender vegetables.
Make several sowings of the quick-maturing salad crops – lettuce, rocket, radish, beetroot, scallions – and of white turnips, peas, french beans and carrots. Pay special attention to sowing varieties of cabbage, cauliflower, sprouts, spring broccoli and leeks for use in the period after Christmas and up to June.
Transplanting
Vegetables need enough space for each plant to develop to a usable size. The amount of space varies for each vegetable and may even vary between varieties of a particular vegetable. The seed packets give suggested spacings for each variety.
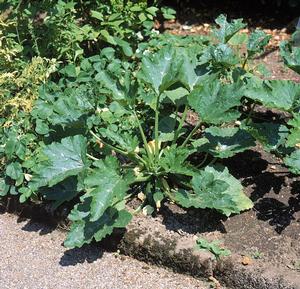
Courgettes need wide spacing
Some vegetables, such as peas, beans, scallions, radishes, potatoes and onion sets, are sown at their final spacing and need no further adjustment. Others do need to be spaced and there are two ways of achieving the final spacing.
Thinning
Many crops cannot be transplanted. The root crops – carrots, parsnips, turnips, swedes and beetroot – would form a useless forked root if transplanted because of the damage caused by lifting. These must be thinned to their final spacing.
Parsnips after preliminary thinning
Sow the seeds of these crops thinly. Too many seedlings emerge and the surplus is simply pulled out, choosing the strongest to grow to maturity. It is a good idea to thin in two stages. If the final spacing is made when the plants are still young and vulnerable, gaps will be left if some die, or are damaged, for instance, by snails. A preliminary thinning, to half the final spacing, will provide substitutes if there are casualties.
Outdoor sowing
Most vegetables are raised from seed each year. Vegetable seed can be sown indoors in trays, or outside in the open soil, depending on which is most appropriate for the crop and the time of year. Some vegetables are perennial – they do not need to be sown each year. In fact, these are usually purchased as small plants.

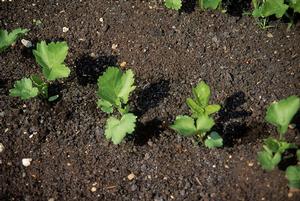
Lettuce and onion seedlings
Indoor sowing
Some vegetables are subject to damage by frost and cannot be grown outdoors until the danger of late frost is past – about mid to late May. However, sowing outdoors at that late stage would leave too short a growing season, so these crops should be sown indoors and planted out at the end of May.
This group of tender vegetables includes tomatoes, sweet corn, courgettes, pumpkins, squash, runner beans, celery and peppers. Sowing indoors to extend the season forward can be also used for some of the ordinary vegetables such as cabbage, cauliflower, brussels sprouts, peas, french beans, lettuce and onions to get early crops.
Indoors, in a greenhouse, kitchen window sill or propagator, seeds are sown in trays of seed compost, kept moist and warm until germination occurs. These seedlings are then pricked out into other seed trays, at about 5 centimetres apart each way, or into small individual pots.
The larger seeds of sweet corn, runner beans, french beans and pumpkins can be placed directly in twos into small pots, the better seedling being retained.
Raising perennial vegetables
Although these many kinds can be raised from seed sown indoors or outdoors, they are often purchased as small plants. Since they are perennial, there is no need to sow each year. These vegetables usually occupy the same piece of ground for several years. Many herbs fall into the perennial category, but a few, such as parsley, chervil and dill, need to be sown each year.
Vegetables belonging to the same family tend to be affected by the same pests and diseases, which can build up to damaging proportions if the same crops are grown in the same piece of ground for several years. Therefore, it makes sense to rotate the various families around the vegetable plot each year.
Rotation is difficult to achieve in small plots
However, it is very difficult to maintain a strict rotation in a small garden because of the different sized areas for each crop. There may be several crops of a particular vegetable, for example cabbage, in a single year and this adds to the difficulty of finding a ‘new’ site each time.
Besides, tools and boots are efficient spreaders of pests and diseases, and certain weeds often provide a ‘bridge’ for harmful organisms when suitable crop plants are not available. Because of the wide variety of crops grown and the restrictions of space in a small garden, only short rotations are possible and these are of limited value.
Even so, it is worth trying to avoid following a crop with another of the same family. Rotation offers the opportunity to add organic material and lime to the soil in such a way as to be an advantage to particular crops.
Organic material is very beneficial for potatoes, celery, courgettes and sweet corn, while it tends to make Cabbage family plants too leafy. So, it should be applied before potatoes, etc., and the Cabbage family should be kept away for a while.
Applying organic material before potatoes, each year in a four-year rotation, means that a different quarter of the vegetable area gets it every year and the entire site will be covered by the fourth year. If slugs in potatoes have been a problem, apply the organic matter before the Pea and Onion families instead.
If the soil is acid, and lime is to be applied, apply it before the Cabbage family and keep it away from the Potato family. It prevents clubroot disease of the Cabbage family but encourages potato scab disease. If lime is applied before the Cabbage family, in a four-year rotation, then the whole vegetable area will be covered in four years, which is about right on an acid soil.
Vegetables grown quickly are more succulent and have the best flavour. To encourage quick growth, vegetables should have full sunshine. They must not be shaded or they will grow poorly.
Some low shelter is useful because it increases the air and soil temperature levels in the vegetable area and improves growth. A slight south, or south-west, slope is ideal, because the soil warms up early in the year and stays warm later. But hedges and tree-roots too close to the vegetable garden can starve vegetables of moisture and nutrients. Vegetables need to be at least 1.5 metres from a hedge and even more from trees.
Good fertile soil is essential for quick growth of vegetables. Drainage should be good because wet soil delays the start of growth in spring and brings it to an early stop in autumn. However, the soil must be capable of retaining enough moisture to support strong growth in summer.
Light, sandy soil is ideal for carrots, onions and early vegetables. Heavier limy soil is good for the Cabbage family. A medium soil, well supplied with organic material, is ideal for most vegetables. It is open, easily worked, warms up quickly and retains moisture in summer. The ground must be completely free of perennial weeds.
A high level of soil fertility must be maintained and good soil structure encouraged. To maintain soil structure, organic material, such as well-rotted manure, or compost or peat, should be dug in to part of the vegetable area each year.
Some compost placed under potatoes
Lime also improves soil structure and should be added to acid soils in the south, south-east and west, at 300-400 grams of ground limestone per square metre, or hydrated lime, every three or four years. Most vegetables prefer soil pH to be about neutral. A soil test kit can be used to estimate soil acidity and lime can be applied if necessary.
Vegetables are hungry feeders that remove large quantities of nutrients from the soil. Manure and compost add back some of these nutrients, but it will also be necessary to apply general fertiliser, such as 7:6:17, or 10:10:20 at about 100 grams per square metre before sowing or planting each year.
Various parts of plants – leaves, stems and roots – are eaten as vegetables. Some ‘vegetables’ are, in correct botanical terms, fruits, seeds or flowers. Tomatoes, peppers and courgettes are fruits; sweet corn, peas and beans are seeds; and cauliflower, broccoli and globe artichokes are flowers.
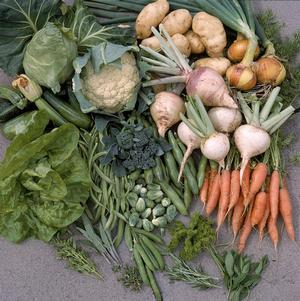
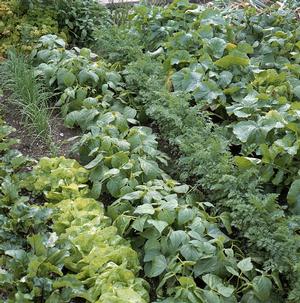
Vegetables all picked in one garden in late July
Most of the vegetables grown belong to just a few plant families. The Cabbage family (Brassicaceae) includes cabbage, cauliflower, brussels sprouts, broccoli, turnips, swedes, kale, seakale, kohlrabi and radish.
The Carrot family includes carrots, parsnips, parsley, celery and florence fennel. The Onion family includes onions, shallots, leeks, scallions and garlic. The Beet family includes beetroot, spinach beet and seakale beet.
The Pea family includes peas, beans, french beans and runner beans. The Potato family includes potatoes, tomatoes, peppers, chillis and aubergines.
Vegetables are either grown outdoors in the open soil, or under the protection of glass or polythene. Only the vegetables grown outdoors are dealt with here; greenhouse vegetables – kinds that spend their entire life in the greenhouse – are described in Greenhouse Growing.
Outdoor vegetables can be divided into three groups; those sown and grown outdoors, those sown indoors and later planted out, and the perennial vegetables, including most of the herbs.
French beans, or les haricot verts as the French call them, are one of the most popular garden vegetables, flavoursome and versatile in cookery, and they are very easy to grow. They need no thinning, transplanting or training as other vegetables do. They are quick to give results, they are very prolific, and freeze very well.
Site and soil
Choose a warm sunny spot for french beans so that the air temperature will be as high as possible. Shelter is important and a sun trap can increase temperatures by a couple of degrees. The plants also need shelter from strong winds that can topple the plants when wet of when carrying a heavy crop. But the shelter must not cast shade because they need full sunshine for rapid growth. French beans must be grown in fertile open soil. Being members of the legume family, they have nitrogen-fixing bacteria in their root nodules and these need lots of air in the soil, so the structure must be loose and open. Fairly light soil to which plenty of organic material has been added would be ideal.
Varieties
There are two kinds of french bean varieties, bush beans and climbing beans. The bush types are most common and less trouble – no need for canes or other support. Most of the varieties now offered are ‘stringless’, that is with no strong ‘string’ running down the back of the bean. Bush types take about sixty days to mature pods, less for some early kinds in good weather, more for the slower kinds and in cool weather.
‘The Prince’ is a standard variety with long slim pods that are oval in section. It crops well and reliably, and over a long period if the beans are picked regularly and it is good for freezing. ‘Sprite’ is another good variety with round pods, completely stringless. ‘Tendergreen’ is round and a good cropper, early to mature, and good for freezing. ‘Masterpiece’ is another early maturing variety, with long flat pods and a good cropper. ‘Safari’ is a Kenyan type, carrying slender, round bean pods that used to be called ‘filet’ beans. ‘Delinel’ is a good cropper, also a filet type of good flavour. ‘Opera’ is an early maturing type of filet or Kenyan bean. A new variety ‘Speedy’ is reputed to be very quick to mature. There are varieties with coloured pods, such as ‘Purple Queen’ and ‘Orinoco’, a yellow pod variety, but these are mostly of novelty value, the purple colour goes in cooking.
The climbing types are not as much grown. They are somewhat slower to mature, having to make a taller plant and the beans are generally more robust but still much finer than runner beans. Being capable of self-pollination without visiting bees, climbing french beans fare out better in a dull summer. ‘Cobra’ is a standard climbing variety, stringless, round pods and continuous cropping. ‘Rustico’ is early maturing and has slender round pods.
Sowing
French beans are originally from Mexico and Central America and as a result they need warmth in the soil to germinate. They can be sown in April and May in good warm weather, but it is best to wait until conditions are right because they often fail or result in a patchy row. Seeds can be sown in pots in a greenhouse in April for planting out in May and this can be a first crop. They can also be sown to mature in the greenhouse or under the protection of cloches, cold frame or fleece.
Sowing is normally done in rows about 40 or 50cm apart, the beans spaced about 5cm apart in the row. This spacing covers some losses and gives a nice dense row of bean plants that keeps weeds down. Repeat sowings can be made at intervals of two to four weeks until July, depending on need, to keep a supply going.
Aftercare
French beans need relatively little care after sowing, making them a very easy vegetable to grow. The main concern is to control weeds by careful hoeing as soon as the bean plants appear above the soil. The climbing sorts need support with canes or sticks of some sort and may need to be encouraged to climb. If the garden is very windy, even bush beans may need a few bushy twigs to keep them steady. The plants are very fast-growing and if a dry spell comes, they should be watered.
Picking
French beans should be picked as soon as they are usable, even less than finger-length. These early beans are delicious and early and regular picking helps to keep the plants cropping. If there are too many to eat fresh, they can be frozen very successfully in batches. If there are enough stored, the late beans can be left to ripen on the plant and used as haricot beans, or used as seed the following year, as they come true to type.
Pests and diseases
Slugs and snails can wreak severe damage on the emerging beans and for a time afterwards. Black bean greenflies can attack foliage and pods. Root rot disease can occur in wet years and on heavy soil. Leaf spot diseases can occur but are unusual, as they are carried on the seeds.
While all kinds of fennel have a tendency to make a swollen crown at ground level as a young plant, the kinds grown for these swollen leaf bases are known as Florence fennel, or sometimes Florentine fennel. It is an Italian vegetable and not much grown in Northern Europe until relatively recent times. It is widely available in recent years in supermarkets, almost certainly imported since the ‘bulbs’ are usually much bigger and more rounded than the specimens that are grown in gardens.
The bulbs are really just the swollen leaf bases gathered together to produce an energy source to over-winter and generate the tall flower stem in the second summer. It would appear that these plants were continuously selected for those that produced large, well-developed bulbs. While uncommon as a vegetable, florence fennel is easy to prepare and it is pleasant to eat, quite sweet to taste with a distinctive flavour and scent of fennel. However, it can be a bit tricky to grow well.
Cooking florence fennel
With few calories but plenty of fibre and good amounts of potassium and Vitamin C, florence fennel is considered a very healthy food, eaten cooked or raw. It is credited with stomach-calming properties, may ease menstrual pain and reduce appetite, and is thought to have anti-bacterial effects. It can be eaten in many ways: salads, roast in olive oil, stir-fried, very good raw with cheese and can be mixed with other vegetables for flavour.
Growing florence fennel
Site and soil: Fennel is an Italian vegetable and needs all the sunshine and warmth it can get in our gardens. Full sunshine and a rich, deep fertile soil that does not dry out. A raised bed, especially if well furnished with rotted compost is ideal.
Varieties
Older kinds such as ‘Sweet Florence’ and ‘Perfection’ have be superceded by modern varieties such as ‘Sirio’, ‘Amigo’ and ‘Victoria’.
Sowing
A big problem is a tendency to ‘bolt’, to produce a flower stalk while still small. Low natural light levels, cool weather and dry soil tend to encourage this, when no usable ‘bulb’ will be formed. Sowing is best done in May or June, and into July, to reduce the chances of bolting, but good soil preparation and covering with horticultural fleece, to keep temperatures up, will help. The seeds are large and two or three seeds can be sown about 15 centimetres apart and thinned to one strong seedling. It germinates quickly and easily.
Watering
Make sure to water when a dry spell is threatened.
Picking
Pick the roots when as near fist-sized as possible. Do not leave them when growth slows or they might bolt, or become tough.
Pests
Watch for greenflies in the foliage and for snail damage to the seedlings.
Courgettes is the French name for immature marrows, and zucchini is the Italian. Vegetable marrows were grown for many years before they became known by their French and Italian names, but not very much. In fact, it was rare to see vegetable marrows grown in Irish gardens and if they were, it was more for curiosity, or for a local show, than for eating. The breakthrough came when people began to use immature marrow, or courgette, in cookery.
All of a sudden, a ‘new’ vegetable had arrived and lots of people like them and now grown them. It is a very easy vegetable to grow and quick to develop. Originally from North America, the vegetable marrow is considered botanically similar to pumpkins and squashes – the various kinds just being forms of the same species, Cucurbita pepo. The immature marrows are taken off the plant when little more than finger length, although they can also be allowed grow to about 15 centimetres. The flowers can also be eaten.
Cooking courgettes
Courgettes are an excellent source of vitamin C and also supply folate, potassium, fibre and small amounts of other vitamins and minerals. Courgettes are very versatile in cookery and easy to prepare – trim the stalk end off and eat either raw or cooked. There is no need to peel them. Steam, boil, microwave, bake, stir-fry or grill courgettes – they are particularly good in stir-fries and barbecues, or filled with a savoury stuffing and baked. They are good when used raw in salads. Courgettes can also be grated or finely chopped and used in flans or quiches. Used in a similar way to carrots they also make delicious moist cakes and breads. The brilliant yellow flowers can be used stuffed or in salads, or as decoration.
Growing courgettes
Varieties
Look for varieties that are resistant to cucumber mosaic virus and powdery mildew. There are lots of varieties with resistance to the former, such as ‘Tiger Cross’, ‘Supremo’ and ‘Defender’. The former standard variety ‘Green Bush’ has no resistance. ‘Dundoo’ is credited with mildew resistance as well as being virus resistant. There are yellow kinds too, such as ‘Gold Rush’.
Sowing
Sow the seeds indoors in mid-April to late April and have young plants for planting out in late May. Seeds can be sown for later crops too – courgettes take something over 60 days to first fruits.
Planting
Plant out in late May or early June into rich, fertile ground in full sunshine about 90 centimetres apart each way. Usually a couple of plants will be enough for most households. Water a little at planting and give no more water until very strong growth begins, unless the weather is exceptionally dry.
Watering
Avoid ground that dries out as it encourages powdery mildew. When growth is active water to keep the ground nicely moist.
Picking
Pick the first fruits are soon as they are ready and keep them picked. Use the flowers too. Excess fruits can be cooked and frozen for winter use.
Troubles
Cucumber mosaic virus can strike susceptible varieties very rapidly, causing the youngest leaves to turn yellow, and patchiness in the older ones. It effectively stops growth. Powdery mildew slows growth and looks bad but often the plants keep cropping at a lower rate.
If you have a herb book published twenty years ago, the chances are that it does not even include coriander. Now it is really one of the “in” herbs, an essential ingredient of so many of the currently popular ethnic dishes. Mexican, Indonesian, Thai and Peruvian cookery are all unthinkable without coriander. All parts of the plant are used for culinary purposes, including the root, but it is the leaves that are most sought after.
Coriander is a quite short-lived annual, and with some protection can be grown for use throughout the year in Ireland. It is relatively easy to grow. Apart from being evidently quite attractive to slugs, there are no serious pest or disease problems.
The first thing of importance is to obtain the right seed for the purposes required. Given that most people want good quantities of leaves, it is one of the ‘great garden mysteries’ why most seeds firms supply strains that are quite unsuited for leaf production. The most generally available strains go very quickly to flower and are more suited for seed production. Look for varieties such as ‘Cilantro’, ‘Leisure’, or ‘Santo’.
Coriander will do best in a deep, well-drained, fertile and humus-rich soil. They should at no time be allowed to become stressed because of lack of moisture, as this will encourage them to immediately flower – and once flower buds appear, the leaves become more serrated and loose much of their flavour. For most areas it should be possible to make a first in-situ sowing around the middle of April. Sow in shallow drills, with seeds 1cm apart, and about 20cm between drills.
To enjoy a continuous supply of fresh leaves, it will be necessary to make successional sowings every two to three weeks during the spring-early summer; from early July, sowings made every four weeks will be adequate. In the autumn the plants will be much slower going to seed, and will last until the first real frost.
An alternative method which will suit some gardeners is to sow coriander in modules or small pots, with about three seeds per cell, and germinated at 15 Celsius. It is important not to allow the cells to dry out. These may then be planted out as soon as the roots have developed sufficiently to hold the soil in the cell together.
Where a glasshouse or tunnel is available, it is possible to plant coriander from September to April inside, which will give a continuous supply of leaves October-May. Sowings during the winter should be made every six weeks or so. It is also quite possible to successfully grow coriander in pots or other containers, inside during the winter and near the kitchen door during the summer.
It is usual to harvest coriander on a cut-and-come-again basis, usually three or four times. Once flower-buds appear, it is best to cut the remaining foliage, and remove the plants.
Not much more than a decade ago, it would have been a rare Irish kitchen garden in which chilli peppers were to be found growing. Even still, not many home growers of vegetables would grow chilli peppers, not because they might not use them but because do not realise that they are quite easy to grow.
The chilli pepper, Capsicum annum, is native to Mexico and Central America, and has spread to many parts of the world. It is strange to think that there were no hot chilli dishes in India, China or other countries a few hundred years ago, until the chilli seeds found their way east. There are records of chilli seeds in archaeological remains in Mexico dating back to 7,000 BC but records of their cultivation from about 5,000 BC. The first chillis arrived in Europe about five hundred years ago and were quickly taken up by a society that greatly valued the then very expensive black pepper, a tropical plant. The Portugese brought the plant to the East Indies and it moved outwards from there.
Chillis proved easy to grow. They are part of the potato family that includes tomatoes and have similar requirements to tomatoes. Having been in cultivation for so long, it is not surprising that there is a very wide range of chilli peppers – many different sizes, shapes, colours, flavours and degrees of ‘heat’.
The heat of chilli is directly related to the content of capsaicin, recorded by gas chromatography and known as The Scoville Scale, after the inventor in 1912 of a system of dilution to rank the heat of peppers. The ordinary sweet pepper, part of the same species, is rated at zero and the hottest recorded chilli – a Habanero – was 577,000 units, although most chillis of this variety rate about one-fifth of this. High-score chillis are capable of causing blistering to delicate skin.
Cooking chillis
The pungency of chilli peppers is much valued in a wide range of cookery. They can be added to cooked and raw dishes, fresh, pickled, canned, dried and powdered. Simply air-dried on a plate they can last well for a couple of years at least. The ‘heat’ is contained mostly in the seeds and internal ribs of the little fruits. Fresh chillis have useful amounts of various vitamins but these are largely lost in cookery. The feeling of well-being produced by eating chilli is thought to be produced by the release of endorphins, the body’s natural painkillers, released as a response to the ‘pain’ of the capsaicin in chilli.
Growing chillis
Site and soil
While it is possible to grow chillis outdoors, they really need the protection of a greenhouse, tunnel or cold frame to do well. In a hot, sunny summer, in a sheltered position, they will be fine but do not do so well in a cool year. The soil needs to be fairly rich, well-drained.
Varieties
‘Apache’ is a neat-growing hot pepper and ‘Cayenne’ produced long, pretty chillis. There are dozens of kinds, jalapeno, serrano and habanero being hot kinds. But there are some very mild kinds too, such as ‘Sweet Banana’, often used for frying. The mild, sweet kinds add chilli flavour to a chilli dish without adding ‘heat’, and can be used in combination with hot kinds. Some seed companies offer mixed chilli varieties to try, and it is easily possible to save seeds of the ones preferred.
Sowing
Sow the seeds in March in a pot or seed tray, usually a handful of seedlings is enough.
Planting out
The seedlings are pricked out into small pots and grown on to planting out in May in the greenhouse or mid-June in open ground. Usually three to five plants is adequate for most households, even one well-grown plant can give a year’s supply.
Picking
Chillis can be used when formed though still green. Maximum heat is produced in red ripe fruit and in hot weather conditions. Pick the fruit when red and air-dry on a sheet of tissue on a plate; place in a screw-top jar when fully dry.
Troubles
Chilli peppers can be attacked by greenfly, whitefly and red spider in a greenhouse, treat with derris if necessary.
Chicory and endive are not common vegetables in Irish gardens but they are not difficult to grow, and they add to the range of salads. Chicory resembles lettuce and the two are related, both members of the Daisy family. Lettuce has yellow flowers and the flowers of chicory are a lovely soft blue, but the flowers are rarely seen because these vegetables are grown for their leaves as salad. Chicory is correctly Cichorium intybus and endive is Cichorium endivia.
Endive is quite bitter and needs to have its leaves tied together or covered to ‘blanch’ the leaves and reduce its bitterness. However, there are ‘sugarloaf’ chicories and radicchio with red leaves that are not as bitter, or not bitter at all, depending on variety and growing conditions. Chicory can have its roots lifted and forced in a warm dark place in winter, known as ‘chicons’, for use as a winter salad. The ‘Witloof’ type is used of this purpose.
Site and soil
Choose a sunny, warm spot with good, rich soil.
Varieties
Good varieties include: ‘Witloof'(forcing chicory), ‘Sugarloaf'(leaf chicory), ‘Green Curled’ (endive), ‘Rossa di Verona’ (radicchio).
Sowing
Sow in late spring or early summer in warm soil and avoid any check to growth by thinning to 15 cm apart in good time and watering as needed. Repeat sow the salad types.
Harvesting
The leaf types are cut for salad use as soon as they big enough.
Forcing: In late autumn and winter, the thickest roots are lifted, the leaves cut back just about the roots and the roots forced in a pot of compost in a dark, warm place. A few roots are used at a time as needed. It takes about three weeks to produce the ‘chicons’.
Mention celeriac and most people will say: celery? And after all it is a form of celery, a turnip-rooted celery. The French name is ‘celeri-rave’ which means ‘turnip-rooted celery’ and similarly the botanical name is Apium graveolens var. rapaceum. As a form of celery this is grown in Europe and further east to Asia. All kinds of celery have a short stem at soil level that carries the leaf stalks, but in the case of celeriac this basal stem is greatly enlarged and the leaf stalks are small compared to standard celery. The turnip-like ‘root’ is actually a swollen stem and is the storage organ to over-winter for flowering in the second year of growth under natural conditions.
Celeriac is not easy to grow, and offers a challenge for even experienced growers, just as celery itself can be a challenge too. In fact, the best idea might be to buy a couple of celeriac roots first to see if it appeals as a vegetable and if it does, then to try growing it. It is a versatile vegetable and it adds to the limited repertoire of winter vegetables.
Cooking celeriac
The edible part of the celeriac is the crunchy core of the root. The outside tough skin is peeled or sliced off, or the soft core bored out. It has a refreshing celery flavour, sweet but more intense than celery – it has a hint of parsley – and it can be eaten raw sliced or grated in salads or cooked in stews, soups and casseroles. It is not eaten on its own as such but used to impart flavour, celeriac dip made with mayonnaise and mustard is an example. It is often used in conjunction with other root vegetables. It is a good source of potassium and Vitamin C with some fibre and lesser amounts of other vitamins. It tends to turn black when cut so use lemon juice or cook right away.
Growing celeriac
Site and soil
Like celery, this crop loves full sunshine and really rich, deep humusy soil. If you had a lot of compost or manure to use up, this is a crop for the job.
Sowing
The seed is sown in late February or early March as for celery, that is, indoors in a greenhouse. The young seedlings are pricked out into small pots as soon as they are big enough to handle.
Transplanting
The young plants are grown on without check until planting out in late May. They need to be well spaced, at least 40 centimetres apart each way. Otherwise they will not make good size and this is often a disappointment.
Watering
Like celery, celeriac is a very heavy feeder and the feeding is no good without lots of water. It needs watering during any dry spell of more than a few days. If water goes short, the root make develop hollow inside.
Feeding
The outer ring of leaves is removed in mid-summer to encourage the round ball to develop and any secondary buds should sliced off. A top dressing of compost can be applied at that time.
Harvesting
The ‘roots’ are harvested in autumn and winter as needed. It stands quite well in the open, not being damaged except by hard frost, and it can be stored like turnips in a cool place.
Troubles
Although generally trouble-free, boron deficiency can wreak havoc causing splits and browning in the core of the roots. If turnips have shown boron deficiency, it would be essential to apply a trace element solution.
Why grow cauliflower – one might ask when it is available cheaply in the shops year-round. It takes up space and needs a certain amount of looking after but it is a very satisfying crop to grow – those large creamy heads grown by your own hand are a wonder to behold. Besides, there is no shop-bought cauliflower to compare with a head cut in the garden and cooked within minutes.
Summer cauliflower is easy to grow. The seeds can be sown outdoors now and transplanted in about six to eight weeks. There are varieties for sowing in spring that crop in late summer and others that mature into late autumn. The crop takes up a little space, compared to other vegetables and it needs to be grown in good conditions for best results.
The idea is to grow the crop without any setback, sowing the seeds in good conditions in the first weeks of April and transplanting during moist, warm weather in June. If it gets a setback, a phenomenon called ‘buttoning’ occurs when the curd develops prematurely and very small. This can be got around by sowing a few seeds directly at the final spacing and thinning out to one good plant.
Varieties
There are many varieties of cauliflower and new ones appearing all the time. However, many of the newer varieties are F1 hybrids, which means they have been bred for uniformity. This also means uniformity of maturity and it often results in two dozen heads ready in the same week. The older varieties, such as ‘All Year Round’ are more forgiving in this area and this is a very reliable variety for late summer and autumn from a succession of sowings. ‘Autumn Glory’ is another old favourite, later maturing.
Sowing
The seeds can be sown into fine soil in a seedbed, or they can be sown in little pots in a greenhouse or tunnel if the weather outdoors is not amenable.
Transplanting
Cauliflower must be transplanted while it is quite small – three expanded leaves is about right. Take care to lift the roots with soil attached in a little ball. It is a good idea to lightly thin the rows of seedlings as soon as they emerge to make space between them for lifting without much disturbance. The ground should be quite rich and the location open to the full sunshine. Plant out at about 40 to 50 cm apart each way.
Watering
Water immediately after transplanting and two or three days later. Also water during any dry spell of more than about five days especially in July/August.
Harvesting
Start to cut and use cauliflower as soon as the first heads are not much more than fist size. These early heads are very tender and it will help to spread the crop over a longer period. As the curds get bigger and become visible among the leaves, bend over some leaves, snapping the mid-rib to cover the curd and prevent it yellowing in the sunlight.
Pests
Cauliflower is subject to cabbage family pests especially cabbage greenflies, which cause serious damage if they attack young plants, and caterpillars. Horticultural fleece is useful in preventing the latter.
Carrots are one of the most popular vegetables, very versatile in cookery and used in a wide range of recipes- soups, casseroles, stir-fries and grated in salads, as well as by themselves. Carrots are easy to grow and do not need a lot of effort, yielding good returns form quite a small space. Home-grown fresh carrots have much better flavour than even the freshest shop-bought kind. Carrots are one of the few vegetables it is possible to grow for use almost year-round because they can be stored in winter.
Site and soil
Carrots grow best on light sandy soils or soft peaty soils. The common factor between these two completely different soil types is that they have an open airy soil structure. They dislike heavy soil and can be very strong-flavoured in heavy rich ground. However, they can suffer drought in very light sandy or peaty soil. The crop needs a fair level of nutrients in the soil, but not too rich. Ideally, well rotted organic material should be applied a year or two before. Forking of the roots can occur if manure is applied before carrots and this can give woody flavour too. A dressing of general fertiliser can be applied to light soil, about 50 to 80 grams per square metre, but not if the soil is already rich.
Varieties
Carrot varieties can be divided into quick-maturing varieties for early and late sowing and maincrop kinds that develop over a longer period and grow larger. These are also stored. Amsterdam and Nantes type carrots are used for early crops while Chantenay are used for late summer and autumn use and Berlicum and Autumn King types are used in autumn and winter. The Amsterdam and Nantes types are cylindrical, Chantenay types to a lesser extent and the later ones are more tapering and pointed with larger roots.
The older varieties such as ‘Amsterdam Forcing’ and ‘Early Nantes’ or versions of these are still popular and successful. ‘Nelson’ is another good early variety, as is ‘Mokum’. Similarly ‘Chantenay Red-cored’ is available, but this type has also been crossed with Berlicum and Autumn king varieties to give better flavour and earlier main crops with better size. ‘Bangor’ and ‘Carson’ are examples. ‘Red Intermediate’ or ‘New Red Intermediate’ is a popular and reliable maincrop variety.
‘Autumn King’ and ‘St Valery’ are typical older varieties, still reliable and good for winter storage. ‘Eskimo’ has performed well in trials as a late carrot variety. In recent years, a selection of new varieties showing resistance to the pest carrot fly have been developed. ‘Parano’ and ‘Flyaway’ are early fly-resistant varieties, ‘Maestro’ is a good maincrop and ‘Resistafly’ can be stored. A range of round and short stump-rooted varieties, as well as purple, yellow and white forms have been made available, but these are not much more that novelties.
Sowing
The earliest carrots can be sown in cold frames or a greenhouse in late December or early January, using the forcing and early Nantes types to give the first fingerling carrots in May. These varieties can be sown in the open ground in early spring under fleece and the main crop types can be sown from March onwards. Sowing after May tend to run into trouble with carrot fly, but sowing anytime, except the early crops can be affected, as the hatches carrot flies more or less overlap. A sowing with early varieties can be attempted in July or early August for some later fingerling carrots. To achieve continuity, two, three or four separate sowings can be made, using a range of varieties to get a spread of maturity.
Sow carrots into soft, well cultivated fine soil in good condition and not wet. The soil can be drawn up in to drills for the later crops for storing. Sow the seeds in a very shallow drill, about one centimetre deep or less. Use sand to cover the early crops in a frame. Space the rows of carrots about 20cm apart for the early crops, 30 cm for the later ones. Sow thinly to avoid having to thin out much, because the smell of crushed seedlings is thought to attract the carrot fly adult females. Thin out when very small to about 3 to 5cm apart in the row and watch that snails do not graze the rows.
Aftercare
Keep carrots free form weeds by careful hoeing between rows and hand-weeding in the rows. Carrots shade out weeds when the leafy tops have formed, but compete poorly until then. Water the carrots in dry weather but before the ground dries out because the carrots will split if watered after a dry spell.
Pulling and storage
Use the first fingerling carrots when they are just the length of your little finger. These are the most delicious of all. Pulling these allows a thinning and the remaining carrots can be left to grow larger. The earlier sown crops will all be used directly from the garden and only the last maincrop sowing will be used in autumn and stored for winter. Carrots left in the soil are often affected by carrot flies and mushroom flies as well as being attacked by root rot diseases and the top of the roots damaged by frost. Carrots are more likely to remain usable in light, well-drained soil, but late maincrop carrots can be stored too. Traditionally, this was done in a pit or clamp with a layer of straw and soil on top, along with potatoes. The clamp keeps the roots cool and slightly moist too. If an old fridge is available, it makes a very good store. Plastic bags with holes are quite good too, but the roots must have cool conditions or they will sprout. Storage in sand and soil is sometimes recommended but this can create earthy, woody off-flavours in carrots. They can be prepared and frozen too.
Pests and diseases
The main pest of carrots is the carrot fly. The females lay eggs at the stem of the carrot plants and the larvae tunnel into the root and can kill young plants, and spoil mature carrots. The resistant varieties can be used although the resistance is variable. The best solution is a carrot fly fence of polythene or fleece, 50 or 60 cm tall and buried in the soil with no gaps or joins where the flies can enter, as they buzz along at ground level looking for the carrot plants. Greenflies can infest the foliage and can cause a setback and might need to be controlled. Root rots can usually caused by soil that is too heavy and wet and by making the carrots too lush and soft with too much nitrogen and rich organic material such as manure.
Onions are a popular vegetable to grow at home as they are used continuously in the kitchen. Bulb onions store well and it is possible to have them from your own garden from mid-summer to the following spring. They are relatively easy to grow, not needing a great deal of effort, and a good crop of onions is a very satisfying achievement.
Site and soil:
Onions have a relatively short growing season, at least if sown in spring, and they need good soil in a sunny position to grow quickly and make good size before bulbing up begins. The soil must be fertile but not too rich. Very rich soil with a lot of organic material tends to make the plants very leafy, large, and with a greater number of ‘thick-necks’, which do not store well. If the soil fertility is a bit low, apply some general fertiliser at about 70 grams per square metre. The soil should be light and well-drained without being dry. Ideally, onions can follow a crop such as potatoes or courgettes for which lots of organic material is applied. The rotted organic material will boost onion growth and retain good reserves of moisture without promoting too-vigorous growth.
Varieties
Onions can be grown from seeds or from sets, which are small bulbs. The standard variety for many years from seed is ‘Bedfordshire Champion’, a round brown-skinned onion, which stores well. ‘Buffalo’ is a relatively new variety which can be sown in spring or in August and can be used to provide early onions. ‘Napoleon’ is new with flattened bulbs that stores well, spring sown. ‘Carlos’ is recommended for resistance to bolting and very good storage, spring sown. The main variety from sets is ‘Sturon’, a good reliable variety that stores well. In general, onions grown form seeds store better than those grown from sets, but it is easier to grow from sets, which are spring-planted although autumn sets are sometimes available. Japanese bulb onions can be sown in autumn to provide onions in mid-summer and the variety generally used is ‘Senshyu Yellow’.
Sowing
Onions can be sown in August or early September, using a suitable variety, or in early spring. They are sown early to make some size before bulbing starts. Bulbing is regulated by day length and begins in late May and June. If the plants have not made much growth by then, they will start to make bulbs before they should, resulting in smaller bulbs, which actually might be preferred. For large bulbs, it is essential to sow early. This can be achieved by sowing in a greenhouse or under other cover as early as December or January. Seeds sown in cell trays can be grown on as four or five seedlings per tray, or even one to get greater size, for planting out in April.
When sowing outdoors, the ground needs to be well cultivated in advance and a fine tilth made at the surface. It may help to rake in some silver sand for very early-sown crops outdoors. Sow about one centimetre deep and watch early-sown crops for slug attacks.
Transplanting
Plant out onion plants sown indoors in April. These can be grown in cell trays or small pots and transplant very easily after being hardened off. It is also possible to transplant onions sown outdoors, lifting them carefully and re-planting immediately, watering them in. This can be a way of extending a planting if there is patchy germination or losses from an early spring sowing.
Onions sets are planted out in April usually although they can be planted out earlier if required. These are spaced 10 to 15 centimetres apart, with rows 30 to 40 centimertres apart. Often a double row of sets about 20 centimetres apart is planted. If more than one double row is grown, the rows can be laid out at 50 to 60 centimetre centres. Seed-grown onions can be thinned to about the same spacing or a group of seedlings from a cell tray planted about 20 centimetres apart.
Aftercare
After setting sets, transplanting, or thinning seedlings, the main aftercare required is weed control. With seed-sown plants, weed control will often need to start before the onions seeds are up to control weeds seeds that germinate more quickly. The best method is to hoe the weed seedlings when they are tiny. In this way, they are easily controlled and never offer any competition to the onions. If they get large, it can be very difficult to remove weeds without pulling up onion roots as well, and onions suffer badly from weed competition as they offer vey little leaf cover of their own. Consider watering if there is a dry spell, which often happens in May. Onions react to drought by bulbing and make very little growth subsequently. Overwintered onions often show signs of lack of nutrients and can benefit from a liquid feed in early spring as growth begins.
Harvesting
Onions are generally harvested in September from a spring sowing or April-sown sets. But if the seeds were August sown, they will be ready in mid-summer. Summer onions can be used straight out of the ground while the remainder of the crop ripens. The sign of readiness is when the tops of most of the plants fall over. The bulbs can then be loosened in the ground with a fork and this triggers bulb ripening. This will happen any way but often the weather can turn wet and the bulbs may get neck rot, a storage disease. In a week or so, when the leaves have withered and yellowed, the bulbs can be lifted and the soil shaken off. They can be placed on a paved area or a wire rack to dry, and they can be placed in an airy greenhouse or tunnel to ripen fully. This helps to improve storage quality. Store in net bags or in trays, or make an onion hank by twisting the onion tops around a strong wire.
Pests and diseases
Onions are relatively free of pests. Occasionally greenflies affect the young growth on plants in very sheltered gardens and may need to be controlled. White rot disease is a very damaging soil borne disease that builds up and can ruin an entire crop by causing the base of the bulbs to rot and the plants to wilt. Use a different part of the garden and avoid contamination. Neck rot is a storage disease that may be seed-borne or picked up late in the season. Some seed is sold with fungicide treatment, but all old onions should be destroyed to prevent spread to new season crops.
Unlike so many common vegetables that originated in other parts of the world, the ancient ancestor of cabbages, or which the Brussels sprout is a form, is native to northern Europe, though not to Ireland. It does not take a great leap of imagination to see the similarities and close relationship between cabbage and Brussels sprout. A cabbage similarly has a stem with buds in each leaf axil but the buds do not develop unless the head, the main bud, is removed. With sprouts the side buds develop while the head is still on, although it is interesting that it is an old grower’s trick to remove the top to encourage the top-most buds to develop.
The common name of Brussels sprout is related to the fact the this form of cabbage was first recorded in Belgium about 1750, but may have been grown in that region, in some form, since the Middle Ages. Sprouts have been popular in the past because they offer green vegetables in winter. They are handy to use in that only the amount required need be picked while cabbage requires a whole head to be taken. Sprouts have own distinctive, nutty flavour, albeit cabbage-like, although this does not recommend them to every taste. Too big for most modern gardens, they are worth growing if you like them and there are smaller varieties.
Cooking Brussel sprouts
Although Brussels sprouts can be eaten raw, they are generally cooked usually by quick boiling or steaming, but they can be stir-fried, finely sliced, and they can be baked with cheese in the oven. They have quite good nutritional value, like that of other green vegetables, good levels of Vitamin C and useful amounts of other vitamins and minerals, most of which are retained when not over-cooked. Cooling the cooked sprouts and re-heating quickly gets over the ‘tired sprout’ problem that has done so much to spoil the image of an excellent vegetable.
Site and soil
Brussels sprouts are easy to grow. They tend to become too rank and vigorous on rich soil, so reasonably fertile ground that drains well but does not go dry is ideal. Too much nitrogen, from manure or rich compost, can cause leafy growth, the sprouts opening into a leafy rosette rather than making a tight bud. They need full sunshine.
Varieties
Older varieties such as ‘Bedford Winter Harvest’ are suitable for gardens because they crop over a longer period. F1 hybrids are suitable for commercial production but tend to come in too close for the garden. The F1 hybrid ‘Peer Gynt’ is reliable and popular in gardens because of its compact size. It crops in October and November. It could be followed by the F1 hybrid ‘Topline’, for instance, which crops to March. Some modern varieties, such as ‘Romulus’ and ‘Montgomery’ are mild-tasting and sweeter.
Sowing
The seeds are sown outdoors between mid-March and mid-April. For garden purposes, it is not essential to sow very early. Sow into fine, well tilled garden soil.
Transplanting
The young plants are lifted and transplanted to their final positions during May and June. Spacing can be 60 cm square and up to 90 cm square for large-growing varieties, although this would be little used gardens. The wide spacing gives taller plants that carry sprout over a longer period, but they are also inclined to topple over in a windy garden. The planting ground should be quite firm.
Watering
It is generally not necessary to water sprouts, except when first transplanted to get them established. Otherwise water only if there is a dry spell of more than a week or ten days. Too much watering leads to leafy growth.
Picking
The sprouts can be picked as soon as they are of a usable size and still quite small, using the lowest ones first. They can be sliced off the stem with a knife, if it proves difficult to break them off.
Pests
Sprouts are susceptible to the usual cabbage family pests, such as cabbage root flies, cabbage mealy aphid, slugs and pigeons. The aphid is a form of greenfly that is particularly damaging to sprouts. It suffers from cabbage diseases too, such as leaf spot and white blister, but these are not a great problem in gardens.
Broad beans have long been a poor relation of the vegetable garden. Easy to grow and fairly popular but they are not on every body’s list of favourite vegetables. All that is changing because broad beans are back in fashion with chefs. Often now known as fava beans – their American-Italian tag – they are being used in more imaginative ways, in salads, stews and stir-fries, and, crucially, they are being used as much younger beans.
Site and soil
The ideal site for broad beans is full sunshine with shelter from strong winds but reasonably airy. It is a fast grower and needs good light. Being a legume, a member of the pea and bean family, the broad bean likes well-drained, open soil but unlike peas and some other legumes, it likes the soil to be rich, well manured or enriched with plenty of compost. While over-rich conditions make peas very leafy, broad beans crop very well when well fed. Too much richness, especially nitrogen, tends to make the plants very lush, however, and inclined to topple over, and more prone to pests and diseases. But it is not a very choosy plant and will crop reasonably well in most soil conditions.
Varieties
Many of the broad bean varieties have been around for a long time, over one hundred years in some cases, such as ‘Bunyard’s Exhibition’, and this is usually a sign that a variety is stable and reliable, not overly susceptible to pests and diseases. The commonly used varieties are ‘The Sutton’, ‘Masterpiece Green Longpod’ and ‘Aquadulce Claudia’. ‘The Sutton’ is a dwarf variety, reaching only about half the height of the taller kinds that reach over one metre. This avoids having to support the stems. It yields well and has white beans. ‘Masterpiece Green Longpod’ produces green beans of good quality, yields well and freezes well. ‘Aquadulce Claudia’ is the variety most popular for autumn or early spring sowing. There are newer varieties too such as ‘Witkiem Manita’, which is an early to mature from a spring sowing. ‘The Sutton’ can be used for autumn sowing too but does best with cloche protection.
Sowing
Broad beans can be sown in autumn, choosing a suitable variety. If the weather is rough and cold, the plants can get damaged and snails can cause problems in mild weather. But mostly they survive to give an early crop in summer. Seeds can be sown in January or February in mild areas, if the soil is open and not too heavy, but most sowings are done in March or April, and repeat sowing can be carried out to get a spread of maturity.
Prepare the soil by digging and opening it up well, incorporating well-rotted manure or compost. Beans like plenty of air in the soil to grow well. Choose a spot where the taller varieties will not shade other vegetables. Make a single or double row about 60 centimetres between rows or other vegetables. The double row can be about 20 centimetres apart. Sow the beans about 15 centimetres apart in a single row and a bit more in a double row. Closer spacing helps the plants to support each other.
Aftercare
The beans germinate readily and soon they make small plants. These quickly grow tall when warmer weather arrives. Weed removal should be kept up until the plants are well-grown. They are sown early and rarely need watering.
The plants can be over on metre and are inclined to topple over if the garden is not very sheltered, particularly when laden with a heavy crop of developing pods. It might be necessary to push in some strong twigs or sticks, or to run a wire support on light posts on either side of the plants to hold them in place.
Picking
It is not generally known that the entire pods of broad beans can be eaten in the same way as french beans, but the pods must be picked when still small, about finger-length. This is not a waste because there are usually too many beans at maturity. The pods are carried in groups and some of the these can be removed and some left to grow bigger. Later on the pod becomes tough and furry on the inside. But the pods picked for beans should be picked relatively young so that the beans are sweet and succulent and not becoming starchy. The size of beans varies but it is best to pick the beans before they fill the pod. Broad beans freeze well. The tips of the shoots can be used in the same way as spinach. If some pods remain unpicked, they can be allowed to mature and dry and saved for seed the following year.
Pests and diseases
Broad beans generally suffer from only one pest – aphids. The black bean aphid is commonly found on the tips of the shoots after flowering has started and the tips can be taken off to reduce the attractiveness of the plant, but they also feed on the spine of the pods sometimes. They may not need control but can affect growth in large numbers.
Bean weevils harmlessly notch the leaves of young plants. Chocolate spot disease can cause leaf spotting in wet conditions and rust disease often appears as the plants are declining.
Commonly called beet root, red beet is related to sugar beet, mangolds, swiss chard and perpetual spinach. All of these vegetables have been derived by selection from the same basic wild species, Beta vulgaris. In its various guises, it produces more root or more top, more or less colour in the roots and stems, and has been selected for these characteristics.
Red beet has been long selected for human consumption as a boiled fresh vegetable or pickled. There are two main forms of red beet, one kind with rounded roots, known as globe beet and the other are the long-rooted types, which are now not much grown. The wild beet is native to Ireland and the shores of Europe and it is so much a seaside plant that even still, beetroot is known to benefit from a light shake of common salt over the ground, something that most garden plants do not tolerate well.
Beet has been grown since Roman times and probably long before. It is grown all over the world in both its root form and its leaf forms. Red beet too has been grown since Roman times. There are some yellow and white forms of this beet but mostly the red kind is grown.
Cooking beet
Beetroot has a high content of folic acid and it contains some fibre, B vitamins, vitamin C and a small amount of iron. Beetroot also contains some valuable antioxidants agaisnt the free radical that cause cancer. Beetroot can be boiled, steamed or baked beetroot served with sour cream. The roots can be used raw, grated or finely sliced into a salad. The leaves can be prepared like spinach, either boiled, steamed, microwaved or stir-fried. The skin is easily removed when cooked and cooled.
Growing Beetroot
Site and soil
Beetroot likes an open sunny position in light, fertile soil. It is usually grown in ground that has not recently had organic matter recently added because this can make the roots coarse and earthy in flavour. But it is easily accommodated.
Varieties
The standard variety has long been ‘Boltardy’, a reliable variety that is not prone to ‘bolting’, or going to seed. Some seed companies offer ‘Burpee’s Golden’ and ‘Chioggia Pink’, both said to have good flavour. ‘Red Ace’ is a new hybrid variety.
Sowing
Beetroot needs high soil temperatures for good germination and often fails if the ground is too cold and wet. It is not sown until April or May in good weather. Too early sowing leads to bolting. Repeat sowing can be carried out into July for an autumn and winter supply.
Thinning
Beetroot is sown thinly in rows about thirty centimetres apart an the plants are thinned out in two stages, first to about five centimetres apart and then to ten centimetres apart. But the seedlings can be left crowded to produce a larger number of small beets if preferred.
Watering
During dry spells of more than a few days, watering reduces the danger of bolting.
Picking
The little beets can be used as soon as they are big enough, even ping-pong ball size. Later the larger beets can be stored in a cool shed.
Pests and diseases
Mangold fly might cause leaf-miner damage to leaves and snails can cause damage. Leaf spot disease may occur though rarely. Generally it is an easy, trouble-free crop.
One of the most choice garden vegetables, asparagus is ridiculously easy to grow. Traditionally it is grown in an asparagus bed of about twenty or more plants spaced about 30 cms apart in three rows about 40cms apart. This spacing gives a greater number of shoots of smaller dimension than the normally wider commercial spacing. It would also be possible to grow a small patch of five or six plants grouped together in a sunny part of a mixed border, where the ferny leaves would be most attractive in summer.
Asparagus is a perennial vegetable, a member of the lily family, interestingly. The plants will last for decades, if kept free of weeds and fed a rich diet of well-rotted garden compost. Raise plants from seeds sown in spring or early summer and transplanted to their permanent positions two years later, or speed up the process by buying plants.
Unusually for a vegetable, asparagus has male and female plants, one carrying pollen, the other the berry-like seeds. Male plants are best because they do not waste energy on making seeds, saving all their growth for producing succulent shoots. Most modern varieties are bred to have more males.
Cooking Asparagus
Fresh asparagus from the garden is unsurpassed for flavour. When buying asparagus, choose firm, bright green or ivory stalks with tight tips. It is best cooked the same day that it is purchased but will keep tightly wrapped in a plastic bag 3 to 4 days in the refrigerator. Asparagus is grown in sandy soil so thorough washing is necessary to ensure the tips are not gritty. If asparagus stems are tough remove the outer layer with a vegetable peeler. Asparagus contains a quantity of vitamin A and is a rich source of iron, vitamin B and C.
Varieties
‘Connover’s Colossal’ and ‘Martha Washington’ are tried and trusted varieties with large spears. ‘Lucullus’ is an all-male variety, and newer all-male varieties such as ‘Andreas’ and ‘Geynlim’ are becoming available.
Sowing
Sow the seeds about 5cm apart in April or May in good soil in full sunshine.
Planting
Choose a sunny, open but not overly windy spot, ideally on sandy soil. Dig in plenty of well-rotted organic material. Plant in spring.
Weeding
Start with ground free of weeds, especially perennial weeds. Control weeds, especially before the ‘fern’ develops in summer.
Watering
Watering is not a priority but one or two heavy soakings are beneficial in a prolonged dry spell.
Harvesting
Usually the first spears can be cut in late April or May the year after planting. Do not take too much to start with as it weakens the plants.
Troubles
Largely trouble-free, watch for greenflies that occasionally land on the spears. Simply wash these off; it is too close to harvest for anything else.
The swede turnip is the ordinary kind of turnip, but called swede turnip to distinguish it from the smaller white turnips. The latter is a summer vegetable while the purple-topped swede is quintessential winter fare. It probably would not even taste right in warm weather; it is sweeter to taster after frost.
A member of the cabbage family, the swede turnip actually originated in Sweden, where it is known as ‘rutabaga’ in the seventeenth century and it is still a cool climate vegetable. It is easy to grow but not grown that much in gardens. It is a bulky vegetable and widely grown as an extensive field crop, so most gardeners do not bother, simply buying their swedes, quite cheaply, in the supermarket. The other reason that the swede turnip is not grown much in gardens is that it is late sown. Most people who grow vegetables sow the seeds in one lot in spring, but swede turnips are better sown a little later in May or June even.
If they are sown too early, they tend to become mildewed and not form the swollen root so well and there is a danger of bolting too. A few swedes are worth growing because they provide fresh produce in winter and they are not much trouble.
Cooking Swede Turnips
The swede is quite a versatile vegetable. It can be eaten raw in slices or grated, and it has a nice crunchy texture with a mixture of sweetness and a slight peppery taste. Typically, it is boiled and served as sliced turnip or mashed. But is can also be used in stews and casseroles, or stir-fried. It has great ability to absorb flavours and is used with a variety of herbs and spices, such as coriander, parsley, pepper and nutmeg, in various countries. The leaves can be used as for cabbage. Swedes are a good source of fibre and a reasonable source of calcium and vitamins A and C.
Growing Swede Turnips
Soil
Choose a sunny spot on well-drained, fertile, but not overly rich soil, or an area that has received organic manure in the past year – this gives a strong, earthy flavour. They need lime in the soil, like most vegetables, and acid soil should be limed to bring it to the limy side of neutral.
Sowing
Seeds of swede turnips are sown in May in cooler areas and the northern half of the country, in June elsewhere. The seeds are sown directly where the plants are to mature; they cannot be transplanted, unless perhaps in cell blocks. Sow the seeds in groups of six or eight about fifteen centimetres apart in rows about fifty centimetres apart.
Thinning
When the seedlings have one or two true leaves, thin out the seedlings by half their number at each station along the row. About three weeks later, reduce this to own plant at each station and a few weeks later, remove the plant from every second station. Leaving in the extra stations is insurance against loss at some stations, which can occur, due to pests or seedling blindness. The leaves of the plants removed can be cooked as cabbage.
Aftercare
Keep weeds under control at least until the turnip leaves cover the soil, after that they are able to compete quite well. Water the little seedlings during any dry spell in the weeks after they emerge; they tend to start of form a root too early if they get a setback from drought.
Harvesting and storage
Swede turnips can be used when they are big enough but do not develop flavour until cool autumn days arrive. They can be left in the ground and used as necessary or they can be lifted in autumn and stored in a cool place, not too dry.
Some vegetables are rarely seen on supermarket shelves and the swiss chard is a notable example. Known by various names, such as seakale beet, silver chard, rainbow chard and silver beet, the confusion of names has not helped. Sometimes restaurants even get it wrong, naming this vegetable erroneously as ‘sea kale’.
For the home garden, the swiss chard has the great advantage of being easy to grow and producing a crop that stands well throughout winter, producing usable leaves and leaf stems until late spring. The two parts of the leaf can be cooked, using the green leaf blade in the same way as spinach and the leaf stalks in the way celery stalks are used.
The vegetable has got a new lease of life recently with the trend for ‘jardins potager’ – decorative vegetable gardens. In shades of red, white, yellow, pink and purple, the brightly coloured stems are as much grown for colour as eating!
Swiss chard is related to beetroot and even sugar beet. Broad-stalked forms of beet have been grown in China since the seventh century and in Europe it is recorded over four hundred years ago. It is valued as a fresh winter vegetable and is very versatile in cookery. The leaves contain useful amounts of iron and dietary fibre.
Growing swiss chard
Sowing
The seeds are sown in two lots – early spring and mid-summer. The first sowing will give a crop for late summer and autumn and the second sowing will give plants to stand over winter. Sow the large seeds thinly about 5cm apart in rows 30cm apart in good soil.
Thinning
When the seedlings emerge they can be thinned at about two weeks to 10cm apart and two weeks later to 20cm apart. If there are gaps, the seedlings can be transplanted easily.
Weeds
Weed control is relatively easy when the crop has grown to cover the rows with dense foliage but until then should be kept free of weeds.
Watering
Swiss chard does not need watering except in a summer dry spell. In light soil, it may show signs of wilting and should be watered.
Harvesting
Simply pull up the entire plant and cut off the root, or break off enough leaves to satisfy requirements.
Pests and diseases
The swiss chard is not prone to diseases but can suffer from snail damage, especially as young seedlings.
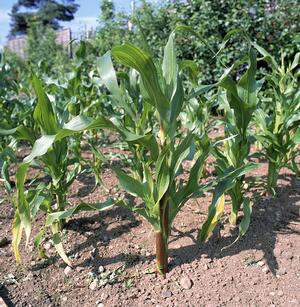
A relatively new vegetable to Irish gardens, sweet corn is quite easy to grow, although some simple preparations increase the likelihood of success. Freshly picked sweet corn has exceptional flavour compared to shop-bought fresh corn and is immensely better than frozen products.
Site and soil
Originally from Central America, sweet corn shares with other crops of tropical origin the ability to grow much faster than crops native to temperate climate. But it must have reasonable levels of summer warmth to achieve such growth. Despite using varieties specially bred for cooler climate, in a cool Irish summer, it may not grow well. In fact, it is an excellent indicator of a poor summer. Good crops of sweet corn mean a nice sunny summer, while a poor crop, or no crop, means a cool, wet and dull summer. In terms of site, it is important to maximise temperature and sunshine by choosing a sunny, warm, sheltered spot. The soil must be deep, open, well-fertilised and well-supplied with rotted organic material – all the needs of a potentially fast-growing plant.
Varieties
With a lot of interest in sweet corn, the breeders have been actively trying to breed varieties suitable for more northern latitudes and new varieties are emerging each year. These are also classed as supersweet varieties, sugar enhanced varieties and normal varieties. The supersweet kinds have much higher sugar levels and taste relatively sweet compared to normal kinds, but some people find them too sweet. The sugar-enhanced varieties have been bred to last longer before becoming starchy which can occur quite quickly in warm weather in late summer or early autumn.
A variety of normal sweetness, ‘Sundance’ is one of the best varieties, early to mature and probably the most reliable. It is certainly a good choice in cooler parts. ‘Swift’, also called ‘Tendersweet’ is an early maturing supersweet variety. ‘Champ’ is another early supersweet variety, reliable in cool conditions. ‘Miracle’ is a relatively new variety, sugar-enhanced, with large cobs. ‘Ovation’ is a mid-season supersweet with long cobs and a reliable variety. ‘Dynasty’ and ‘Conqueror’ are two late-maturing supersweet varieties that can cope with less-than-ideal conditions. The variety ‘Indian Summer’ has mixed coloured seeds.
In the cooler areas, it is best to stick to the early-maturing varieties, spacing a sowing two weeks after the first to achieve a spread of supply. In parts of the country with a longer growing season, especially in the south and near the coast, an early, mid-season and a later variety can be sown to achieve a spread of supply over a period of about three weeks. Each variety does not stand for much more than a week or ten days before becoming starchy and hard. Warm areas inland that have a shorter growing season can compensate to some degree by having higher summer temperatures and good result scan be got from the quicker-maturing kinds.
Sowing
Typically, the middle of April is a good time to sow. A week or so earlier in the warmer parts and a week later in the cooler areas. Four to six weeks is enough for the seed to sprout and the young plants to reach about ten to fifteen centimetres for planting out. If they grow much bigger before planting out, they run the risk of stunting and going to flower prematurely and not setting cobs of usable size. Ideally, each seed should be sown in a small pot, even up to a one-litre pot. If the weather is really cold towards the end of May or early June, plants in a large pot will have a reduced chance of stunting and can be held for a week or more.
If small plants are put out in cold conditions, they often get a severe setback and behave as though pot-stunted. Sowing directly into the open ground is successful in a good year with an early-maturing variety but it is hardly worth the risk. Covering the soil with polythene or a low tunnel can help by increasing the soil temperature. But sowing indoors, even on a kitchen window sill gains the plant a month’s time that they are unlikely to overhaul when direct-sown.
Planting out
Plant out in the right weather conditions as much as possible, though your hand may be forced by the weather. Plant into soft soil and do not firm much. Water immediately if the weather is dry. Plant in a block of short rows rather than one long row so as to improve pollination. Pollen is shed from the male flowers at the top of each plants and settles on the female tassels that protrude from the top of each cob. Space the plants forty to fifty centimetres apart each way.
Aftercare
Control weeds by lightly hoeing regularly. Water if the plant needs it. One or two liquid feeds directly to the root of the plants can often be useful to kick-start them if the weather is poor immediately after they are planted out but wait until there is an improvement in the weather. When flowering starts make sure they do not run short of water. Try at all times, from sowing to harvesting, to maintain steady even growth.
Picking
When the tassels on the top of each corn cob begin to turn brown and wither, it is time to check a few cobs. Strip back the sheath around the cob. See if the seeds are well-swelled and beginning to square-out in shape. If they are still round and pearly, they are unlikely to be ready. Press a few seeds – if the juice is clear and watery, they are not quite ready, if it is slightly cloudy to milky but liquid, they are ready, and if it is white and toothpasty, they are getting past use. If dry and hard, they have become too starchy. Use them as soon as they become ready, a few plants are always a little ahead and before they get too advanced pick the remainder and freeze them if necessary. Home-frozen corn can be excellent. Strip off most of the sheath but not all to freeze it. Most crops yield only one cob per plant, two is very good and three is excellent and exceptional, happens only in a rare year.
Pests and diseases
There are no pests and diseases of note – the vagaries of the summer weather are much more likely to cause problems. Seeds sown in compost that is too wet and cold, often rot and do seeds directly sown. Mice can take the seeds in a greenhouse or outdoors. Cobs opened for testing but not ready are often invaded by earwigs.